
User Manual

36
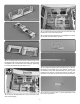
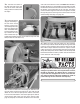
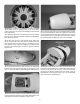
INSTALL THE COWL
❏
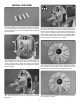
1. Sand a bevel on one end of each of the four 10 x 25mm
cowl ring dowels. We found putting the dowels in a drill and
using a sanding bar with coarse sandpaper makes beveling
the dowels easy.
❏
2. Insert the bevel end of the cowl ring dowels in the front
of the fuselage. They should t well but not be dif cult to
insert or remove. If they are tight, wrap a piece of sandpaper
around the shaft of a screwdriver or brass tube and enlarge
the hole slightly.
❏
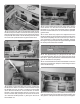
3. Test t the plywood cowl ring on the dowels to check
alignment.
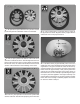
❏
4. Once satis ed with the t, use 6-minute epoxy to glue
the dowels in the cowl ring. Keep the cowl ring and dowels on
the front of the fuselage for proper alignment while the epoxy
cures. A piece of masking tape over the holes will keep the
dowels ush with the front of the cowl ring. Caution: Make
sure to leave a slight gap between the cowl ring and the front
of the fuselage to avoid gluing them together.
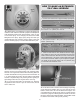
❏
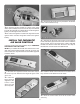
5. Cut out the center of the dummy engine to clear the
drive washer of the gas engine. If the RimFire 65 motor is
installed, the hole will need to be enlarged as shown.
❏
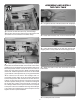
6. If a gas engine is installed, cut two openings between
the cylinders for cooling.