
User Manual


23
❏
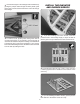
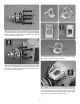
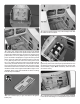
4. Insert the servo tray. Use the six holes in the servo tray
as guides to drill 1/16" [1.5mm] pilot holes into the servo
tray frame. Secure the servo tray to the frame with #2 x 3/8
sheet metal screws and #2 at washers. Harden the screw
holes with thin CA.
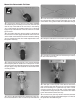
❏
5. Before reinstalling the servo tray, install the grommets
and eyelets on the rudder, elevator and steering servos. Install
the servos as shown. Use thin CA to harden the screw holes.
❏
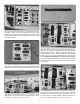
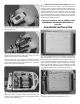
6. Mount the receiver switch in the opening in the
fuselage frame and through the fuselage side or mount
the switch in the position of your choice.
❏
7. Cut three 5" (127mm) long pieces of hook and loop
strip, from one of the 24" (610mm) long hook and loop strips.
Overlap the strips by 1" (25mm). Wrap the receiver and
receiver battery in foam and secure them to the receiver
battery tray. Connect the receiver battery to the receiver
switch. NOTE: If installing S.Bus, skip to the next step.
Connect the switch to the battery port on the receiver. Secure
the battery to the switch connection with a piece of heat
shrink tubing.
❏
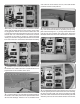
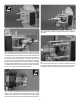
8. S.Bus Only: Install the 6-Way Terminal Box (not
included) on the receiver battery tray. Connect the receiver
battery to the receiver switch. Plug in the receiver switch to
the terminal box. Connect a Male-to-Male extension from
the terminal box to the battery port on the receiver.