
User Manual


21
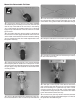
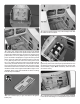
Mount the Retractable Tail Gear
❏
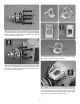
1. Remove the steering arm from the Robart #160WC
retractable tail gear assembly (not included). File a at spot
near the top of the shaft for the set screw, in the steering
arm, to seat against. Re-install the steering arm on the shaft.
Apply a drop of threadlocker to the set screw and re-install
the set screw.
❏
2. File another at spot near the bottom of the shaft for
the set screw in the fork. Apply threadlocker to the set screw
and re-install. Check that the axle in the fork and the steering
arm are parallel with each other. Make adjustments to the
at spots if necessary.
❏
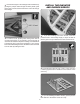
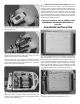
3. Enlarge the hole through the 1-3/4" (44mm) tail wheel
with a #9 [5mm] drill bit. Install a 5mm metal spacer on each
side of the wheel. Re-install the tail wheel on the retractable
tail gear. Apply a drop of threadlocker to the threads of the
mounting screws.
❏
4. Insert a .080" ball link ball in the middle hole of each arm.
Secure each ball with a .080" nut and a drop of threadlocker.
❏
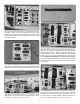
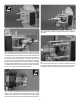
5. Use wire cutters to cut the supplied braided cable into
two equal lengths. Slide a swage (metal tube) over one end
of the cables. Then, guide the end of the cable back through.
❏
6. Wrap the cable back around and through the swage.
❏
7. Use pliers to pull the cable from the rst loop to reduce
the size of the second loop.
❏
8. Now pull on the long end of the cable to reduce the
size of the rst loop. Slip the loop over one of the ball link
balls on the steering arm. Tighten the loop until it is small
enough to remain secure on the ball, yet may still be pried
off. Squeeze the swage with pliers. Connect the other cable
to the other ball link ball the same way.
❏
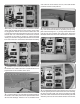
9. Connect a 36" [915mm] actuator extension (included
with retract) to the electric retractable tail gear or air lines to
the pneumatic retractable tail gear.