
User Manual


20
❏
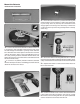
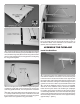
8. Mix up approximately ¼ oz. [7.4cc] of 30-minute epoxy.
Use a toothpick to thoroughly apply the epoxy in the holes
in the n and rudder. Use the toothpick to get the epoxy out
of the opening of the holes in the rudder and n so it doesn’t
get into the hinge pin. Wipe away any excess epoxy around
the outside of the holes with a paper towel dampened with
denatured alcohol.
❏
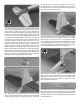
9. Use the toothpick to apply epoxy to the ends of the
rudder hinges that go into the n. Insert each hinge into the
n and wipe away any excess epoxy that squeezes out of
the hole.
❏
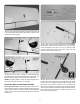
10. Apply epoxy to the other end of the hinges. Join the
rudder to the n, pushing the hinges only about ¾ of the way
into the rudder. Use a paper towel to wipe away any epoxy
that squeezes out. Then, t the rudder the rest of the way on.
❏
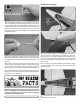
11. Move the rudder left and right a few times to align the
hinges and make certain that the rudder de ects left and
right the full 1-1/2" [38mm].
Because of its variety of weapons and equipment the F6F
Hellcat was able to perform a broad range of missions.
This included ghter versus ghter, strike plane escort,
combat air patrol, long range search, ground support,
night ghting and photo recon.
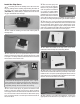
Install the Tail Light
❏
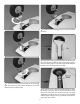
1. Test t the tail light in the fuselage. We found that the
wire from the LED is stiff enough to guide the LED to the
hole. However, it is not stiff enough to push the LED into the
hole. Once you have the LED positioned in front of the hole,
use the included white inner pushrod tube to push the LED
into the hole.
❏
2. Now that you have the installation method down, apply
a couple of drops of 6-minute epoxy to the LED base and
reinstall the LED.
❏
3. Once the epoxy has cured, route the wires through the
fuselage to the servo tray.