
User Manual


18
❏
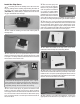
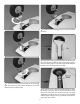
4. Use 6-minute epoxy to glue the wing alignment dowels
in the forward hole of the wing outer panels. Before the epoxy
cures, slide the wing outer panel onto the wing center section.
Leave a small gap between the wing panels to avoid gluing
the wing panels together.
❏
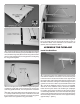
5. Once the epoxy has cured, slide the wing panels together
completely. Locate and cut the covering from over the four
outer wing panel bolt holes, two on top and two on bottom.
❏
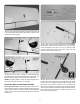
6. Apply a drop of thread locker to the threads of four 4-40
x ¼" (6mm) socket head cap screws. Install the screws and
#4 lock washers into the C-channel in the outer wing panel.
Tighten the screws against the wing joiner blade.
❏
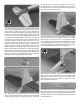
7. Loosen the screws and remove the outer wing panel.
The 4-40 socket head cap screws will have left a mark on
the aluminum blade. Use a metal le to cut a shallow 1/32"
(0.8mm) slot in the aluminum blade.
ASSEMBLE THE FUSELAGE
Install the Stabilizer
❏
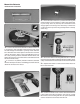
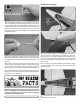
1. Test t the two aluminum stabilizer tubes in the fuselage
and slide the stabilizers on the tubes. The shorter tube goes
in the front hole. If the aluminum tubes are too tight to slide
through the holes, take a sharp hobby knife and gently scrape
the inside of the holes. During the manufacturing process a
small amount of resin or ller may be left behind in the hole.
❏
2. Test t the stabilizer halves. Once you are satis ed
with the t of the stabilizer halves, remove the stabilizer
halves and the joiner tubes. Use medium grit sandpaper
to roughen up the aluminum tubes and the gluing surfaces
on the fuselage stabilizer roots. Clean the tubes and gluing
surfaces with denatured alcohol and insert both tubes back
into the fuselage until the end exits on the opposite side by
approximately 1" [25mm].