
User Manual


15
Mount the Retracts
Install the left retract rst.
❏
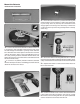
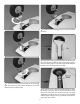
1. Trim the axle that is included with the Robart retracts to
2" [51mm] long. File a at spot at the end of the axle. Insert
the axle through the included 5" [127mm] wheel. Slide the
6mm thick aluminum wheel spacer onto the axle. Insert the
axle into the retract. Apply a drop of threadlocker to the 10-
32 x 3/16" [4.8mm] set screw, included with the retract, and
tighten the set screw onto the at of the axle. Make sure that
the wheel rotates freely.
❏
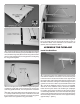
2. Connect a 12" (305mm) Actuator Extension (included
with the retracts) to the retract. If installing pneumatic retracts,
attach the air lines to the retract.
❏
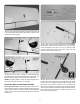
3. Tie the Actuator extension or pressure lines along with
a ap and aileron servo extension or S.Bus hub, depending
on your setup, and a 16" (400 mm) servo extension for the
wing tip lights to the string in the retract bay. Pull the lines
out the hole in the top of the wing and tape them to the top
of the wing.
❏
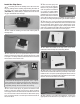
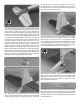
4. Secure the retract in the wing with six 8-32 x 1" (25mm)
machine screws and #8 lock washers. Before installing, apply
a drop of thread locker to the threads on the machine screws.
❏
5. Operate the retract to make sure the wheel does not
bind in the wheel well.
❏
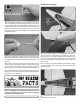
6. Position the retract cover over the retract and drill 1/16"
(1.5mm) pilot holes using the holes in the cover as a guide.
Mount the cover to the wing with #2 x 3/8" (9.5mm) at head
screws. Harden the screw holes with thin CA.