
User Manual


11
Install the Flap Servo
❏
❏
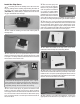
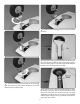
1. Carefully remove the left ap servo hatch from the
wing by peeling off the masking tape holding the hatch to
the wing. Use a paper towel dampened with lighter uid
(CAUTION: Very Flammable) or similar solvent to remove
any glue left behind from the tape.
❏
❏
2. Install the rubber grommets and metal eyelets in
the ap servo.
❏
❏
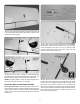
3. Center the servo arm spline of the ap servo in the
opening of the servo hatch cover. Position the two 7/8" x 5/8"
x 3/8" [20 x 15 x 8mm] hardwood blocks as shown and mark
the locations on the hatch cover.
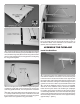
To increase the strength of the glue joint, use a T-pin to
prick holes into the gluing surface of the servo blocks and
the plywood servo hatch. Be careful to not prick holes
completely through the servo hatch and covering.
❏
❏
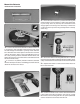
4. Use 6-minute epoxy to glue the two blocks to the
bottom of the servo hatch over the servo block locations.
Thoroughly coat the end of the blocks and allow them to set
for a few seconds to allow the blocks to absorb the epoxy.
Then, recoat the blocks. Use clamps to hold the blocks to
the servo hatch.
❏
❏
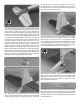
5. Once the epoxy has
cured, remove the clamps.
Place a 1/16" [1.6mm] spacer,
such as a piece of cardstock
or a piece of paper folded
several times, under the servo
and between each mounting
block to raise the servo off the
servo hatch. After the servo is installed the spacer will be
removed, providing adequate spacing for vibration isolation.
❏
❏
6. Drill 1/16" [1.5 mm] holes through the blocks for the
servo mounting screws. Mount the servo to the blocks with
the screws that came with the servo. Remove the servo
mounting screws and apply a couple of drops of thin CA in
each hole to harden the threads. Allow the CA to fully harden.
Then, reinstall the screws and remove the spacer.
❏
❏
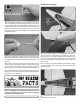
7. Make two marks on the top of the servo hatch,
centered on the two ap servo mounting blocks.
❏
❏
8. Drill 1/16" [1.5 mm] holes through the servo hatch
and into the servo blocks at the two previously made marks.
Install two #2 x 3/8" (9.5mm) self-tapping at head screws to
secure the servo mounting blocks to the aileron servo hatch.
Use thin CA to harden the screw threads.
❏
❏
9. Following your radio setup diagram, connect the
appropriate servo extension to your ap servo. Cut a piece