
User Manual


10
❏
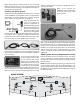
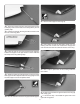
2. Tie the end of the string from the wing tip light recess
to the plug of the red LED. Secure the string with a piece of
masking tape.
❏
3. Pull the wire through the wing until the connector exits
the root of the wing panel.
❏
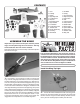
4. Insert the LED in one of the plywood LED supports.
Position the support in the light recess so that it matches
the shape of the wing leading edge.
❏
5. Attach the white wing tip light decal on the front of the
LED support and the adjacent side of the wing tip light recess.
The LED support can also be painted white.
❏
6. Glue the red LED in the hole in the plywood LED support.
❏
7. Glue the LED support in the wing tip.
❏
8. Last chance to test the red LED to make sure it is
working and is the correct color. Position the wing tip lens
over the LED and mark the outline of the lens on the wing.
❏
9. Use a T-pin to poke holes in the covering inside the
lens outline.
❏
10. Wipe off the outline and glue the lens to the wing tip
with canopy glue.
❏
11. Go back to step 1 and install the green LED in the
right outer wing panel.