M6D Manual V1.0 2020.04 www.toolkitrc.com ToolkitRC Technology (Shenzhen) Co..
Introduction Thank you for purchasing the ToolkitRC M6D multi-function charger, please read this manual carefully before use. Key Points Tips Important Information Further information To ensure you have the best experience with this product please scan the QR code below to stay up to date with news, information and firmware updates for your charger. Or visit www.toolkitrc.
Safety 1,M6D allows input voltage of 7-28V. Please ensure that the power supply voltage is in line with this range. Pay attention to the positive and negative polarities of the power supply when connecting. 2,Do not use this product in a hot area or near a heat source. Do not use this product in a damp, flammable or explosive gas environment. 3,Only use this product while under direct supervision. No not leave charging batteries unattended.
Contents Introduction.......................................................... 2 Key Points............................................................. 2 Further information............................................. 2 Safety..................................................................... 3 Contents................................................................4 M6D Layout.......................................................... 8 Quick start.......................................................
9,Loop setting................................................. 22 10,Power mode setting..................................24 11,Smart battery.............................................. 24 Charge and discharge work............................ 26 System settings.................................................. 31 other functions...................................................35 Specification.......................................................
Product description M6D is a dual-channel balanced charger product. Small size, high power density, innovative design, charging accuracy can be as low as 5mV.. Charge, discharge and balance management of LiPo, LiHV, LiFe Lion 1-6S, NiMh 1-16S, PB 1-10S batteries.
USB 2.1A@5.0V output, rechargeable mobile device. The device connects to PC like a USB drive for easy firmware upgrades. Simply copy and paste new firmware files to update.
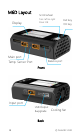
M6D Layout Scroll wheel Turn: left or right Display Exit key Press: OK CH key Main port Balance port Temp.
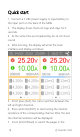
Quick start 1,Connect a 7-28V power supply or input battery to the input port on the back of the M6D. 2,The display shows the boot logo and stays for 2 seconds. 3,At the same time accompanied by do-re-mi's boot sound. 4,After booting, the display will enter the main interface and display as follows: 5,Short press [Exit], the cursor switches between the left and right channels. 6,Press and hold [EXIT] to start testing the internal resistance of the corresponding channel.
corresponding channel. 8,Short press [OK], can select the charging task when the channel is idle and can adjust and end the work when the channel is working. 9,Press and hold [OK] to enter the system setting interface when both channels are idle. 10,Press [Exit], to end the modification or return to the previous interface.
Charge and discharge settings Short press [OK] on the main interface to enter the charging function, the following interface is displayed.
Move the cursor to [Battery Type] and press [OK] to modify the battery type, as shown below: The charger supports charging and discharging of 6 types of batteries: Lipo, LiHV, LiFe, Lion, NiMh, and PB.
can be also selected. After selecting a battery that matches the actual battery. Short press [OK] and [Exit] to take effect and return to the previous interface. ================================= Warning 1 , Choosing the wrong battery type to charge may damage the battery, the charger, and the risk of burning, so please choose carefully. 2,Do not use this product to charge batteries that do not indicate the battery type.
6, PB: often called lead-acid battery, nominal voltage 2.00V. =================================== 2,Number of cells Move the cursor to the position of [Battery cell Number] and press [OK] to modify the number of battery cells. The display is as follows. Turn [Scroll wheel] to adjust the value. When set to [Auto], the charger will automatically recognize the number of connected battery cells according to the battery voltage connected to the output port.
=================================== Tips 1,Over-discharging or over-charging of the connected battery may lead to incorrect recognition of the battery cell number, and it is necessary to manually set the correct cell number. 2,If the cell number is set incorrectly, it may not be fully charged, or the battery may be damaged by overcharging. Please set it carefully. 3,After Lixx battery is connected to the balance port, the number of battery cells can be more accurately identified.
Lipo, LiHV, LiFe, Lion batteries can be charged, discharged, and stored. NiMh battery can choose to charge, discharge, cycle. PB battery can choose to charge and discharge. Short press [OK] and [Exit] to take effect and return to the previous interface. 4,Discharge mode When the working mode selects discharge, storage, and cycle mode, the battery setting interface will increase the discharge mode. As shown below.
M6D supports two discharge modes. 1. Inter (Internal) Mode, discharge through internal heat consumption, maximum support 3.0A@12W discharge. 2. Recycle mode, when the input is a suitable battery, this function can recover the electric energy from the discharging battery to the input battery, the maximum support is 15.0A@250W discharge. 5,Input MaxVoltage When the discharge mode is selected to recycle, the battery setting interface will increase the input MaxVol setting. As shown below.
Move the cursor to [Discharge Mode] and press [OK] to adjust the input MaxVol. If the input voltage reaches this voltage during discharge, the discharge will stop. ================================= Tips: Please set the input cut-off voltage withing the safe voltage range of the power supply battery. After the voltage is reached, the charger will automatically stop recycling and discharging. Setting a high over-voltage may damage the input power battery.
voltage, and the range is plus or minus 50mV of the full voltage. When the working mode is discharge, it is the discharge cut-off voltage. Scroll the [Scroll Wheel] to adjust the value in steps of 0.01V. =================================== 1,Only LiPo, LiHV, LiFe batteries can set the end voltage. 2 , If not familiar with battery characteristics, please do not modify the cut-off voltage. 3,The charging cut-off voltage can be set to a range of plus or minus 50mV of full voltage.
7,Current setting Move the cursor to the position of [Charge Current] or [Discharge Current] and press [OK] to modify the current. Rotate the [Scroll Wheel] to adjust the value and step 0.1A. Quickly scroll [Scroll Wheel] to quickly increase or decrease. The charger supports up to 15.0A. In synchronous mode, maximum support 25A. =================================== Tips: 1. Please set the charging rate of 1-2C according to the battery capacity.
in the corresponding working mode 3. For the setting of discharge mode, please refer to the chapter of in this manual =================================== 8,NiMH setting (PeakV) When the battery type is NiMh, can set the negative pressure value when the battery is fully charged, the range is 5mV-15mV, as shown below. =================================== Tips: 1,Only NiMh battery can set negative battery voltage.
9,Cycle setting When the battery type is NiMh, and the work mode is selected to cycle, the battery setting interface will increase the number of cycles and the rest time setting. As shown below. Move the cursor to [Cycle times] and press [OK] to set the cycle times to 2-12. The charger will follow the pattern cycle of discharging-> charging-> discharging-> charging ... "Discharge-> Charge" is 2 times.
Move the cursor to [Rest time] and press [OK] to set the interval time of the cycle charging. The range is 2 to 10 minutes. As shown below.
10,Power mode setting When the battery type is power, the battery setting interface only has two options: output voltage and maximum current. As shown below. Move the cursor to [Output Voltage] and press [OK] to modify the output voltage. The voltage range is 1V to 28V. Move the cursor to [Max Current] and press [OK] to modify the maximum current, which is the maximum current of the output power supply. The range is 0.5A to 15A.
Move the cursor to [Drone model] and press [OK] to select different drone models. As shown below. Move the cursor to [Max Current] and press [OK] to set the charging current. The range is 0.5A to 15A.
Charge and discharge work When charging and discharging starts, the charger enters the working interface as shown below. Rotate the [Scroll wheel] on this interface to switch the bottom status information and internal resistance voltage value. Short press [OK] to dynamically set the working current or stop working. As shown below.
To end the charge and discharge work, short press [OK], move the cursor to [Stop working], short press [OK], stop work and return to the main interface. When charging is completed or an error occurs during charging, a prompt box pops up and a tone sounds. Display content description: 24.00V:Input power supply voltage 9A:Input power current 20.0Wh:Total power consumption of input power 45.0℃:Charger internal temperature. V: Constant pressure sign. C:Constant current sign. F: Current limit sign.
25.20V:Second channel main port voltage. 10.00A:Second channel main port current. 060:59:Second channel working time. 1888mAh:Cumulative capacity of the second channel. 4.202V:1st battery voltage ....... 4.200V:4th battery voltage(this cell is in balance 1 4 management) -.--V :No battery connected Scroll [Scroll Wheel] to switch to the second column of the second channel, which is the internal resistance information. As shown below. 1 14mΩ:Internal resistance of the first battery ......
shown below. Charge done: indicates the current charging status. Lipo 6S: the current rechargeable battery type and battery number. 4.20V/2.00A:Current battery end voltage and charging current. =================================== Tips: 1. When charging and discharging, please directly supervise throughout the process to deal with the abnormality in time. Do not leave charging or discharging batteries unattended. 2.
attention to the balance of the battery. Connecting the balance lead is recommended and will automatically begin balance management. 3. After the charging is completed, unplug the battery and connect a new battery, it will automatically continue to charge and discharge according to the set mode (if continuous work mode is selected). When set to a fixed number of cells, you need to connect the batteries of the same cells and capacity.
System settings After long-pressing [OK] on the main interface, you can enter the system setting interface when both channels are idle, as shown below. Input power settings: Enter the relevant settings of the power supply. After long-pressing, can select power supply 1, power supply 2, and power supply 3. Short press to expand settings. As shown below.
Power type: Battery and adapter (PSU). A battery can be used to recover energy when discharging batteries (Recycle mode). This mode also provides greater current draw than internal resistance discharging. Recycle mode can not be used with a Power Supply Unit (PSU) or any form of mains power adapter Max power: the maximum power absorbed from the input port when charging. Max current: the maximum current drawn from the input port during charging. Voltage range: the allowable input voltage range.
Safe Inter. Temp.: Above this temperature value, the device will stop the main port output. Safe Exter. Temp.: If the external sensor detects a temperature higher than this temperature, the device will stop the main port output. Safe time: the maximum time of continuous charge and discharge, beyond which it will stop working. Safe capacity: the maximum capacity of continuous charge and discharge, beyond which it will stop working. Synchronization mode: can be set to open or not.
battery that was being charged. Work completed: After charging, whether to stop or trickle charge. Backlight: The backlight brightness level of the display can be set from 1 to 10 levels Buzzer: The tone of the buzzer can be set to off. Language: The system display language. English, Chinese, etc. can be selected. Default : Restore all settings to factory defaults.
other functions 1,Firmware upgrade After connecting the M6D to the computer with the USB cable in the box, the computer will recognize a USB disk named Toolkit, download the upgrade file app.upg on the official website Copy and Paste the new file to overwrite the previous files in the USB disk, and the firmware can be upgraded. 2,USB 5.0V output In addition to the above upgrade function, the USB interface can also output 2.0A current to charge mobile devices.
value, modify the voltage value to be consistent with the voltmeter value, and achieve calibration. After the calibration is completed, move the cursor to save, short press once, the buzzer will beep once, and the save is successful. Just log out or shut down 6,Fully charged When the lithium battery is charged, it prompts "Fast charging has ended". If the battery is not removed, constant voltage trickle charging will be performed automatically to make the battery more fully charged.
Specification Input 7-28V@MAX30A Battery Type LiPo LiHV LiFe Lion@1-6S NiMh @1-16S Pb @1-10S Bal Cur. 800mA @2-6S Accuracy <0.005V Charging Power 0.1-15A@250W *2 (Asynchronous mode) 0.1-25A@500W (Synchronous mode) Charging Discharging 0.1-15A@250W*2 Recycle Mode Power 0.1-3A@12W*2 Normal Mode USB Display Product Individual packing 37 2.1A@5V upgrade@USB3.0 Battery Voltage 1.0V-5.0V @1-6S Battery Internal Resistance 1-100mR @1-6S LCD IPS 2.