
Instructions

24
c) Switching On/Off
Switch on the hot-air soldering/desoldering system with the mains switch on the rear (switch position “I” = on). After
activation, the display on the front will be activated.
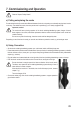
There is a magnet in the holder; a solenoid switcher is integrated in the housing of the hot-air nozzle. If the
hot-airnozzleisinsertedintotheholder(seegureinchapter7.b),standbymodeisactivatedautomati-
cally. The display shows “SLP”.
After 30 seconds in standby mode, the heating element and the blower are deactivated.
When you take the hot-air nozzle from the holder, the heating element and the blower will start up (at the
existing temperature/blower settings).
The switch it off, push the mains switch into the “O” position.
At initial commissioning, there will be a little smoke or odour, especially at high temperatures. This is nor-
mal.Makesurethatyourworkplaceissufcientlyventilated.
d) Select Temperature
When the hot-air soldering/desoldering system is on, you can set the hot-air temperature with the buttons “+” and “-”.
The display shows the respective currently set temperature.
• Button “+” = Increase temperature
• Button “-” = Reduce temperature
Keep the respective button pressed for quick adjustment.
e) Switching between Temperature Units
Brieypushthebutton“°C/°F”toswitchthetemperatureunitbetween°C(degreesCelsius)and°F(degreesFahr-
enheit).
f) Select Air Quantity
The dial switch at the front of the hot-air soldering/desoldering system sets the air volume:
• Turn counter-clockwise to the left (“DOWN-”) = reduce air volume
• Turn clockwise to the right (“UP+”) = increase air volume
When the hot-air soldering/desoldering system is in standby for more than 30 seconds (display “SLP”
indicated), the blower will be switched off.
When you take the hot-air nozzle from the holder, the blower will start up automatically at the air volume
that you have set on the dial switch.