
User manual
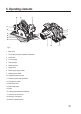


36
Important! After cutting the blade reaches high temperatures: waiting for it to cool down before
replacing it.
Important! The blade has very sharp edges: use gloves to prevent serious injuries.
Important! The assembly of the blade must be carried out with absolute precision. Incorrect assembly
causes very serious danger.
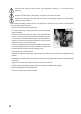
When replacing the blade, proceed as follows. The operation must be carried out by an expert; if in doubt please
contactanauthorizedservicecentre.
- Unplug the tool from the electric power supply.
- For correct reassembly, carefully observe the various components
before proceeding.
- Press the button (20) that locks the rotation of the motor/blade and
withthehexwrench(21)suppliedunscrewthebladexingscrew(
13); turn the key in the blade rotation direction. If the lock button is not
present you must use 2 keys to perform the operation, one to lock the
rotation and the other to unscrew the screw.
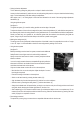
- Removetheoutsideange(14)andextracttheblade(theinsideange
must stay assembled on the motor shaft) to facilitate the operation turn
the mobile guard (9) through half a turn and keep it open.
- Clean components and the new blade.
- Assemble the new blade observing the rotation direction: the blade arrow must match the one impressed on the
machine.
- Reassembletheoutsideange,ensuringthattheshapedholeoftheangeitselfisplacedontheshapedshaft
of the motor.
- Tighten the screw well without hitting the key with a hammer or other tool.
- Carefully check that the blade guard goes back into rest position and that it works correctly.
- Make sure the blade turns freely without jerks.
- Carry out a test with the machine running idle.
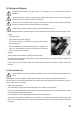
21
20
a
b
Fig. E