
User manual


34
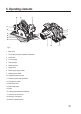
• Cutting inclination adjustment
This is obtained by putting the guide panel on a slope in relation to the blade.
Loosen the front handwheel (2) and/or the rear one and put the guide panel on a slope to obtain the desired cutting
angle. Fix the handwheel(s) well after making the adjustment.
Withanglesover0°,thecuttingdepthislessthanthatindicatedonthescaleofthecuttingheightadjustment
handwheel (16).
Using the guide set square
SeegureA.
The guide set square (3) is used for making parallel cuts to the edge of the panel.
To adjust the distance of the cut from the edge of the panel, loosen the handwheel (11) and slide the set square into
the relevant guide; check the cutting distance on the graduated scale. Fix the handwheel well after the adjustment.
Should you need carry out a parallel cut, at a distance greater than the maximum one allowed by the guide set
square,usingastripofwoodxedwithclampstobeusedasaparallelcuttingguide.
• Marking the cutting area (18)
Thetwogroovesontheguidepanelindicatethepositionofthebladeincaseofaperpendicularcutwitha0°angle
orona45°slope.Itisrecommendedtocheckthecorrectalignmentbymakingatrialcutrst.
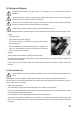
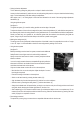
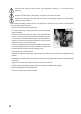
• Using the laser system
SeegureD.
Before proceeding to use the laser line system, ensure that the Additional
Safety Rules for Laser Lights section is read and fully understood.
Always ensure the laser beam is aimed at a sturdy workpiece without
reectivesurfaces.
i.e.woodorroughcoatedsurfacesareacceptable.Brightshinyreective
sheetsteelorthelikeisnotsuitableforlaseruseasthereectivesurface
could direct the beam back at the operator.
Only turn the laser beam on when the tool is on the workpiece.
- Mark the line of the cut on the workpiece. Adjust the depth of cut and
bevel angle as required.
- Rest the front edge of the base on the workpiece.
- Switch on the laser beam by pressing the laser switch (23).
- Align the beam shot from the laser aperture (22) with the line on the workpiece.
- Start the motor by Pressing the safety button (7) and the switch button (6).
- Always let the blade reach full speed before you begin to cut into the work piece. Slowly push the saw forward
using both hands, keeping the red laser light beam on the line of cut.
- After completing your cut, release the switch button (6) and allow the blade to come to a complete stop. Do not
remove the saw from the workpiece while the blade is moving. Switch off the laser beam by pressing the laser
switch (23) again on completion of the cut.
• Panel being processed
The panel that you are going to cut must have a compatible thickness with the circular saw.
23
22
Fig. D