TomTom GPS Watch Reference Guide 2.
Contents Welcome 4 Getting started 5 Your watch 7 About your watch .................................................................................................. 7 Wearing your watch ............................................................................................... 7 Cleaning your watch............................................................................................... 8 The heart rate sensor ..................................................................................
Settings for Treadmill ........................................................................................... 34 Settings for Gym activities ..................................................................................... 35 Settings for Cycle activities .................................................................................... 35 Using the stopwatch ............................................................................................. 36 Training programs ........................
Welcome This Reference Guide explains everything you need to know about your new TomTom GPS Sports Watch. If you want a quick read of the essentials, we recommend that you read the Getting started page. This covers downloading TomTom MySports Connect and using the desk dock. After that, if you have a smartphone, you will probably want to download the TomTom MySports app for free from your usual app store or by going to tomtom.com/app.
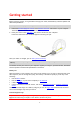
Getting started Before you start training, it's a good idea to charge your watch, download any software updates and download QuickGPSFix. Note: QuickGPSFix helps your watch get a GPS fix and find your location quickly. 1. Download TomTom MySports Connect from tomtom.com/123/ and install it on your computer. TomTom MySports Connect is available for free. 2. Place your watch in the desk dock and connect the dock to your computer. Follow the instructions that TomTom MySports Connect gives you.
You can download the TomTom MySports app for free from your usual app store or by going to tomtom.com/app. To learn more, go to TomTom MySports mobile app in this guide. Pairing your watch with your phone To learn more, go to Phone in this guide.
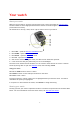
Your watch About your watch When you use your watch, you start from the clock screen. This screen shows the time and date. The hour number is shown slightly dimmed and the minutes are shown brighter so you can see the precise time more clearly. Use the button to move up, down, left or right to other screens on your watch. 1. 2. 3. 4. 5. 6. Move LEFT - opens the ACTIVITY TRACKING screen. Move DOWN - opens the SETTINGS menu. Move RIGHT - opens the ACTIVITIES menu. Move UP - opens the MUSIC screen.
Wear the watch in the normal way, with the watch face on top of your wrist and the bottom of the watch touching your skin, away from the wrist bone. Do the strap up so that it is tight to your wrist without being uncomfortable. You get the most accurate results from the heart rate sensor when you are warmed up. Cleaning your watch It is recommended that you clean your watch once a week if you use it frequently. Wipe the watch with a damp cloth as needed.
Note: The sensor cannot measure your heart rate while swimming. Removing your watch from the strap You may want to remove your watch from the wrist strap in order to charge it or before placing it in the holder before using the bike mount. To remove your watch from the wrist strap, do the following: 1. Press the bottom of the watch. 2. Remove the watch from the strap.
1. Open the holder by pressing as shown below and then lift the cover. 2. Push the watch back towards you to unlock it from the holder. 3. Slide the watch out towards you into the palm of your hand. Charging your watch using the desk dock Important: You can also use any USB wall charger to charge your TomTom GPS watch. Place your watch in the desk dock and then connect the USB connector from the desk dock to your USB wall charger.
Important: When you place your watch in the dock, you may get one of three types of connection: Charging using a wall socket or USB socket with no data capabilities. Full connection including access to MySports. 3. To remove your watch from the desk dock, pull the watch away from the dock, following the curve of the back of the watch.
1. Slide the handlebar strap into the hook at the back of the watch holder. Choose the right length for the size of your handlebars. Tip: The strap has two holes so that it fits a range of different sizes of handlebars from 22 mm to 32 mm. Select the hole that fits your handlebars best.
2. Place the watch holder on your handlebar and wrap the strap around the bar. 3. Use the clip on the bottom of the holder to attach the handlebar strap. The strap should now be attached securely around the handlebar.
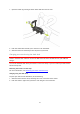
4. Remove your watch from the wrist strap. Open the holder by pressing as shown below. Lift the cover. 5. Slide your watch into the holder as shown. 6. Make sure your watch clicks securely into place.
7. Close the holder over the top of the watch, ensuring that it clicks as you close it. You are now ready to go cycling! Using an O-ring If you lose your bike mount strap, you can use a standard O-ring to mount your watch on your handlebars. To use an O-ring, do the following: 1. Turn the watch over and insert the O-ring in the hook nearest the front of the watch. 2. Find a piece of rubber, for example, a piece of an old bicycle inner tube.
3. Place the mount onto the handle bars so that the piece of rubber is sandwiched between the mount and the bars. 4. Wrap the O-ring around the handle bars and lift it over the back hooks. About now From the clock screen, move DOWN to open the About now screen. The About now screen shows the following information: BATTERY - the battery power left in your watch. To charge the battery, place the watch in the desk dock and connect the dock to your computer.
QuickGPSFix helps your watch find your precise location quickly so that you can start your activity. To update the QuickGPSFix information on your watch, connect your watch to your computer. TomTom MySports Connect automatically updates QuickGPSFix on your watch. QuickGPSFix information is valid for three days after you download it. These symbols are used to show the status of QuickGPSFix: QuickGPSFix on your watch is up to date. QuickGPSFix on your watch is out of date.
You should only use a factory reset as a last resort to restore your watch or if you really want to remove all your data and settings. A factory reset reinstalls the software on your watch and this removes the following: Your activities. Your settings on the watch. Your settings for uploading activities in MySports Connect. Important: When you perform a factory reset, do not disconnect your watch before MySports Connect has finished restoring your watch. This takes several minutes.
Activity tracking About activity tracking You can use your TomTom GPS watch to track how active you are. Here are some of things you can do: Track steps, time spent being physically active, calories burned and distance moved. Set a daily goal for one of these metrics on your watch. Use a weekly goal that is automatically generated based on your daily goal multiplied by 7. See your daily and weekly progress for your set goal.
MANUAL allows you set to manually enter the goal by using UP and DOWN. AUTO calculates a goal for you based on your last week's performance. 6. Move RIGHT to go back to the Clock screen. Tip: Some examples of typical goals are 30 minutes of active time per day or 10,000 steps per day. Note: Your weekly activity goal is automatically calculated by multiplying your daily goal by 7.
Music About music You can store and play music on your TomTom GPS watch and listen to it during your activities. Here are some of things you can do: Pairing headphones to watch Wearing your headphones Playing music Charging supplied headphones Some TomTom GPS watches are supplied with their own headphones for listening to music. Tip: The headphones are supplied with approximately a 50% battery charge.
To pair your supplied Bluetooth headphones with your watch, do the following: 1. Switch the headphones OFF. 2. To enter pairing mode, hold the center button down on the headset control for 10 seconds. Tip: Blue and red lights alternately flash when the headphones are in pairing mode. You could also put one earbud in one ear so you can hear the audio feedback during pairing. 3. Move UP from the Clock screen. Your watch searches for headphones. 4. If only one set of headphones is found, pairing starts.
To change the earbuds for the supplied headphones so that they are the correct size, pull the bud off the stalk and swap it as shown below: Wearing your headphones We want to make sure that your headphones are correctly fitted so they will stay in place while you are doing activities. To put on the supplied headphones, do the following: 1. Hold the earbuds so that the one marked L is on your left and the one marked R is on your right.
2. Lift the headphones up and over your head from BEHIND so that the cord sits behind your head and neck. The cables should lie behind your ears as shown below. 3. Fit the earbuds and then tighten the cable to ensure a snug fit. Putting music on your watch You can store and play music on your TomTom GPS watch and listen to it during your activities.
AAC MPEG2 and MPEG4 AAC-LC and HE-AACv2 are supported. Sample rate: up to 48 kHz Bit rate: up to 320 kbps Mono/stereo/dual mono are supported. Artist, track title and length for AAC is not supported. The watch does not support files with DRM of any type. Uploading and syncing music You can upload complete playlists of music from iTunes and Windows Media Player on your computer to your watch.
VOLUME UP Press button 1 with your thumb to increase the volume. VOLUME DOWN Press button 3 with your thumb to decrease the volume. NEXT TRACK Hold button 1 down for 2 seconds to go to the next track. PREVIOUS TRACK Hold button 3 down for 2 seconds to go to the previous track. Using the watch To play music using your watch, do the following: 1. Switch the headphones on following the instructions supplied with your headphones. 2. Move UP from the Clock screen. A track starts to play.
Headphones troubleshooting Some TomTom GPS watches are supplied with their own headphones for listening to music. If you experience gaps or clicks in the music, this may be due to your body blocking the Bluetooth signal between your watch and the headset controls. Try wearing the watch on the other wrist to improve the reception and audio quality. The best position for the watch is on the left wrist.
Sleep tracking About sleep tracking You can track how much you sleep using your TomTom GPS watch. Here are some of things you can do: Track your how long you are sleeping each day, week, month or year. You can upload your sleep tracking metrics to the TomTom MySports website and TomTom MySports mobile app. Activity Tracking Accuracy Activity tracking aims to provide information to encourage an active and healthy lifestyle. Your TomTom GPS watch uses sensors that track your movement.
Activities About activities In the activities menu, you can start one of the activities available on your watch: Run Cycle Swim Treadmill Freestyle Gym Indoor cycling Stopwatch When you select RUN, CYCLE or FREESTYLE, your watch uses its internal GPS receiver to measure your speed and to record the route you have taken. If your watch has a heart rate sensor and the heart rate sensor is set to ON, your heart rate is shown during your activity. This includes running, cycling, treadmill and freestyle.
Starting an activity To start an activity on your watch, do the following. 1. From the clock, move RIGHT. 2. Select one of the activities, then move RIGHT. RUN CYCLE SWIM TREADMILL GYM INDOOR CYCLING FREESTYLE STOPWATCH 3. For RUN, CYCLE and FREESTYLE activities, until your watch has a GPS fix you see the message Please wait, and the GPS icon flashes in the top left-hand corner of the screen.
Pausing and stopping an activity Pausing and stopping an activity During an activity, press and hold LEFT to stop the clock and pause your activity. To restart the activity again, move RIGHT. To stop the activity completely, move LEFT to pause the activity, then move LEFT again. How pause works If you upload your activity to your MySports account and view it on a map, you see your whole course with the pause shown as a straight line.
SWOLF - this metric is only given for swimming activities. The SWOLF score is calculated by adding the time in seconds and the number of strokes you make to swim one length of the pool. SWOLF shows your swimming efficiency. The lower the score, the better. The word SWOLF is a portmanteau of swimming and golf. CALORIES - Calories for the freestyle activity are based on heart rate.
Choosing other metrics to display Note: To get help on choosing which metrics you want to see during an activity, see Choosing which metrics to display. To choose to see just one metric for speed, average speed, pace or average pace, move DOWN to the SETTINGS menu. Select METRICS, then move RIGHT. Select SPEED, AVG SPEED, PACE or AVG PACE. To choose to see speed, pace or both metrics, move DOWN to the SETTINGS menu. Select METRICS then move RIGHT. Select SPEED, then move RIGHT. Select SPEED, PACE or BOTH.
3. Select DISPLAY then move RIGHT. 4. Set the size so it shows the correct length for the pool. 5. Move RIGHT to go immediately back to the activity screen. When you select SWIM, your watch does not use its internal GPS receiver. To set other metrics, such as strokes, do the following: 1. 2. 3. 4. From the activity start screen, move DOWN to the SETTINGS menu. Select DISPLAY, then move RIGHT. Select LEFT or RIGHT to set the metric shown on the left or the right.
To choose to see just one metric for speed, average speed, pace or average pace, move DOWN to the SETTINGS menu. Select METRICS, then move RIGHT. Select SPEED, AVG SPEED, PACE or AVG PACE. To choose to see speed, pace or both metrics, move DOWN to the SETTINGS menu. Select METRICS, then move RIGHT. Select SPEED, then move RIGHT. Select SPEED, PACE or BOTH.
Using the stopwatch To use the stopwatch, do the following. 1. From the clock, move RIGHT. 2. Select STOPWATCH, then move RIGHT. Your watch shows an image of a stopwatch and the word GO. 3. Move RIGHT to start the stopwatch. The stopwatch starts and shows the elapsed time. 4. To pause the stopwatch, move LEFT. Move RIGHT to resume counting. Tip: When paused, to see more of your previous laps, move DOWN and move UP. 5.
Training programs About training programs For each type of activity, the following training programs are available: NONE GOALS INTERVALS LAPS ZONES RACE From the clock screen, do the following to see the list of training programs: 1. 2. 3. 4. Move RIGHT and then select your choice of activity. Move RIGHT. Move DOWN and select TRAINING. Move RIGHT and choose a training program.
This screen shows the percentage of your target you have reached and the remaining distance, time or number of calories. Tip: When running, you can head away from home until your progress reads 50% and then turn and come back again. Progress alerts When training to a goal, your watch alerts you at these stages: 50% 90% 100% 110% Intervals How to get there: Activity screen > Move DOWN > TRAINING > INTERVALS > WARMUP, WORK, REST, # SETS, or COOLDOWN. Select this option to use interval training.
During interval training, you see an alert for the next stage of interval training: You see the name of what you are doing and how long this part of the set is in either time or distance. You are also warned with beeps and buzzes when you need to switch to the next stage in your interval training. Tip: When you use interval training on the watch, interval sections are marked as laps so you can better track pace and other metrics for each interval section.
SPEED - select this option to set your target speed and a margin above and below the target that you allow yourself. HEART - select this option to set your target heart rate using a custom heart rate zone or choose a predefined heart rate zone. For your watch to be able to measure your heart rate, it must be connected to a Heart Rate Sensor. CADENCE - select this option to set your target cadence for your cycling activity.
If you are outside your training zone, an alert is played and the screen shows if you are above or below your zone. When you are back in your training zone, an alert is played and the screen shows a target symbol. Heart rate zones Note: For your watch to be able to measure your heart rate, it must be connected to a Heart Rate Sensor. Your watch uses heart rate zone boundaries based on your age.
From the activity progress screen, move RIGHT to scroll through graphs showing how close your training is to the zone you set. The graph shows if you are above or below your target zone and by how much, throughout your activity. The zone you are using is highlighted in white. Move RIGHT to see the heart rate zone summary. This graph, shown above, is a heart rate zone summary. It shows the percentage of time spent in each zone with your current zone highlighted in white.
This graph shows your heart rate over the last 2.5 minutes of activity and the percentage of time spent in each heart rate zone after an activity. Tip: You can view your progress in a heart rate zone even when you are using a Graphical Training Partner like Race or Goal. During training, from the screen showing a main metric, move RIGHT to see the graphical training screen. Move DOWN to see the heart rate zone screens as described above.
The distance at the top of the screen shows the remaining distance in the race, and the distance at the bottom shows how much you are ahead or behind. Your watch alerts you so you know whether you are in front (#1) or behind (#2) in your race. In this example you are 23 meters (75 ft.) behind your previous activity and you have a remaining race distance of 2.3 kilometers (1.4 mi). Tip: To get information on adding previous activities to your watch, go to tomtom.com/support and read the FAQ.
Settings About settings From the clock screen, move DOWN to open the SETTINGS menu. These settings determine the overall behaviour of your watch. For each activity, there are also settings related to that activity.
Tracker Switching off activity tracking From the Clock screen on your watch, move DOWN to open the SETTINGS menu, then select TRACKER. Activity tracking is ON by default so select OFF to switch off activity tracking. GOALS From the Clock screen on your watch, move DOWN to open the SETTINGS menu, then select TRACKER. Move RIGHT to select GOALS. For more information, see Setting a daily activity goal. SLEEP From the Clock screen on your watch, move DOWN to open the SETTINGS menu, then select TRACKER.
1. Make sure that your phone or mobile device is close by. 2. On your phone, make sure that Bluetooth is enabled. 3. From the Clock screen on your watch, move DOWN to open the SETTINGS screen, then select PHONE and move RIGHT. 4. Move RIGHT to start pairing. 5. On your phone, start the MySports Connect app and tap to connect. 6. When the name of your watch appears, select it. 7. On your phone, enter the PIN shown on the watch, then select PAIR. Your watch is now paired with your phone or mobile device.
From the Clock screen on your watch, move DOWN to open the SETTINGS screen, then select PHONE and move RIGHT. Select SYNC. If automatic uploading is currently switched OFF, move UP or DOWN to switch automatic uploading on. Airplane mode From the Clock screen on your watch, move DOWN to open the SETTINGS screen, select AIRPLANE mode and then move RIGHT. Move UP or DOWN to switch on airplane or flight mode.
Note: The battery will run down much more quickly than normal if you use the night mode while training. Lock Select Lock to turn the activity lock function on and off. The lock function prevents your current activity from being paused or stopped if you accidentally move left. Profile From the Clock screen on your watch, move DOWN to open the SETTINGS menu, then select PROFILE and move RIGHT to open the PROFILE menu.
Adding sensors About sensors Sensors are external devices which you can link to your watch to provide information about your activity. Two types of sensors can be used with your watch: External Heart Rate Sensor - this measures your heart rate as you train. The external TomTom Heart Rate Sensor is included in some products and available as an accessory for others. Cadence & Speed Sensor - this measures your cadence and speed as you cycle.
5. Select HEART, then move RIGHT to turn it on. 6. When you begin an activity, your watch connects to the sensor and you see a heart icon at the bottom of the screen. When your watch is trying to connect to the sensor, the heart flashes. The first time your watch tries to connect to your sensor, if it finds more than one sensor, your watch doesn't know which sensor to connect to. Move to a place where there are no other sensors within range of your watch.
Important: The smaller part of the sensor needs to face the crankarms and should not be attached to the top of the chainstay. You may have to tilt the main body of the sensor towards the wheel depending on your bike. You should make this adjustment after you have attached the spoke magnet. 2. Attach the spoke magnet to one of the spokes on your bike. The magnet should face the chainstay where you attached the chainstay sensor. 3.
4. Attach the crankarm magnet to one of the crankarms on your bike. The magnet should face the chainstay where you attached the chainstay sensor. Tip: Make sure the different parts of the Cadence & Speed Sensor are lined up correctly on your bike. The spoke magnet should pass the main body of the chainstay sensor and the crankarm magnet should pass the tip of the sensor. 5. 6. 7. 8. 9. 10. Once you have adjusted the sensors to the right position, tighten the cable ties so they are held securely in place.
When you have connected to your sensor once, your watch always reconnects to your sensor. When the chainring icon has stopped flashing, your watch is ready to measure your speed and cadence. You can start cycling with no GPS fix, but for proper GPS tracking wait until the GPS icon has also stopped flashing before you start your cycling activity. Tip: When you are using the Cadence & Speed Sensor for cycling activities, you are warned when no speed data is being received from the sensor.
TomTom MySports account Your TomTom MySports account is a central storage location for all your training and fitness information. To create an account, click the button in TomTom MySports Connect, or go directly to the website: mysports.tomtom.com As you can see from the diagram below, you can transfer your activities to your MySports account using either TomTom MySports Connect or the TomTom MySports app.
TomTom MySports Connect TomTom MySports Connect does the following: Helps you set up your watch. Updates the software on your watch when new versions become available. Transfers your activity information to your TomTom MySports account or another sports website that you choose. We can currently transfer activity information to Endomondo, Strava, MapMyFitness, RunKeeper, Jawbone and Nike+. TomTom MySports Connect can also transfer activity information to your computer in a number of file formats.
TomTom MySports mobile app The TomTom MySports mobile app does the following: Transfers your activity information to your TomTom MySports account automatically when in range of your phone. Transfers any settings you make on TomTom MySports to your watch. Updates the QuickGPSFix information on your watch. Provides an alternative to TomTom MySports Connect for transferring activity information to your MySports account and updating QuickGPSFix.
Addendum Warning Always consult a physician before starting an exercise program. If you have a pacemaker or other implanted electronic device, consult your physician before using this product. The use of this product while exercising might distract from your surroundings or your activity. How TomTom uses your information Information regarding the use of personal information can be found at tomtom.com/privacy.
FCC information for the user THE DEVICE COMPLIES WITH PART 15 OF THE FCC RULES Federal Communications Commission (FCC) Statement This equipment radiates radio frequency energy and if not used properly - that is, in strict accordance with the instructions in this manual - may cause interference to radio communications and television reception.
Equipment is certified to the requirements of RSS-210 for 2.4-GHz. IMPORTANT NOTE IC Radiation Exposure Statement: This equipment complies with IC RSS-102 radiation exposure limits set forth for an uncontrolled environment. This device and its antenna(s) must not be co-located or operating in conjunction with any other antenna or transmitter. This equipment complies with IC radiation exposure limits set forth for an uncontrolled environment.
Copyright notices © 2014 - 2015 TomTom. All rights reserved. TomTom and the "two hands" logo are registered trademarks of TomTom N.V. or one of its subsidiaries. Please see tomtom.com/legal for limited warranty and end user license agreements applying to this product. Linotype, Frutiger and Univers are trademarks of Linotype GmbH registered in the U.S. Patent and Trademark Office and may be registered in certain other jurisdictions.