
User's Manual
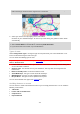


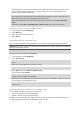
Table Of Contents
- Welcome to navigation with TomTom
- Get going
- TomTom services
- Connecting a smartphone
- Wi-Fi connection
- What's on the screen
- Traffic
- Setting your vehicle type
- Syncing using TomTom MyDrive
- About TomTom MyDrive
- Logging in to MyDrive
- Setting a destination using MyDrive
- Planning a route with stops using MyDrive
- Showing a planned destination in MyDrive
- Clearing a MyDrive destination
- Deleting a MyDrive destination from My Places
- Set a phone contact as your destination using the MyDrive app
- Finding and syncing locations using MyDrive
- Syncing My Places locations with MyDrive
- Importing a community POI list
- Deleting a community POI list
- Importing a track GPX file
- Deleting a track GPX file
- Saving and restoring your personal navigation information
- Quick search
- Choosing which search to use
- Using quick search
- Planning a route using quick search
- Using destination prediction
- Planning a route to an address
- Planning a route to a city centre
- Planning a route to a POI
- Planning a route to a POI using online search
- Planning a route using the map
- Planning a route using My Places
- Planning a route using coordinates
- Planning a route using a mapcode
- Planning a route in advance
- Finding a car park
- Finding a petrol station
- Step by step search
- Choosing which search to use
- Using step by step search
- Planning a route using step by step search
- Using destination prediction
- Planning a route to an address
- Planning a route to a POI
- Planning a route to a city centre
- Planning a route to a POI using online search
- Planning a route using the map
- Planning a route using My Places
- Planning a route using coordinates using step by step search
- Planning a route in advance
- Finding a car park
- Finding a petrol station
- Changing your route
- The Current Route menu
- Avoiding a blocked road
- Avoiding part of a route
- Finding an alternative route
- Types of route
- Avoiding features on a route
- Avoiding an incident or route feature using the route bar
- Adding a stop to your route from the current route menu
- Adding a stop to your route using the map
- Deleting a stop from your route
- Skipping the next stop on your route
- Reordering stops on a route
- My Routes
- About My Routes
- About GPX and ITN files
- Saving a route
- Navigating using a saved route
- Navigating to a stop on a saved route
- Adding a stop to a saved route using the map
- Recording a track
- Navigating using a track
- Deleting a route or a track from My Routes
- Exporting tracks to a memory card
- Importing routes and tracks from a memory card
- Voice control (Speak&Go)
- About voice control
- Starting voice control
- Making your own wake-up phrase
- The voice control screen
- Some tips for using voice control
- What you can use voice control for
- Saying commands in different ways
- Entering an address using voice control
- Going to home using voice control
- Going to a POI using voice control
- Changing a setting using voice control
- Talking to Siri or Google Now™
- Map Share
- Speed Cameras
- Danger Zones
- My Places
- About My Places
- Setting your home or work location
- Changing your home location
- Adding a location from My Places
- Add a location to My Places from the map
- Adding a location to My Places using search
- Adding a location to My Places by marking
- Deleting a recent destination from My Places
- Deleting a location from My Places
- Using community POI lists
- Hands-free calling
- About hands-free calling
- Volume control for hands-free calling
- Accepting an incoming call
- Ending or rejecting an incoming call
- Ignoring an incoming call
- Making a hands-free call
- Making a hands-free call using your contact book
- Replying by SMS to a call
- Receiving an SMS or IM
- Switching off messages
- Talking to Siri or Google Now™
- Settings
- Getting Help
- Product certification
- Using MyDrive Connect
- TomTom account
- Addendum
- Copyright notices

109
Recording a track
You can record a track while you drive, with or without a route planned. After recording, you can then
export your track so that you can share it with others or view it using tools such as Tyre Pro.
To record a track, do the following:
1. In the Main Menu, select Start Recording.
A red dot appears in the lower right-hand corner of the screen and initially flashes 3 times to show
that you are now recording. The dot remains on the screen until you stop recording.
2. To stop recording, select Stop Recording in the Main Menu.
3. Enter a name for your track or you can leave it at the suggested date-time combination.
4. Select Add or Finished, depending on the device you are using.
5. Your track is saved in My Routes.
Note: You can export tracks as GPX files and save them on a memory card for sharing with
others.
Navigating using a track
You can import tracks on to your GO PROFESSIONAL using MyDrive. To navigate using an imported
track, do the following:
1. In the Main Menu, select My Routes.
2. Select a track from your list.
The track route is shown on the map view.
3. Select the track, then select the pop-up menu.
4. Select Drive to Starting Point.