
User manual
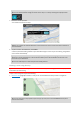
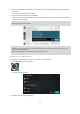
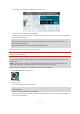
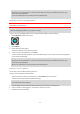
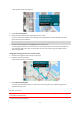
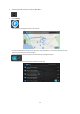

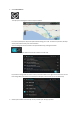
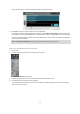
Table Of Contents
- Welcome to navigation with TomTom
- Get going
- What's on the screen
- Traffic
- TomTom MyDrive
- Using search
- Planning a route using search
- Planning a route to an address using search
- Planning a route to a city centre
- Planning a route to a POI using search
- Planning a route to a contact using search
- Planning a route using the map
- Planning a route using My Places
- Planning a route to a contact using My Places
- Planning a route to a geotagged photo
- Planning a route in advance
- Finding a car park
- Finding a petrol station
- Sharing your destination and arrival time
- Changing your route
- The Current Route menu
- Decide by steering
- Avoiding a blocked road
- Avoiding part of a route
- Finding an alternative route
- Changing the type of route
- Avoiding features on a route
- Avoiding an incident or route feature using the route bar
- Adding a stop to your route from the current route menu
- Adding a stop to your route using the map
- Deleting a stop from your route
- Skipping the next stop on your route
- Reordering stops on a route
- My Places
- About My Places
- Setting your home or work location
- Changing your home or work location
- Your contacts in My Places
- Adding a location from My Places
- Add a location to My Places from the map
- Adding a location to My Places using search
- Deleting a recent destination from My Places
- Deleting a location from My Places
- Speed Cameras
- Danger Zones
- Maps
- Apple CarPlay
- Settings
- Getting Help
- Addendum
- Copyright notices

44
Tip: If your destination is in a different time zone, you see a plus (+) or a minus (-) sign and the time
difference in hours and half hours in the arrival information panel. The estimated time of arrival is the
local time at your destination.
Tip: You can add a stop to a route that you have already planned.
Planning a route to a geotagged photo
Important: In the interest of safety and to avoid distractions while you are driving, you should always plan a
route before you start driving.
Tip: A photo that is geotagged has the location that the photo was taken stored in the photo file. You can
switch on geotagging of photos in your phone's settings.
To plan a route to a geotagged photo in your smartphone photo gallery, do the following:
1. Select My Places from the main menu.
2. Select Photos.
3. Select photo from your gallery.
The photo’s address is shown above the photo.
4. To plan a route to this destination, select Drive.
A route is planned and then guidance to your destination begins. As soon as you start driving, the guidance
view is shown automatically.
Tip: If your destination is in a different time zone, you see a plus (+) or a minus (-) sign and the time
difference in hours and half hours in the arrival information panel. The estimated time of arrival is the
local time at your destination.
Tip: You can add a stop to a route that you have already planned.
Planning a route in advance
You can plan a route in advance before you drive it.
To plan a route in advance, do the following:
Tap on the search bar at the top of the map, or select Search from the main menu.
The search screen opens with the keyboard showing.
Tip: If you don't want to use search to choose your starting point and destination, go to the map view and
press and hold to select a location.
1. Use the keyboard to enter the name of the location you want to use as a starting point.
2. Select an address or POI suggestion. The location is shown on the map.
3. Select the pop-up menu button.