
User manual
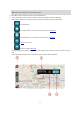
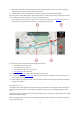
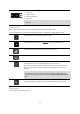
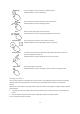
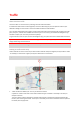
Table Of Contents
- Welcome to navigation with TomTom
- Get going
- What's on the screen
- Traffic
- TomTom MyDrive
- Using search
- Planning a route using search
- Planning a route to an address using search
- Planning a route to a city centre
- Planning a route to a POI using search
- Planning a route to a contact using search
- Planning a route using the map
- Planning a route using My Places
- Planning a route to a contact using My Places
- Planning a route to a geotagged photo
- Planning a route in advance
- Finding a car park
- Finding a petrol station
- Sharing your destination and arrival time
- Changing your route
- The Current Route menu
- Decide by steering
- Avoiding a blocked road
- Avoiding part of a route
- Finding an alternative route
- Changing the type of route
- Avoiding features on a route
- Avoiding an incident or route feature using the route bar
- Adding a stop to your route from the current route menu
- Adding a stop to your route using the map
- Deleting a stop from your route
- Skipping the next stop on your route
- Reordering stops on a route
- My Places
- About My Places
- Setting your home or work location
- Changing your home or work location
- Your contacts in My Places
- Adding a location from My Places
- Add a location to My Places from the map
- Adding a location to My Places using search
- Deleting a recent destination from My Places
- Deleting a location from My Places
- Speed Cameras
- Danger Zones
- Maps
- Apple CarPlay
- Settings
- Getting Help
- Addendum
- Copyright notices

12
8. Back button. This button returns the map to an overview of your whole route or, if no route is planned,
moves the map to put your current location at the centre.
9. Location details. Tap and hold anywhere on the map and you see the details of that location.
10. Pop-up menu. Tap on this symbol to open the pop-up menu, which gives you a list of actions you can take.
11. Drive button. This button prepares a route to the selected location.
If you have planned a route, your complete route is shown on the map. You can add stops
to your route
directly from the map. When you start to drive, the guidance view is shown.
12. Instruction panel. This panel shows the following information:
The direction of your next turn.
The distance to your next turn.
The name of the next road on your route.
Lane guidance at some junctions.
13. Route bar. The route bar is shown when you have planned a route.
14. Your route, if you have planned a route. Select the route to clear it, change the route type, add a stop or
save changes to your route.
15. Traffic incidents. A symbol or number at the start of the incident shows the type of incident or the delay in
minutes, for example 2.
The guidance view
The guidance view is used to guide you along the route to your destination. The guidance view is shown when
you start driving. You see your current location and details along your route, including 3D buildings in some
cities.
The guidance view is normally in 3D. To show a 2D map with the map moving in your direction of travel, change
the 2D and 3D default settings.
When the navigation app starts after it was closed and you had a route planned, you are shown the map view
with your planned route.