TomTom GO
1.
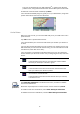
Included with TomTom GO 930 and 930T h Remote control 3
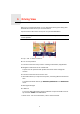
2. Before You Start... Before You Start... Switching on and off To switch your TomTom GO on or off, press and hold the On/Off button for 2 seconds. The first time you switch on, it may take a short while for your device to start. Note: In rare cases, your GO may not start correctly. If this happens, press the reset button, then switch on the device again. Setting up To set up your TomTom GO you need to answer a few questions by tapping the screen.
When you connect your TomTom GO to your computer, you can use TomTom HOME to download information about GPS satellite positions during the next 7 days. This helps your GO to find your position faster. Important: Some vehicles have heat reflective shielding in the windshield. This may prevent your GO from locating your current position. The TomTom External Antenna Kit (available for purchase as an accessory) can help to improve reception.
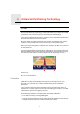
3. Driving View Driving View When your TomTom GO starts, you are shown the Driving View along with detailed information about your current location. Tap the center of the screen at any time to open the Main Menu. Note: The Driving View is shown in black and white until your GO locates your current position. A Tap + and - to zoom in and out. B Your current position. C The name of the next major road or road sign information, if applicable. D Navigation instruction for the road ahead.
4. Enhanced Positioning Technology Enhanced Positioning Technology Note: Enhanced Positioning Technology is available on the TomTom GO 930 and 930T. Enhanced Positioning Technology or EPT estimates your location when GPS reception is poor, such as when you drive between tall buildings. Your GO uses positioning sensors to monitor your acceleration and direction and then estimates your current location. EPT only helps your GO to estimate your location.
5. Making your first trip Making your first trip Planning a route with your TomTom GO is easy. To plan your first route, follow the steps below. Important: You should always plan your journey before you start driving. It is dangerous to plan a route while driving. 1. Tap the screen to bring up the main menu. Note: The buttons on your GO are shown in full color unless a button is currently unavailable. For example, the button named Find alternative...
• Cross street or intersection - tap this button to set your destination as the point where two streets meet. • Spoken address - tap this button to set your destination by announcing the address to your GO. For more information, see Voice address input on page 21. For your first trip, we will enter an exact address. 4. Tap Street and house number. Note: When planning a trip for the first time your GO asks you to choose a country. Your choice is saved and used for all routes you plan.
The route is calculated by your GO. IQ RoutesTM is used to plan the best possible route, using historical information about traffic speed on the roads. 9. When the route has been calculated, tap Done. Your GO will immediately begin to guide you to your destination, using both spoken instructions and on-screen directions. Arrival times When you plan a route, your TomTom GO asks you if you need to arrive at a particular time. Tap YES to enter a preferred arrival time.
What are the other navigation options? When you tap Navigate to..., you can set your destination in many ways, not just by entering the address. The other options are listed below: Tap this button to navigate to your Home location. You will probably use this button more than any other. Home For information about setting your Home location, see Change Home location on page 51. Tap this button to select a Favorite as your destination. For more information about Favorites, see Favorites on page 31.
Tap this button to select your last recorded position, as your destination. Position of last stop For more information about the GPS, see Global Positioning System (GPS) on page 93. Spoken address Instead of typing addresses, you can now enter an address by speaking to your GO. Note: The speech recognition feature is currently only available for entering addresses and for responding to special notifications. In the Main menu tap Navigate to...
• • • • Avoid freeways - a route which avoids freeways. Walking route - a route designed for making the trip on foot. Bicycle route - a route designed for making the trip on a bicycle. Limited speed - a route for a vehicle which can only be driven at a limited speed. You have to specify the maximum speed. 6. Your TomTom GO plans the route between the two locations you selected.
6. Finding alternative routes Finding alternative routes Once you have planned a route, you may want to change something about the route, without changing your destination. Why change the route? Maybe for one of these reasons: • You can see a roadblock or a line of traffic ahead. • You want to travel via a particular location, to pick someone up, stop for lunch or fill up with gas. • You want to avoid a difficult intersection or a road you don’t like. Tap Find alternative...
Tap this button to change your route so that it passes a particular location, perhaps to pick someone up on the way. Travel via... You choose the location you want to pass in the same way as you choose a destination. So you can select from all the same options: for example, Address, Favorite, Point of Interest and Point on map. Your GO will calculate a new route to your destination that passes the location you chose. Using this button, you can only travel via one location.
7. Sounds and voices Sounds and voices The sound on your TomTom GO is used for features such as: • Spoken instructions • Hands-free calls • Warnings • Music For information on making hands-free calls on your GO, see Hands-free calling on page 45. For information on playing music on your GO, see Music and Media on page 25 How do I change the volume level? You can change the volume in three ways: • Tap the bottom left hand area of the Driving View.
Selecting a voice To change the voice being used by your TomTom GO, tap Voice preferences in the Preferences menu, then tap Change voice. Select a voice from the list. Voice preferences Your TomTom GO has two different kinds of voices: • Computer voices These are generated by your GO. They provide spoken instructions while you are driving and can pronounce street names and announce messages, traffic reports, weather reports, tips and tutorials. • Human voices These are recorded by an actor.
Setting up • In the Main Menu tap Change preferences, then tap Speaker preferences. • Switch on your car radio. • Tune your car radio to a frequency that is not being used by a radio station. • Tap Change and set the frequency on your GO to the same frequency as your car radio. If you drive into an area where a radio station transmits on the same frequency you are using for the FM Transmitter, you may have to use another frequency. Note: The FM Transmitter is available in the GO 530, 730 and 930.
Tap this button to change the speaker settings. Speaker preferences 5. Select the speaker you want your GO to use for announcing instructions. • Internal speaker • Bluetooth Hi-Fi device • Line-out (audio cable) • FM to your car radio 6. Select the speaker you want your GO to use for playing music. • Internal speaker • Bluetooth Hi-Fi device • Line-out (audio cable) • FM to your car radio Note: The FM Transmitter is available in the GO 530, 730 and 930. 7. Tap Done. 8.
• Bluetooth Hi-Fi device • Line-out (audio cable) • FM to your car radio Note: The FM Transmitter is available in the GO 530, 730 and 930. 4. Tap Done. 5. Your GO asks you to confirm that you want to use an external Bluetooth® Hi-Fi speaker. Tap YES. Your GO will start searching for Bluetooth® Hi-Fi devices. 6. Select your Bluetooth® Hi-Fi device from the list of devices found by your GO. Your GO will try to establish a Bluetooth® connection with your device.
8. Voice address input Voice address input Important: You should always plan your journey before you start driving. It is dangerous to plan a route while driving. When you plan a trip with your TomTom GO, instead of tapping the screen to type in an address, you can use voice address input to say the address. Tap this button to enter an address using only speech. Using this option, your GO can recognize the following: Spoken address (dialog) • Commands: Yes, No, Back, Done, OK, Crossing. • Street names.
Planning a trip using voice address input Important: You should always plan your journey before you start driving. It is dangerous to plan a route while driving. To plan a route using speech, do the following: 1. Tap Navigate to... in the Main menu. 2. Tap Address. For this example, we will navigate to an address using only speech to enter the address. 3. Tap Spoken address (dialog). 4. Say the city name. When you say the city name, you are then shown a list of six names that match what you said.
Your GO tells you the name at the top of the list. If the name you hear is correct, then say, "Done" or "OK" or "Yes" or "One" or tap on the name. If the city name you hear is not correct, but the name appears in the list, then say the number next to the correct name or tap on the correct name. For example, if the correct name is Rotterdam and this name is number two in the list, you could say, "Two" or tap on the name, Rotterdam.
Tip: If you say, "Back" when there are no numbers shown on the screen, then your GO will return you to the previous screen. When the number is shown correctly say, "Done" or "OK." Alternatively, enter the number by tapping the screen. To select a crossroads as the location, say "Crossing". Note: You need to say numbers in the same language that is used for menu buttons. 7. Your GO asks if you need to arrive at a particular time. For this exercise, tap NO. The route is calculated by your GO. 8.
9. Music and Media Music and Media Important: Only select music and media when you are stationary. It is dangerous to select songs and make adjustments while you are driving. Your TomTom GO can play mp3 audio files and Audible® Audiobooks and display HTML and text documents and photos. Note: mp3 files and Audiobooks can be stored and played on the GO 530, 730 and 930. Putting Music and Photos on your GO Transfer music files and photos to your TomTom GO from your computer using TomTom HOME.
A Information about the song. B Volume - change the volume by moving the slider. C The Options button. You can, for example, choose to repeat a song and shuffle the songs. You can change these options: • Shuffle songs - the next song is selected randomly. • Repeat song - repeat the current song. • Reduce brightness - brightness is only reduced on the playing screen. • Show music button in Driving View - enables fast access to your music.
Using your iPod® with your TomTom GO You can connect your iPod to your GO with the TomTom iPod Connect Cable, which is available as an accessory. You can then control your iPod from your GO. Sound from your iPod will be played over the internal speaker in your GO, or an external speaker if selected. For more information about using different speakers, see Internal and external speakers on page 17. To use your iPod with your GO, do the following: 1.
10. Help me! Help me! Help me! provides an easy way to navigate to emergency services centers and other specialist services and contact them by phone. For example, if you are involved in a car accident, you could use Help me! to call the nearest hospital and tell them your exact location. Tip: If you do not see the Help me! button in the Main Menu, tap Show ALL menu options in the Preferences menu.
Options Use your TomTom GO to find the location of a service and the contact details. Phone for help • Emergency services • Emergency breakdown services • Nearest police station • Nearest doctor • Nearest hospital • Nearest public transport • Nearest car repair services • Nearest dentist • Nearest pharmacy • Nearest vet Note: In some countries, information may not be available for all services. Use your TomTom GO to navigate your way by road to a service center.
Tap this button to read the British Red Cross First Aid guide. First Aid Guide Tap this button to read a selection of useful guides.
11. Favorites Favorites What are Favorites? Favorites are places that you often visit. You can create Favorites so that you don’t have to enter the address every time you want to navigate there. They don’t have to be places you especially like, just useful addresses. How can I create a Favorite? From the Main Menu, tap Add Favorite. Note: The button Add Favorite may not be shown on the first page of the Main Menu. Tap the arrow to open other pages in the Main Menu.
Select a Favorite location from a list of places you have recently used as destinations. Recent destination You can add a Point of Interest (POI) as a Favorite. Does it make sense to do this? Point of Interest If you visit a POI you particularly like, for example a restaurant, you can add it as a Favorite. To add a POI as a Favorite, tap this button, then do the following: 1. Narrow your choice of POIs by selecting the area where the POI is.
Tap this button to make a Favorite of the current position of a TomTom Buddy. TomTom Buddy For more information about TomTom Buddies, see TomTom Services on page 65. Tap this button to select your last recorded position as your destination. Position of last stop For more information about the GPS, see Global Positioning System (GPS) on page 93. How can I use a Favorite? You will normally use a Favorite as a way of navigating to a place without having to enter the address.
5. Tap Rename.
12. Browse map Browse map To look at the map in the same way as you might look at a traditional paper map, tap Browse map in the Main Menu. You can move the map by touching the screen and moving your finger across the screen. A The scale bar B Your current position. C GPS button Tap this button to center the map on your current position. D Options E The cursor F The Find button Tap this button to find specific addresses.
Tap the cursor button then tap one of the following buttons: Tap this button to navigate to the cursor position. Your GO will calculate the route. Navigate there Tap this button to find a POI near the cursor position. For example, if you have found a restaurant to go to, you can search for a parking garage nearby. Find POI nearby Tap this button to call the location at the cursor position. This button is only available if your GO has the phone number for the location. Call...
13. Points of Interest Points of Interest Points of Interest or POIs are useful places on the map. Here are some examples: • Restaurants • Hotels • Museums • Parking garages • Gas stations Showing POIs on the map 1. Tap Show POIs on map in the Preferences menu. Show POI on map 2. Select the POI categories to display on the map. Tap Find to search for a POI by name. 3. Tap Done. The POIs you have selected are shown as symbols on the map.
You can select one of these options: • POI near you - to choose from a list of POIs near to your current location. • POI in city - to find a POI in a particular town or city. • POI near Home - to choose from a list of POIs near to your Home location. You can select from a list of POIs which are along your route or close to your destination. Choose from one of these options: • POI along route • POI near destination 6.
Managing POIs Tap Manage POIs from the Preferences menu. Manage POIs Note: The Manage POIs button is only available when all menu buttons are shown. To show all menu buttons, tap Show ALL menu options in the Preferences menu. You can, for example, do the following: • Create your own POI categories and add POIs to them. • Set warnings when you get close to POIs.
8. Select the location of your POI from the list below. You can set your Home location as a POI. If you want to change your Home location, you can create a POI of the Home location before you change it. Home You can create a POI from a Favorite. Favorite 1 22 3 Address You can only create a limited number of Favorites. If you want to create more Favorites you have to delete some Favorites first. Before you delete a Favorite, make it into a POI so that you don’t lose the address.
Tap this button to select your last recorded position as your destination. Position of last stop This may be useful if your GO is unable to maintain a strong GPS signal, for example, when you drive through a long tunnel. For more information about the GPS, see Global Positioning System (GPS) on page 93. How can I set warnings for POIs? 1. Tap the screen to bring up the main menu. 2. Tap Change preferences. 3. Tap Manage POIs. Note: The Manage POIs button is only available when all menu buttons are shown.
14. Itinerary planning Itinerary planning What is an Itinerary? An Itinerary is a plan for a trip including more locations than your final destination. An Itinerary can include the following items: • Destination - a location on your trip where you want to stop. • Waypoint - a location on your trip you want to travel through without stopping. Here’s an example of an Itinerary: Destinations are shown using this symbol. Waypoints are shown using this symbol.
The Itinerary planning screen opens. At first, there are no items on the Itinerary. Itinerary planning Note: This button may only be available if all menu options are shown. To show all menu options, tap Show ALL menu options. For more information, see Hidden buttons and features on page 48. 3. Tap Add and select a location. Tip: You can add items to your Itinerary in any order and rearrange the order later. Start Using an Itinerary Tap Options, then tap Start navigation.
You can change a waypoint into a destination using this button. Mark as destination Waypoints are locations you want to pass through on your way to your chosen destination(s). Destinations are locations where you want to stop. This button is only shown if the item you tapped is a waypoint. Tap this button to miss out part of your Itinerary. Your GO will ignore this item and all the items before it in the Itinerary. Mark ‘visited’ It will navigate you to the next item in the Itinerary.
15. Hands-free calling Hands-free calling Hands-free calling If you have a mobile phone with Bluetooth®, you can use your TomTom GO to make phone calls and send and receive messages. Note: Not all phones are supported or compatible with all features. For more information, visit www.TomTom.com/phones Connecting to Your Phone First you must establish a connection between your mobile phone and your TomTom GO. Tap Mobile phone in the Main Menu and then follow the instructions on the screen.
Note: You can copy your phonebook to your TomTom GO at any time. From the Mobile phone menu, tap Get numbers from phone. Not all phones can transfer their phonebook to your GO. For more information, visit www.TomTom.com/phones Making a Call Once you have established a connection with your phone, you can start making calls. 1. Tap Mobile phone in the Main Menu. 2. Tap Call. Note: Make sure that your phone is currently selected. The current phone is shown at the bottom of the screen. 3.
3. Tap Find other phone... and follow the instructions on the screen. To switch between phones, tap Connect to your phone and then select your phone from the list. The available buttons are listed below: Tap this button to redial a telephone number using your mobile phone. REDIAL Tap this button to read or write a message. Read/Write message Tap this button to configre how your TomTom GO communicates with your mobile phone.
16. Preferences Preferences You can change the way your TomTom GO looks and behaves. Tap Change preferences in the Main Menu. Hidden buttons and features When you first start using your TomTom GO, all the buttons are shown in the menu. The buttons for the more advanced features can be hidden. This is a useful option because you are unlikely to use certain features very often. Tap this button in the Preferences menu, to reduce the number of buttons that are shown.
Show POI on map Tap this button to set which categories for the Points of Interest (POIs) should be shown on the map. Select the POIs that you want to see on the map from the list. Show POI on map When you select a POI, it is shown on the map using the symbol you can see next to each category in the list. To find a POI category quickly, tap Find, then start to type the name of the POI category. As soon as the category is shown in the list, you can select it.
Voice preferences Tap Voice preferences to manage your TomTom voices. The following options are available: Voice preferences • Change voice - tap this button to change the voice that gives you instructions. A wide range of recorded human voices and computer voices are available. For more information on choosing a voice and the differences between human and computer voices, see Selecting a voice on page 17. • Disable voice - tap this button to disable the use of voices. To enable voices, tap Enable.
Volume preferences Tap this button to change the volume for spoken instructions. Volume preferences This setting does not change the volume of the radio, CDs, or music played from an iPod® or USB storage device. Can my GO change the volume depending on how noisy it is in the car? Select Link volume to noise level and your GO will change the volume according to the background noise. The noise level is constantly monitored by the microphone on your GO.
Manage maps This button may only be available if all menu options are shown. To show all menu options, tap Show ALL menu options. For more information, see Hidden buttons and features on page 48. Tap this button to do the following: • Download a map - you can buy new maps using TomTom HOME. Manage maps For more information, see Using TomTom HOME on page 94. • Switch map - tap this button to change the map you are using. • Delete a map - tap this button to delete a map.
Change car symbol This button may only be available if all menu options are shown. To show all menu options, tap Show ALL menu options. For more information, see Hidden buttons and features on page 48. Tap this button to select a car symbol that will be used to show your current position in the Driving view. Change car symbol Change 2D/3D display / Turn on 2D display Tap Turn on 2D display to change the perspective for viewing the map.
Change map colors This button may only be available if all menu options are shown. To show all menu options, tap Show ALL menu options. For more information, see Hidden buttons and features on page 48. Tap this button to select the color schemes for day and night map colors. You can also download more color schemes from TomTom Services. Change map colors Brightness preferences This button may only be available if all menu options are shown. To show all menu options, tap Show ALL menu options.
Status bar preferences This button may only be available if all menu options are shown. To show all menu options, tap Show ALL menu options. For more information, see Hidden buttons and features on page 48. Tap this button to select the information shown on the status bar: • Remaining time - the estimated time left until you reach your destination. Status bar preferences • Remaining distance - the distance left until you reach your destination. • Current time • Arrival time - your estimated arrival time.
Quick menu preferences This button may only be available if all menu options are shown. To show all menu options, tap Show ALL menu options. For more information, see Hidden buttons and features on page 48. Tap this button to choose up to six buttons to be used in the Quick menu. The Quick menu button enables easy access for your most commonly used buttons. Quick menu preferences The buttons you assign for use with the Quick menu, are shown in the Driving View.
Set units This button may only be available if all menu options are shown. To show all menu options, tap Show ALL menu options. For more information, see Hidden buttons and features on page 48. Tap this button to set the type of units that will be shown for the following: • Distance Set units • Time • Latitude and longitude • Temperature • Air pressure Operate left-handed / Operate right-handed This button may only be available if all menu options are shown.
Planning preferences This button may only be available if all menu options are shown. To show all menu options, tap Show ALL menu options. For more information, see Hidden buttons and features on page 48. Tap this button to set the kind of route planned when you select a destination.
Set owner This button may only be available if all menu options are shown. To show all menu options, tap Show ALL menu options. For more information, see Hidden buttons and features on page 48. Tap this button to enter your name and address as the owner of your GO and to change or delete a 4-digit password for your GO. Set owner Note: You can only change or delete a 4-digit password on your TomTom GO. You can create a 4-digit password for your GO using TomTom HOME: 1.
Car preferences This button may only be available if all menu options are shown. To show all menu options, tap Show ALL menu options. For more information, see Hidden buttons and features on page 48. Tap this button to change the way your GO responds to events in your car. • Link night view to headlights Car preferences • Instructions mute car radio Music preferences This button may only be available if all menu options are shown. To show all menu options, tap Show ALL menu options.
Start-up preferences This button may only be available if all menu options are shown. To show all menu options, tap Show ALL menu options. For more information, see Hidden buttons and features on page 48. Tap this button to select how your GO will behave when you turn on the device. The following options are available: Start-up preferences • Continue where I left off - your GO starts and shows the last screen that was shown when you turned off the device.
Disable wireless data / Enable wireless data This button may only be available if all menu options are shown. To show all menu options, tap Show ALL menu options. For more information, see Hidden buttons and features on page 48. Tap this button to block the reception of wireless data. You will still be connected to your mobile phone via Bluetooth and will still be able to receive and make hands-free calls. You will not be able to receive any data that uses a wireless data connection, such as TomTom Traffic.
Battery saving preferences This button may only be available if all menu options are shown. To show all menu options, tap Show ALL menu options. For more information, see Hidden buttons and features on page 48. Tap this button to configure your GO to conserve power when possible. The following options are available: • Never turn off screen Battery saving preferences • Turn off screen between instructions • Always turn off screen Then select whether or not you want to Switch off when external power is lost.
The buttons for the more advanced features can be hidden. This is a useful option because you are unlikely to use certain features very often. Tap this button in the Preferences menu, to reduce the number of buttons that are shown. You might want to do this so that only frequently used buttons are shown. Show fewer menu options When you need to use the buttons that are hidden, you can press Show ALL menu options in the Preferences menu to show all buttons.
17. TomTom Services TomTom Services TomTom Services keep you informed and entertained while you’re on the road. You can subscribe to a range of extras and download them either directly to your GO or to your computer and then transfer them to your GO. Tips • New services are being added regularly. Use TomTom HOME or visit www.tomtom.com/services to find out what’s available.
18. TomTom Map Share TomTom Map Share TomTom Map ShareTM is a free technology that lets you make updates to your map and if you want to, share those updates with other members of the TomTom Map Share community. If you find a street that has recently been blocked to traffic but was open before, you can use Map Share to update your map and then share the update with other Map Share members. You can use Map Share to send and receive map updates during the first year after the map’s release date.
For more information on showing and hiding updates, see Changing my preferences for map updates on page 68. • Updates that are reported to TomTom but not shown immediately on your map. These include, missing streets, errors in freeway entrances and exits and missing rotaries. This type of update is investigated by TomTom and once verified, is included in the next map release. These updates are therefore not shared with the Map Share community.
change, tap the Report button and your GO will save your current location. You can then send the update to TomTom Map Share when you have finished your journey. For more information see Changing my preferences for map updates on page 68. Receiving the latest map updates When you connect your TomTom GO to your computer, TomTom HOME automatically downloads any available map updates and sends any changes you have made, to the Map Share community.
To make an update to your map, tap Map corrections in the Main Menu then tap Correct a map error. The following types of updates are shown. Tap this button to block or unblock a street. You can block or unblock the street in one or both directions. (Un)block street For example, to correct a street near to your current location, do the following: 1. Tap (Un)block street. 2. Tap Near you to select a street near your current location.
Tap this button to change the name of a street on your map. vabckc sdn vk fbks sdjv Edit street name For example, to rename a street near to your current location: 1. Tap Edit street name. 2. Tap Near you. 3. Select the street or section of a street you want to correct by tapping it on the map. The street you select is highlighted and the cursor shows the name of the street. 4. Tap Done. 5. Type the correct street name. 6. Tap Done. Tap this button to change and report incorrect road turn directions.
Tap this button to edit an existing POI. You can use this button to make the following changes to a POI: Edit POI • Delete the POI. • Rename the POI. • Change the telephone number of the POI. • Change the category that a POI belongs to. • Move the POI on the map. Tap this button to report other types of update. These updates are not immediately corrected on your map. Your TomTom GO sends a special update report to TomTom Map Share.
19. Traffic information Traffic information You can obtain traffic information in three ways: • TomTom Traffic • Traffic Message Channel (TMC) Important: Reliable TMC Traffic reception is highly dependent upon optimal antenna placement, vehicle features such as windshield reflective shielding, the surrounding environment such as mountains and high buildings and RDSTMC Radio station transmission signal strength.
The Traffic Message Channel (TMC) TMC transmits traffic information as a radio signal and is available free-ofcharge in many countries. TMC is not a TomTom Service, but is available when using the TomTom RDSTMC Traffic Receiver. The TomTom RDS-TMC Traffic Receiver is included with some products and available as an accessory for others. Note: TomTom is not responsible for the availability or quality of traffic information provided by TMC. TMC is not available in all countries or regions. Go to tomtom.
20. TomTom Traffic TomTom Traffic TomTom Traffic is a TomTom Service for receiving up-to-date traffic information. TomTom Traffic requires a Bluetooth-enabled mobile phone and a wireless data connection (GPRS, EDGE, UMTS, CDMA). TomTom Traffic uses the most up-to-date information from the best local sources. For more information about subscribing see tomtom.com/services Setting up TomTom Traffic To use TomTom Traffic, you need to establish a connection between your mobile phone and your TomTom device.
Traffic information has not been updated for at least 15 minutes. Traffic information has not been updated for at least 30 minutes. Traffic information has not been updated for at least 45 minutes. Traffic information has not been updated for at least one hour. No connection is available between your TomTom device and your mobile.
Changing traffic preferences Use the Change Traffic preferences button to choose how traffic information works on your device. To change your traffic preferences, do the following: 1. Tap the TomTomTraffic button in the Main Menu on your device. Change Traffic preferences 2. Tap Change Traffic preferences.
In the example, the Traffic sidebar shows you that there are two incidents ahead. Both incidents are traffic jams, the first is 15km ahead and is expected to delay you by at least 51 minutes. To re-plan your route to avoid these incidents, tap the Traffic sidebar to open the TomTom traffic menu, then tap Minimize traffic delays. For more information see Using TomTom Traffic on page 75.
To see if there is a quicker way home, you could now tap the Find alternative button and then tap Minimize traffic delays. Tip: You can let your device automatically look for alternative routes by selecting Automatically minimize delays after every traffic update in your Traffic preferences. For more information, see Changing traffic preferences on page 76. Note: It is possible that the alternative route could be longer than your original one (even with its delays).
• Symbols shown in a red rectangle are weather related, because of their nature, you cannot use Traffic to avoid them. Traffic incident symbols and their meaning are shown below: Accident Road closed Road works Traffic incident One or more lanes closed Traffic jam Weather related symbols and their meaning are shown below: Fog Ice Rain Snow Wind Note: The incident avoided symbol is shown for any traffic incident that you avoid using TomTom Traffic.
Tap this button to read aloud all traffic incidents along your route. Read aloud traffic info Tap this button to get the latest traffic information straight away rather than waiting for an automatic update. Update traffic info For more information on automatic traffic updates, see Changing traffic preferences on page 76. Tap this button to disable TomTom Traffic. Disable Traffic Tap this button to view the guided tour on how to use TomTom Traffic.
21. Traffic information using RDS-TMC Traffic information using RDS-TMC The Traffic Message Channel (TMC) The Traffic Message Channel (TMC) is not a TomTom Service. FM radio stations in several countries broadcast TMC information as part of their programming. TMC is also known as RDS-TMC traffic information. Your TomTom navigation device uses this information to warn you about traffic delays along your route and how you can avoid them.
4. Then place the remaining suction cups along the edge of the windshield, as shown, and keep the cable straight. 5. Switch on your navigation device. The Traffic bar is shown in the Driving View and your navigation device searches for a radio station that carries RDS-TMC information. The following symbols are shown at the top of the Traffic sidebar: Your navigation device is searching for a radio station that carries RDS-TMC on that radio frequency.
Using RDS-TMC traffic information Your device receives traffic information when it is broadcasted. If there are any incidents on your route the Traffic sidebar on the right side of the Driving View warns you. An example of a Traffic sidebar with a traffic warning is shown to the left. For information on the Traffic sidebar, see The Traffic sidebar on page 86. 38 min 20 M In the example on the left there is a traffic jam on your route with an expected delay of 38 minutes, 12 miles ahead of you.
3. Select or clear the check box next to each preference you want to change. 4. Tap Done. Your device lists the countries that have radio stations providing RDSTMC traffic information that you can currently receive. Normally you can leave this set to Any country (strongest signal). For more information about this country setting, see Choosing the correct country for RDSTMC reception on page 86. 5. Tap Done.
To see if there is a quicker way home, you could now tap the Find alternative button and then tap Minimize traffic delays. Tip: You can let your device automatically look for alternative routes by selecting Automatically minimize delays after every traffic update in your Traffic preferences. For more information, see Changing traffic preferences on page 83. Note: It is possible that the alternative route could be longer than your original one (even with its delays).
Setting the radio frequency for RDS-TMC information If you know the frequency of a particular radio station you want to use for RDSTMC traffic information, do the following to set the frequency manually: To activate this feature, you must first enable manual tuning. To do this, tap the Traffic bar in the Driving View, then tap Change Traffic preferences. Select Tune manually by entering a frequency and then tap Done. 1. Tap the Traffic sidebar in the Driving View. 2. Tap Tune Manually. Tune manually 3.
In the example, the Traffic sidebar shows you that there are two incidents ahead. Both incidents are traffic jams, the first is 15km ahead and is expected to delay you by at least 51 minutes. To re-plan your route to avoid these incidents, tap the Traffic sidebar to open the TomTom traffic menu, then use Minimize traffic delays. For more information see Using RDS-TMC traffic information on page 83.
Traffic menu Tap the Traffic sidebar in the Driving View to open the Traffic menu. The following buttons are available: Minimize traffic delays Replans your route based on the latest traffic information. Minimize traffic delays Checks the traffic along your Home to Work route. See Making commuting to work easier on page 84. Show homework traffic Tap this button to show areas of traffic congestion along your current route. Show traffic on route Shows an overview of traffic incidents on the map.
22. Remote control Remote control Important: This TomTom product is Bluetooth enabled. Please note that in certain environments, such as hospitals or airplanes, you are required to switch off Bluetooth on all electronic devices. Inserting the batteries 1. Hold the sides of the remote control and press the latch on the back of the device. The keypad lifts out from the back of the device, as shown in the diagram. Take care not to drop the keypad. 2. Place the batteries in the remote control.
Establishing a connection Before your remote control can communicate with your TomTom GO, you need to establish a Bluetooth connection between your remote control and your GO. This Bluetooth process is also known as ‘pairing’. The first time you switch on your remote control, it tries to establish a connection with the nearest GO. To establish a connection, do the following: 1. Switch on your TomTom GO and tap Bluetooth preferences in the Preferences menu.
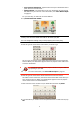
Buttons A B C D A Arrow buttons: • Move the cursor in menus. • Up and down buttons: zoom in and out on the map. • Left and right buttons: go to the previous and next song. B Select button: • Opens the Main Menu. • Selects a menu button. • Selects an item in a list, such as a list of POIs. C Soft buttons: • Select the left, middle and right buttons in menus. • The middle button plays and pauses tracks when playing music. • Select the bottom left and right areas of the screen in the Driving View.
23. Advanced Lane Guidance Advanced Lane Guidance Your TomTom GO helps you prepare for highway exits and intersections by showing you which lane you should be in. Note: This information is not available for all intersections or in all countries. For some exits and intersections, an image shows the turning and the lane you should take. To turn the images off, tap Hide lane images in the Preferences menu. For other exits and intersections, your GO shows the lane you should take in the Status bar.
24. How Does Navigation Work? How Does Navigation Work? Global Positioning System (GPS) In order to navigate you to your destination, your TomTom GO must know where you are now. To find your current position, your GO uses the Global Positioning System (GPS). GPS is available for free and without subscription. GPS uses satellites to transmit signals to GPS receivers. Your TomTom GO has a built-in GPS receiver. Using the GPS signal, your GO can work out where you are and how fast you are going.
25. Using TomTom HOME Using TomTom HOME TomTom HOME is a free software program for your computer that enables you to: • Manage maps, voices, POIs and more. • Transfer music and photos to your TomTom. • Buy TomTom services and manage your subscriptions. • Update your TomTom with the latest software and services automatically. • Make and restore backups. • Set a password to restrict access. • Read the full version of the user manual.
26. TomTom Limited Warranty TomTom Limited Warranty WARRANTOR U.S. and Canadian Purchases: If you have made your purchase in the United States or Canada, this Limited Warranty is granted by and this Limitation of Liability is stipulated for the benefit of TomTom Inc., 150 Baker Avenue Extension, Concord Massachusetts 01742 (United States of America). WHAT THIS WARRANTY COVERS 1) TomTom Inc.
YOUR LEGAL RIGHTS 4) This Limited Warranty gives you specific legal rights, and you may also have other rights which vary from state to state and jurisdiction to jurisdiction. 5) If any part of this Limited Warranty is held to be invalid or unenforceable, the remainder of the Limited Warranty shall nonetheless remain in full force and effect.
27. Addendum Addendum Important Safety Notices and Warnings Global Positioning System The Global Positioning System (GPS) is a satellite-based system that provides location and timing information around the globe. GPS is operated and controlled under the sole responsibility of the Government of the United States of America which is responsible for its availability and accuracy. Any changes in GPS availability and accuracy, or in environmental conditions, may impact the operation of your TomTom device.
SPECIAL NOTE REGARDING DRIVING IN CALIFORNIA AND MINNESOTA California Vehicle Code Section 26708 (a) (1) provides that “No persons shall drive any motor vehicle with an object or material placed, displayed, installed, affixed or applied upon the windshield or side or rear windows.” Drivers in California should not use a suction mount on their windshield, side or rear windows. Note: this section of the California Vehicle Code applies to anyone driving in California, not just California residents.
Important This equipment was tested for FCC compliance under conditions that included the use of shielded cables and connectors between it and the peripherals. It is important that you use shielded cable and connectors to reduce the possibility of causing radio and television interference. Shielded cables, suitable for the product range, can be obtained from an authorised dealer.
AT, CH, CZ, DE, DK, EE, FI, GB, LI, LU, NO, PT, SE C-tick N14644 Z468 This product displays the C-tick to show it complies with relevant Australian and New Zealand regulations. A-tick N14644 Z468 This product displays the A-tick to show it complies with relevant Australian and New Zealand regulations. Warning for Australia The user needs to switch off the device when exposed to areas with potentially explosive atmospheres such as petrol stations, chemical storage depots and blasting operations.
28. Copyright notices Copyright notices © 2008 TomTom International BV, The Netherlands. TomTom™ and the "two hands" logo are among the trademarks, applications or registered trademarks owned by TomTom International B.V. Our limited warranty and end user license agreement for embedded software apply to this product; you can review both at www.tomtom.com/legal Data Source © 2008 Tele Atlas N.V.
SoundClear™ acoustic echo cancellation software © Acoustic Technologies Inc. MPEG Layer-3 audio coding technology licensed from Fraunhofer IIS and Thomson.