TomTom GO Reference Guide
Contents Welcome to navigation with TomTom 5 Get going 6 Installing in your car ...........................................................................................................................6 Positioning the device ........................................................................................................................6 Switching on and off ..........................................................................................................................6 Setting up...
Other buttons ....................................................................................................................................23 Volume control .................................................................................................................................24 Using search 25 About search ....................................................................................................................................25 Planning a route using search ...................
My Places 51 About My Places...............................................................................................................................51 Set your home location ....................................................................................................................51 Change your home location ............................................................................................................52 Add a location from My Places ...........................................
Welcome to navigation with TomTom This Reference Guide explains all you need to know about your new TomTom GO navigation device. If you want a quick read of the essentials, we recommend that you read the Get going chapter. This covers installation, switching on, setting up and planning your first route. After that, you will probably want to connect to TomTom services and you can read all about that in the Connecting to services chapter.
Get going Installing in your car Use the mount provided with your device to install your TomTom GO device in your vehicle. Read the instructions about positioning your device before you install your device. To install your device, do the following: 1. Connect the USB cable to the mount. If the mount is integrated into your device, connect the USB cable to the device. 2. Connect the USB cable to the USB car charger and plug this into the power supply on your dashboard. 3.
You can also press the On/Off button for more than 2 seconds until you see the Sleep and Turn Off buttons. Select Sleep to make the device sleep. Note: If you have planned a route, the route is saved. Tip: To send your navigation device to sleep when it is removed from the mount, go to Battery settings in the Settings Menu.
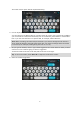
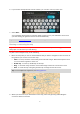
The search screen opens with the keyboard showing. 3. Use the keyboard to enter the name of the place you want to plan a route to. You can search for an address but you can also search for a town, city or postcode. In addition you can search for a POI (Point of Interest), such as a restaurant, petrol station or tourist attraction or you can enter the name of a specific POI, for example, "Rosie's Pizzeria". Note: When searching, the whole map is searched.
6. If you haven't already entered a house number, you can do it now if you have one. 7. Select Drive. Your navigation device plans a route then starts to guide you to your destination. As soon as you start driving, the guidance view is shown automatically. Tip: You can add a stop to a route that you have already planned. Planning a route using the map Important: In the interest of safety and to reduce distractions while you are driving, you should always plan a route before you start driving.
A pop-up menu shows the nearest address. 3. To plan a route to this destination, select the drive button: Your navigation device plans a route then starts to guide you to your destination. As soon as you start driving, the guidance view is shown automatically. Tip: You can use the location you selected in other ways, such as adding it to My Places, by selecting the pop-up menu button. Tip: You can add a stop to a route that you have already planned.
Connecting to TomTom services About TomTom services TomTom services give you real-time information about traffic and speed cameras on your route. To get TomTom services on your GO you need a MyTomTom account. The way you connect your GO to TomTom services depends on your navigation device. A GO can connect in one of the following ways: With a permanent connection directly from your GO. These navigation devices are called 'Always Connected' devices. With a connection via your smartphone.
Personal Area Networks Your phone shares its internet connection by using the phone's Bluetooth and Personal Area Network (PAN) functions. Depending on your phone's Operating System, this network, or PAN, might be called one of the following names: Personal Hotspot Tethering or Bluetooth Tethering Tether or Bluetooth Tether The PAN function is probably already in your phone's Operating System, or you can download an app to create a PAN.
Bluetooth not connected. Bluetooth connecting. Your device is trying to automatically connect to your phone. Bluetooth connected. Your device is connected to your phone. If you want to connect using another phone, you must turn on Personal Area Network (PAN) and Bluetooth on that phone, then let your device search for the phone. Connect to TomTom services using a different smartphone 1. Select Traffic and Speed Cameras or Traffic and Danger Zones in the Main Menu. 2. Select Manage phones. 3.
My device Memory card slot Some TomTom navigation devices have a memory card slot that is located on the side or bottom of the device. Before you use the memory card slot, make sure that you have the latest version of the application installed on your navigation device by connecting to MyTomTom using a computer. When your device is up-to-date, you can use a memory card as extra storage space to add extra maps to your device. Maps can be purchased from tomtom.com.
4. Select the button to turn sending of information on or off. Note: If you choose not to share this information, you will no longer receive our services. This is because services need to send the location of your device to TomTom in order to receive the traffic information related to where you are. The end date of your subscription remains the same, even if you do not share this information with us.
What's on the screen The map view The map view is shown when you start your navigation device and you have no planned route. Your actual location is shown as soon as your device has found your GPS location. You can use map view in the same way as you might look at a traditional paper map. You can move around the map using gestures, and zoom using the zoom buttons. The map shows your current location and many other locations such as your My Places locations.
5. Selected location. Press and hold to select a location on the map. Select the pop-up menu button to show options for the location, or select the drive button to plan a route to the location. 6. Main Menu button. Select the button to open the Main Menu. 7. Map symbols. Symbols are used on the map to show your destination and your saved places: Your destination. Your home location. You can set your home location in My Places. A stop on your route. A location saved in My Places. 8.
When your navigation device starts after it was turned off and you have a route planned, you are shown the map view with your current location. 1. Switch view button. Select the switch view button to change between the map view and the guidance view. 2. Zoom buttons. Select the zoom buttons to zoom in and out. 3. Instruction panel. This panel shows the following information: The direction of your next turn. The distance to your next turn. The name of the next road on your route.
The route bar The route bar is shown when you have planned a route. It has a destination panel at the top, and a bar with symbols underneath. The destination panel shows the following information: The estimated time that you will arrive at your destination. The length of time to drive to the destination from your current location. The distance to your destination from your current location.
As you approach an exit or junction, the lane you need is shown on the screen and in the instruction panel. Tip: To close the lane image, select anywhere on the screen or press the back button. To turn lane images off, select Settings in the Main Menu, then select Appearance. Switch off the Show previews of motorway exits setting.
Using gestures All about gestures You need to use gestures to control your navigation device. This Reference Guide explains which gestures to use throughout the guide but here is a complete list of all the gestures you can use. Double tap Touch one finger on the screen twice in rapid succession. Example of when to use this: Zooming in on the map. Drag Put one finger on the screen and move it across the screen. Example of when to use this: Scrolling around in the map.
Main Menu Navigation buttons On the map view or guidance view, select the Main Menu button to open the Main Menu. The following navigation buttons are available in the Main Menu: Search Current route My Places Parking Petrol Station Traffic and Safety Warnings Select this button to search for an address, a place or a Point of Interest, then plan a route to that location. Select this button to clear or change your planned route. Select this button to show your saved places.
Other buttons On the map or guidance view, select the Main Menu button to open the Main Menu. The following buttons are available in the Main Menu screen, in addition to the navigation buttons: Select this button to open the Settings Menu. Select this button to open the Help Menu. The Help Menu contains a guided tour and information about your GO. Select this button to return to the previous screen.
Select this button to increase the brightness of the screen and display the map in brighter colours. Volume control On the map or guidance view, select the Main Menu button to open the Main Menu. Select and slide the volume control to change the volume of voice instructions and warnings. If the voice instructions are switched off, the volume control will still change to volume of the warnings.
Using search About search To find a wide range of places and then navigate to them, you use search. Using search you can do the following: Search for a specific address, for example, 123 Oxford Street, London. Search for a partial address, for example, Oxford st Lon. Search for a type of place, for example, petrol station, restaurant. Search for a place by name, for example, Starbucks. Search for a postcode, for example, W1D 1LL for Oxford Street, London.
You can search for an address but you can also search for a town, city or postcode. In addition you can search for a POI (Point of Interest), such as a restaurant, petrol station or tourist attraction or you can enter the name of a specific POI, for example, "Rosie's Pizzeria". Note: When searching, the whole map is searched. If you want to change how the search is done, select the button to the right of the search box.
Entering search criteria Select Search in the Main Menu to start searching for addresses and POIs. The search screen opens showing the keyboard and the following buttons: 1. Back button. Select this button to go back to the previous screen. 2. Search input box. As you enter search criteria, hints are shown to help you and then suggestions are shown. 3. Type of search. By default, the whole of the current map is searched.
stations. When prompted, enter the type of location and then select it in the right-hand column to carry out the search. Near destination When a route has been planned, you can select this option to use your destination as the centre for your search. 4. View button. Select this button to return to the map view or guidance view. 5. Show all button. Select this button to hide the keyboard and show the list of results. 6. Show keyboard. Select this button to show or hide the keyboard.
When you select an address from the list of search results, you can choose to show it on the map, add a crossroad or plan a route to that chosen location. If you show the result on the map, you can use the pop-up menu to add the location to My Places or search near this location. If a route is already planned, you can add the location to your current route.
Planning a route Planning a route using search Important: In the interest of safety and to reduce distractions while you are driving, you should always plan a route before you start driving. To plan a route using search, do the following: 1. Select the Main Menu button to open the Main Menu: 2. Select Search. The search screen opens with the keyboard showing. 3. Use the keyboard to enter the name of the place you want to plan a route to.
5. Select an address suggestion. 6. If you haven't already entered a house number, you can do it now if you have one. 7. Select Drive. Your navigation device plans a route then starts to guide you to your destination. As soon as you start driving, the guidance view is shown automatically. Tip: You can add a stop to a route that you have already planned.
. 2. When you have found your destination on the map, select it by pressing and holding the screen for about one second. A pop-up menu shows the nearest address. 3. To plan a route to this destination, select the drive button: Your navigation device plans a route then starts to guide you to your destination. As soon as you start driving, the guidance view is shown automatically. Tip: You can use the location you selected in other ways, such as adding it to My Places, by selecting the pop-up menu button.
Tip: You can add a stop to a route that you have already planned. Planning a route using My Places To navigate to one of My Places from your current location, do the following: 1. Select the Main Menu button to open the Main Menu: 2. Select My Places. A list of all your Places opens. 3. Select the Place you want to navigate to, for example Home. Your chosen Place is shown on the map with a pop-up menu. 4.
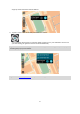
Finding a car park To find a car park, do the following: 1. Select the Main Menu button to open the Main Menu: 2. Select Parking. The map opens showing the locations of car parks. If a route is planned, the map shows car parks near your destination. If a route isn't planned, the map shows car parks near your current location. You can change the screen to show a list of car parks by pressing this button: You can select a car park from the list to locate it on the map.
If you want to change how the search is done, select the button to the right of the search box. You can then change where the search is carried out, for example, to search near you or the whole map. 3. Select a car park from the map or the list. A pop-up menu opens on the map showing the name of the car park. 4. To plan a route to your chosen car park, select the drive button: Your navigation device plans a route then starts to guide you to your destination.
Tip: You can add a car park as a stop on your route by using the pop-up menu. Finding a petrol station To find a petrol station, do the following: 1. Select the Main Menu button to open the Main Menu: 2. Select Petrol Station. The map opens showing the locations of petrol stations. If a route is planned, the map shows petrol stations along your route. If a route isn't planned, the map shows petrol stations near your current location.
If you want to change how the search is done, select the button to the right of the search box. You can then change where the search is carried out, for example, to search near you or the whole map. 3. Select a petrol station from the map or the list. A pop-up menu opens on the map showing the name of the petrol station. 4. To plan a route to your chosen petrol station, select the drive button: Your navigation device plans a route then starts to guide you to your destination.
Changing your route The Current Route Menu When you have planned a route, select the Current Route button in the Main Menu to open the Current Route Menu. The following buttons are available in the Current Route Menu: Clear Route Select this button to clear the currently planned route. The Current Route Menu closes and you return to the map view. Change Route Type Select this button to change the type of route used to plan your route. Your route will be recalculated using the new route type.
Types of route Select Change Route Type to change the type of route planned to your current destination. Your route is recalculated using the new route type. You can select the following types of route: Fastest route - the fastest route to your destination. Shortest route - the shortest route to your destination. This may take much longer than the fastest route. Most eco-friendly route - the most fuel-efficient route. Avoid Motorways - this type of route avoids all motorways.
2. Zoom in on the map, then press and hold to select a location. 3. Select the pop-up menu button. 4. Select Add to Current Route. Your route is recalculated to include your stop. Delete a stop from your route 1. Press the switch view button to show the map. Your complete route is shown on the map. 2. In the route bar, press the stop you want to delete. The map zooms in to the stop and shows a pop-up menu. Tip: If you select the wrong stop press the back button to return to the map. 3.
Traffic About TomTom Traffic TomTom Traffic is a unique TomTom service providing real-time traffic information. For more information about TomTom services, go to tomtom.com/services. In combination with IQ Routes, Traffic helps you plan the optimum route to your destination taking into account the current local traffic conditions. Your TomTom GO device regularly receives information about the changing traffic conditions.
The route bar The route bar is shown when you have planned a route. It has a destination panel at the top, and a bar with symbols underneath. The destination panel shows the following information: The estimated time that you will arrive at your destination. The length of time to drive to the destination from your current location. The distance to your destination from your current location.
Tip: Select an incident on the map to see more detailed information. 1. Traffic incident that affects your route in your direction of travel. A symbol or number at the start of the incident shows the type of incident or the delay in minutes, for example 5 minutes. The colour of the incident indicates the severity of the incident with red being the most serious. The stripes on the traffic jam are animated to show the speed of the incident, where appropriate.
To get more information about an incident, select an incident in the route bar. The map opens zoomed in on the incident and a pop-up opens showing detailed information about the traffic incident. The information shown includes: The type of traffic incident - general, accident, road works or lane closure. The severity of the incident - slow traffic, queuing traffic or stationary traffic. The delay time. The length of the incident. For a complete list of incident types, see Traffic incidents.
Road closure 45
Speed Cameras About speed cameras Note: TomTom services are not available in all countries or regions, and not all services are available in all countries or regions. You may be able to use TomTom services when travelling abroad. For more information on available services, go to tomtom.com/services. The Speed Cameras service warns you about the following camera locations: Fixed speed camera locations. Mobile speed camera locations. Mobile speed camera hotspots. Average speed camera locations.
Changing the way you are warned - speed cameras To change the way your TomTom GO navigation device warns you about speed cameras, select the Sounds and Warnings button in the Settings Menu. You can then set how you want to be warned for the different types of cameras and safety zones. You can change settings for whether you want to be warned, never warned or warned only if you are speeding. For example, to change how you are warned when you approach a fixed speed camera, do the following: 1.
shown, instead of your current speed. When you are in the speed check zone, the visual warning continues to be shown in the route bar. Speed enforcement zone - these zones can contain multiple speed cameras. You are warned at the start and end of the speed enforcement zone. While you are driving in a speed enforcement zone, your current speed is shown. When you are in the speed check zone, the visual warning continues to be shown in the route bar.
Danger Zones About danger zones Since 3rd January 2012, it has been illegal to receive warnings about the position of fixed or mobile speed cameras when you are driving in France. To be compliant with this change in French law, speed camera locations are no longer reported but instead areas of danger are indicated as zones. In France, TomTom terminated the Speed Cameras service and introduced a new service called TomTom Danger Zones.
Changing the way you are warned To change the way your TomTom GO device warns you about danger zones, select the Sounds and Warnings button in the Settings Menu. You can change settings for whether you want to be warned or not. For example, to change how you are warned when you approach a danger zone, do the following: 1. Select Sounds and Warnings in the Settings Menu. 2. Select Safety warnings. 3. Select Danger zones. 4. Select whether you always want to be warned or warned only when you are speeding.
My Places About My Places My Places provides an easy way to select a location without the need to search for the location each time. You can use My Places to create a collection of useful addresses. The following items are always in My Places: Home - Your home location can be somewhere you often visit, such as your office. This feature provides an easy way to navigate there.
Change your home location 1. In the Main Menu, select My Places. 2. Select Home. Your home location is shown on the map, with a pop-up menu. 3. Select Edit this Location. 4. To select a new home location, do one of the following: Zoom in on the map at the location you want to select. Press and hold to select the location, then select the home location symbol. Select the Search button and search for a location. Select a location set as home. Select Set home location. Add a location from My Places 1.
Flick - to scroll the map a long way, flick the tip of a finger across the screen. Tip: For a complete list of gestures, see Using gestures. 2. Press and hold to select the location. 3. Select the pop-up menu button. 4. Select Add to My Places. The name of the location is shown in the edit screen. 5. Edit the name of the location so you can easily recognise it. 6. Select Done to save your location in the My Places list. Add a location to My Places using Search 1. In the Main Menu, select Search. 2.
Delete a location from My Places 1. In the Main Menu, select My Places. 2. Select Edit List. 3. Select the places you want to delete. 4. Select Delete.
Settings Appearance Select Settings in the Main Menu, then select Appearance. On this screen, you can change these settings: Switch to night colours when dark Select this setting to make the device automatically switch to night colours when it gets dark. Show previews of motorway exits Select this setting to control the full screen preview when you approach motorway exits. Automatically change views By default, automatic changing of views is on.
Destination panel Select Settings in the Main Menu, then select Appearance. Select Destination panel to change the following settings: Show remaining distance Select this setting to show the remaining distance left to travel in the destination panel during navigation. Show remaining time Select this setting to show the remaining time left to travel in the destination panel during navigation.
Read aloud road sign information Use this setting to control whether road sign information is read aloud as part of navigation instructions. Read aloud street names Use this setting to control whether street names are read aloud as part of navigation instructions. Read aloud foreign street names Use this setting to control whether foreign street names are read aloud as part of navigation instructions. Maps Select Settings in the Main Menu, then select Maps.
Always take the fastest route Ask me so I can choose Don't ask me Always plan this type of route The types of route you can choose from are as follows: Fastest route - the route which takes the least time. Shortest route - the shortest distance between the locations you set. This may not be the quickest route, especially if the shortest route is through a town or city. Most eco-friendly route - the most fuel-efficient route for your journey.
Fixed cameras Mobile cameras Mobile camera hotspots Average speed zones Speed enforcement zones Red light cameras Traffic restriction cameras Safety warnings Select Settings in the Main Menu, then select Sounds & Warnings. Select Safety warnings. You can then set how you want to be warned for the different types of safety zones. You can change settings for advance warning time and whether you want to be warned, never warned or warned only if you are speeding.
Keyboards Select this setting to choose from a list of available keyboards. You use the keyboard to enter names and addresses, such as when you plan a route or search for the name of a town or a local restaurant. Units Select this setting to choose the units used on your device for features such as route planning. If you want the units to be set by the GPS, select Automatic.
Guided tour Select this option to use the guided tour. The tour is short and includes basic information to help you get going with your new device. About See System.
Help Help menu options The following options are available in the Help Menu: Guided Tour Select this option to get a short tutorial on how to use your navigation device. About Select this option to see information about your device application version, map, copyrights and licences.
MyTomTom About MyTomTom MyTomTom helps you manage the contents and services of your TomTom GO navigation device, as well as giving you access to the TomTom community. You log in to MyTomTom on the TomTom website. It is a good idea to frequently connect your navigation device to MyTomTom to ensure you always have the latest updates. Tip: We recommend using a broadband internet connection whenever you connect your navigation device to MyTomTom.
4. You may have to select your country to continue. 5. On the left hand side, click Download MyTomTom. Your browser downloads the MyTomTom support application, which you need to install on your computer in order to connect your device to MyTomTom. Follow the instructions on the screen if you are asked questions while downloading. 6. When prompted, connect your device to your computer using the USB cable. Then switch your device on.
Addendum Important Safety Notices and Warnings Global Positioning System (GPS) and Global Navigation Satellite System (GLONASS) The Global Positioning System (GPS) and Global Navigation Satellite System (GLONASS) systems are satellite-based systems that provide location and timing information around the globe. GPS is operated and controlled under the sole responsibility of the Government of the United States of America, who are responsible for its availability and accuracy.
Battery This product uses a Lithium-Ion battery. Do not use it in a humid, wet and/or corrosive environment. Do not put, store or leave your product in or near a heat source, in a high temperature location, in strong direct sunlight, in a microwave oven or in a pressurised container, and do not expose it to temperatures over 50°C (122°F). Failure to follow these guidelines may cause the battery to leak acid, become hot, explode or ignite and cause injury and/or damage.
Promptly dispose of used batteries in accordance with local regulations. Battery usage by children should be supervised. Avoid dropping the device. If the device is dropped, especially on a hard surface and the user suspects damage, take it to a service centre for inspection. Improper battery use may result in a fire, explosion or other hazard.
Minnesota State Legislature Statutes Section 169.71, subdivision 1, section 2 provides that "A person shall not drive or operate with any objects suspended between the driver and the windshield other than sun visors and rearview mirrors and electronic toll collection devices." Note: this Minnesota Stature applies to anyone driving in Minnesota, not just Minnesota residents. TomTom Inc. bears no responsibility for any fines, penalties or damage that may be incurred by disregarding this notice.
Important This equipment was tested for FCC compliance under conditions that included the use of shielded cables and connectors between it and the peripherals. It is important that you use shielded cable and connectors to reduce the possibility of causing radio and television interference. Shielded cables, suitable for the product range, can be obtained from an authorized dealer.
Guidelines for people with pacemakers You should ALWAYS keep the device more than 15cm (6 inches) from your pacemaker. You should not carry the device in a breast pocket. Other medical devices Please consult your physician or the manufacturer of the medical device, to determine if the operation of your wireless product may interfere with the medical device.
C-tick N14644 This product displays the C-tick to show it complies with relevant Australian regulations. Customer support contact Australia: 1300 135 604 New Zealand: 0800 450 973 Notice for New Zealand This product displays supplier code Z1230 to show it complies with relevant New Zealand regulations. Warning for Australia The user needs to switch off the device when exposed to areas with potentially explosive atmospheres such as petrol stations, chemical storage depots and blasting operations.
Copyright notices © 2013 TomTom. All rights reserved. TomTom and the "two hands" logo are registered trademarks of TomTom N.V. or one of its subsidiaries. Please see tomtom.com/legal for limited warranty and end user licence agreements applying to this product. © 2013 TomTom. All rights reserved. This material is proprietary and the subject of copyright protection and/or database rights protection and/or other intellectual property rights owned by TomTom or its suppliers.