07/2006 M19K272 取扱説明書 Instructions manual ストレートフロントパイプ VQ35DE Straight front pipe VQ35DE 品 番 Part Number 193094 適 合 : Z33、V35(※セダン(PV35)を除く) VQ35DE搭載車 Application: Z33 , V35 with the VQ35DE engine 日本語・・・・・・・・・・・・・・3p English・・・・・・・・・・・・・・ 7p - 1 -
- 2 -
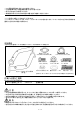
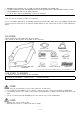
●この取扱説明書を良く読んでからお使いください ●日産自動車の発行する整備要領書と併せてお使いください ●取り付け後も大切に保管してください ●販売店様で取り付けをされる場合は本書を必ずお客様へお渡しください TOMEI 製品のお買い上げありがとうございます。 TOMEIストレートフロントパイプは、エキゾ−ストマニホールドとの組み合わせや、サーキットなどの走行時に排気効率を 重視した仕様とする場合に効果的です。 部品構成 下記の内容・数量が揃っているかを確認してください。( )内は同梱されている数量です。 ガスケットA (2) ※ストレートフロントパイプ-エキゾ-ストフロントチューブ間 フランジボルト M10×1.5 (8) ストレートフロントパイプ本体 (右/左) ブラインドボルト(2) ガスケットB (2) ※マニホールド-ストレートフロントパイプ間 フランジナット M10×1.
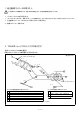
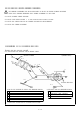
1.純正触媒コンバータの取り外し ここで記載するのは簡易手順です。各部の詳細な脱着方法は、必ず整備要領書を参照してください。 1. バッテリーマイナス端子を取り外す。 2. リヤO2センサーコネクター を取り外す。※この時復帰時に右、左バンク用の各カプラー同士の判別がつきやすいようにしておく。 3. 左右触媒コンバータ∼トランスミッション間のブラケットを取り外す。 4. 触媒コンバーターを取り外す。 2.TOMEI ストレートフロントパイプの取り付け 【各ボルト・ガスケットの装着位置図】 同梱のボルト、ガスケットの使用箇所は下図の通りです。 ③ (例:右バンク) エキゾーストマニホールド ⑦※ ① ③ ⑧ ※② ②※ ⑤ ②※ ③ ⑥ ④ ③ ⑨※ エキゾーストフロントチューブ ②※ <キット内付属品使用箇所と締付けトルク> ① ② ③ ④ ⑤ ⑥ <ノーマル使用箇所と締め付けトルク> ガスケットA (マニ - ストレートフロントパイプ間) フランジボルト フランジナット [34.3∼39.2N・m(3.5∼4.
【装着手順】 1.あらかじめ取り外したノーマル触媒コンバーターから、リアO2 センサーを取り外し、ストレートフロントパイプに取り付 ける。この時、センサーがノーマルから取り外した時と左右が逆にならないよう注意する。 ※締め付けトルク リアO2センサー(前頁⑨)[40∼50N・m(4.1∼5.1kgf-m)] 【参 考 】 A/F計などの機器センサー類をストレートフロントパイプに取り付けない場合は、付属の銅ワッシャーおよびブラ インドボルトを使用し、O2センサーを差し込まない側のボスを塞いでください。(前頁⑤、④) 尚、このボスのサイズはM18-P1.5です。 2.ストレートフロントパイプを付属のガスケットを用いて、それぞれ挟み、取り付ける。 【エキゾ−ストマニホールド側】 ※付属ガスケットA、前頁①使用 締め付けトルク 付属ナット使用部分(前頁③)[34.3∼39.2N・m(3.5∼4.0kgf-m)] 純正ナット使用部分(前頁⑧)[60∼66N・m(6.1∼6.
Notes - 6 -
● ● ● ● Installation of the production is to be carried out after the instructions are carefully read. For further reference, compare this instruction sheet with the authentic Nissan Motor Corporation workshop manual. After installation, keep this copy for future reference. Be sure to give a copy of this instruction manual to the customer. Thank you for the purchase of this TOMEI product. The TOMEI straight front pipe is an effective exhaust component, which allows for a more efficient exhaust flow.
1. Removal of Genuine catalyst converter The following descriptions are simple procedures to remove the factory catalyst converter. Refer to the servicing instruction for a detailed description on each part. 1. Remove negative battery terminal. 2. Remove Rear oxygen sensor. ※ Be sure to label the left and right O2 sensors 3. Remove the bracket between the catalyst convertor and transmissions. 4. Remove the catalyst converter. 2. Installation of TOMEI straight front pipe 【Diagram for each bolt and gasket.
【Installation procedure 】 1.Remove rear O2 sensor from the orginal catalyst converter and install it in the straight front pipe. ※Tightening torque rear O2 sensor( Front Page ⑨)[(The previous page⑨)[40-50N・m(4.1-5.1kgf-m] 【Reference】 When you do not install an aftermarket A/F meter, use the supplied copper washer and plugging bolt This boss's size is M18-P1.5. 2. Using the supplied gasket, insert the straight front pipe, and attach it.
Notes - 10 -
1737-3 Tsuruma Machida-shi Tokyo 194-0004,JAPAN Telephone +81-42-795-8411(main switchboard) /Facsimile +81-42-799-7851 URL:http://www.tomei-p.co.jp ● If you have any questions in regards to the installation of this product, please contact your local distributor or Tomei Powered in the above contact details. OPEN: Monday - Friday (National holidays and public holidays excluded).
〒194-0004 東京都町田市鶴間1737−3 TEL 042−795−8411(代) FAX 042−799−7851 http://www.tomei-p.co.