
Owner manual
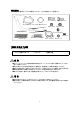


1.REMOVING THE STOCK ASSEMBLY.
The followin
g
are basic instructions. For more details
p
lease refer to the vehicle's
official service manual.
1. Disconnect the ne
g
ative battery terminal.
2. Remove the heat shield around the turbine (u
pp
er, lower and side) and then remove
the O2 sensor.
3. Remove the catalyst.
・Take care when removin
g
the nuts and bolts as these will be reused when installin
g
the
p
roduct.
・The removed catalyst and attached
g
asket will not be reused.
CAUTION
・ When
j
ackin
g
u
p
the vehicle,
p
ay close attention to where you
p
lace the
j
ack.
Incorrect
p
lacement of the
j
ack can war
p
and/or dama
g
e the vehicle
Ensure ri
g
id
j
ack stands are in
p
lace before commencin
g
any work.
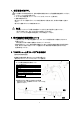
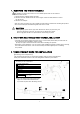
2.THE STOCK HEAT SHIELD AND THERMAL INSULATION
・ The lower and side heat shield removed in ste
p
1 can be safel
y
stored awa
y
as these will not
be reused durin
g
the installation of this
p
roduct.
※ Onl
y
the u
pp
er heat shield will be reused when installin
g
this
p
roduct.
・ De
p
endin
g
on the a
pp
lication,
y
ou ma
y
need to a
pp
l
y
additional thermal insulation after removin
g
the heat shield. These items, such as exhaust wra
p
, should be a
pp
lied
p
rior to installin
g
this
p
roduct.
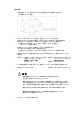
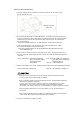
3.TOMEI STRAIGHT DOWN PIPE INSTALLATION
【Positionin
g
of the com
p
onents】
The
p
ositionin
g
of each
p
art is shown below to
g
ether with the tor
q
ue s
p
ecifications.
Stock
p
arts should be used for nuts, bolts and
g
askets without a
p
art number.
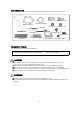
<Positioning of the included parts
and torque specification>
① Turbine Gasket
② Muffler Gasket
③ Cap Bolts【34.0~39.0N・m(3.5~4.0kgf-m)】
④ Disc Spring
⑤ Flange Bolt
⑥ Flange Nut 【34.0~39.0N・m(3.5~4.0kgf-m)】
⑦ Clamp Band【25.0N·m(2.6kgf-m)】
⑧ Blind Plug Use when not installing
⑨ Copper Washer an A/F meter
※
For areas affected by hi
g
h tem
p
eratures
a
pp
ly the included Smooth Bolt Paste
to
p
revent the
p
arts from becomin
g
seized.
7
⑤※
⑤※
⑥
⑥
⑦
⑧
⑨
②