
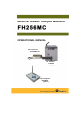
User's Manual

6. Operation
6-1 Precaution
① Handle the torque wrench with care.
② Read the Operation Manual before operation.
③ In case that the an adjustable screw of Preset/Pre-lock type wrench is changed, the
switching mechanism may not work well. Please contact a Tohnichi authorized distributor or
Tohnichi office for replacing a Stud of the torque wrench.
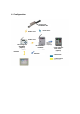
6-2 Replacing RF Transceiver
① Loosen two screws of the transceiver and remove it.
② Install the transceiver, and tighten the screws. (Tightening torque T=270cN・m)
Note: Stud, which comes from wrench, should not be between place spring and the Battery
case when installing the Transceiver.
6-3 Setting the Time to Avoid Double Counting
① The Timer is set to 1 second when delivered.
② To change the time setting, return the variable resistance (VR2) on the Receiver board.
(Refer to “5. Appearance and components”.)
③ The time can be set between 0.2 sec and 2.2 sec.
6-4 Battery Check
① Push the Transmitter-Receiver Check Switch.
② If the Operation Check LED is Green, the battery should be serviceable. If it is red,
replace the battery. Refer to “6-5 Replacing Battery for Transmitter”.
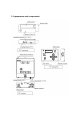
6-5 Replacing Battery for RF Transceiver
① Loosen two screws of the battery cover and remove it.
② Remove the empty Battery, and insert a new one.
③ Always use an AAA Alkaline Battery.
④ Install the battery cover, and tighten the screws by a torque driver. (Tightening torque
T=63cN・m)