
User Guide


Before You Start
If you purchased the SC Tablet (Speech Case and iPad bundle), turn on the iPad and follow the on-screen
instructions to complete the setup process. Make sure to select Set Up Manually and choose a Wi-Fi
Network as soon as you are prompted to do so.
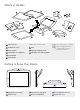
Step 1: Place iPad in Speech Case
Lay the iPad (screen up) on a flat surface.
Place the iPad Frame Cover on top of the iPad and push down to snap it into place.
Align the iPad’s charging port with the corresponding hole in the Speech Case, then
slide the edge of the iPad under the flexible lip at the top of the Speech Case.
Angle the iPad down to lay flat inside the Speech Case.
Use your fingers to bend the flexible lip around and over the edges of the iPad.
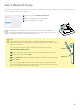
Step 2: Set the Mode
Set the mode on the Access Method Selector BEFORE using the device. Use the decision
tree to determine the best mode for the user.
Touch position (T): The unit will say “Power On” and make 1 click.
Scanning position (S): The unit will say “Power On” and make 2 clicks.
Position (O) is for shipping and extended storage.
1
2
3
4
5
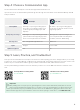
Set to S for iOS scanning
■ Access all apps and files using scanning.
■ Not compatible with certain TD Snap Core First
scanning features.
■ Configure scanning options in iOS Accessibility
Settings.
■ To use iOS scanning in TD Snap, set the access
method in TD Snap to Touch.
Is the user experienced and comfortable
with using the scanning access method?
Set to T
Set to T for TD Snap Scanning
■ Best for users new to scanning.
■ Customize with TD Snap scanning features such as
Group Scanning, Auditory Cues, and Hold Time.
■ Scanning is limited to TD Snap. Items outside of
TD Snap cannot be scanned.
Touch
Scanning
YES NO
How will the user make selections on the device?
If you need to change the mode, please refer to the Speech Case User Manual.
1