
Daim Ntawv Qhia Tus Neeg Siv

iPad mini
Getting Started Guide
MobileDemand Case
Safety and Compliance
Document
Carrying Case
1
1
2
2
3
3
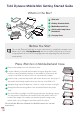
What’s in the Box?
Before You Start
Turn on the iPad and follow the on-screen instructions to complete the setup process.
Make sure to select Set Up Manually and choose a Wi-Fi network as soon as you
are prompted to do so. The TD Snap app and some supporting files will download
automatically.
Place iPad mini in MobileDemand Case
Remove the rubber boot from the plastic shell.
Lay the rubber boot flat with the bumpers facing up. Align the volume
buttons on the iPad with the buttons on the rubber boot, then tuck the
corners of the iPad into the boot. Do not over-stretch the rubber.
Insert the top corner with the power and volume buttons into the top lip of
the plastic shell. Gently wrap the shell over the top of the iPad to fit.
Squeeze along top short edge from corner to corner to ensure a snug fit.
Gently press the remaining sides of the encased iPad into the plastic
shell.
Go around the long edges of the iPad and make sure everything is snug.
You may need to squeeze the encased iPad into the plastic shell to fit
better. If the edges of the rubber are stretched past the edge of the
plastic shell, use your fingers to push them back into place.
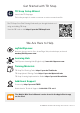
See the Mobile Mini User’s Manual for MobileDemand case removal
instructions.
1
3
4
2
4
4
5
Tobii Dynavox Mobile Mini Getting Started Guide
6
5
5