
Installation & Assembly


1
Installation Instructions for
Capri Small and Large Globe Pendant
1.0
TP1031-TP1041
Pendant
T 1031, TP1041P
GP I :ENERAL RODUCT NFORMATION
These fixtures are intended to be installed utilizing NEC compliant junction
boxes.
This product is safety listed for damp locations.
Incandescent lamps may be dimmed with a standard incandescent dimmer.
LED lamps may be dimmed with a LED dimmer. Consult lamp manufacturer
for additional information.
This instruction shows a typical installation.
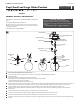
1
2
1A
3
CAUTION RISK OF FIRE-
This product must be installed in accordance with the
applicable installation code by a person familiar with the
construction and operation of the product and the hazards
involved.
Use minimum 90°c supply conductors.
Secure the mounting plate to the junction box.
Screw the lamp into the socket. Refer to the label on the socket for Max Wattage information.
Install the shade:
A) Insert the socket assembly into the shade at an angle.
B) Straighten the socket assembly so the shade rests evenly on the bracket.
C) Place the decorative cap over the glass.
D) Tighten the spindle against the decorative cap.
Install a quick link onto the end of the chain and fixture loop. Determine the wanted height of the fixture and remove a portion of
the chain by opening a link and removing it from the top. Then install the other quick link onto the chain and canopy loop.
Feed the fixture wires through the disc, spool, ball and fixture loop, in that order. Then tighten the fixture loop.
Weave the cord through the chain and canopy and out of the junction box. Trim the cord leaving enough to make electrical
connections.
Connect the fixture to a suitable ground in accordance to local electrical codes.
Connect the white fixture wire (square and/or rigid) to the neutral power line wire with a wire nut.
Connect the black fixture wire (round and/or smooth) to the hot power line wire with a wire nut.
Neatly place all the wires into the junction box, place the canopy onto the ceiling, and secure it in place with the provided canopy
screws.
4
5
6
7
8
9
10
9
LAMP
SHADE
CANOPY
MOUNTING PLATE
JUNCTION BOX
2
6
8
CHAIN
QUICK LINK
4
QUICK LINK
CANOPY SCREW
FIXTURE LOOP
BALL
SPOOL
DISC
THREADED ROD
DECORATIVE
CAP
SOCKET
CANOPY LOOP
SPINDLE
1
10
5
BRACKET
3A
3B
3C
3D