Electric Stand Mixer USE AND CARE GUIDE MODEL TMSM350 • 35 • In 0-Wat t • P clude Moto owe s L rH a •S oft r Boo rge 4 andle •E jec Tech ™ st But Quart s Den tor s t But Ergon on for Stainl e Mix e t om ton ic C Peak ss-Ste ures e P ont l rols erfor m Mixi anc ng B owl e ? Questions Call toll free 1-800-947-3744 Monday – Friday, 8:00 a.m. - 5:30 p.m. CST www.toastmaster.
IMPORTANT SAFEGUARDS When using electrical appliances, basic safety precautions should always be followed, including the following: ◆ Read all instructions. ◆ To protect against risk of electrical shock, do not put cord, plugs or appliance in water or other liquid. ◆ Close supervision is necessary when any appliance is used by or near children. ◆ Unplug from outlet when not in use, before putting on or taking off parts, and before cleaning. ◆ Avoid contacting moving parts.
ADDITIONAL IMPORTANT SAFEGUARDS ◆ ◆ ◆ ◆ ◆ ◆ ◆ All users of this appliance must read and understand this Use and Care Guide before operating or cleaning this appliance. The cord to this appliance should be plugged into a 120V AC electrical outlet only. Do not leave this appliance unattended during use. If this appliance begins to malfunction during use, immediately turn the unit OFF and unplug the cord. Do not use or attempt to repair the malfunctioning appliance.
ADDITIONAL IMPORTANT SAFEGUARDS ◆ ◆ ◆ ◆ ◆ ◆ ◆ All users of this appliance must read and understand this Use and Care Guide before operating or cleaning this appliance. The cord to this appliance should be plugged into a 120V AC electrical outlet only. Do not leave this appliance unattended during use. If this appliance begins to malfunction during use, immediately turn the unit OFF and unplug the cord. Do not use or attempt to repair the malfunctioning appliance.
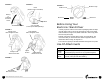
FIGURE 2 FIGURE 3 FIGURE 6 Knob (bottom side of Turntable) Raising or Lowering the Mixer Head Medium Low Minimum Medium High Maximum Large Bowl Press Release Button Small Bowl (not included) (can be purchased separately) FIGURE 4 Dough Hook with Hexagonal Collar Round Beater with Hexagonal Collar Before Using Your Electronic Stand Mixer Carefully unpack the Mixer and remove all packaging materials.
FIGURE 2 FIGURE 3 FIGURE 6 Knob (bottom side of Turntable) Raising or Lowering the Mixer Head Medium Low Minimum Medium High Maximum Large Bowl Press Release Button Small Bowl (not included) (can be purchased separately) FIGURE 4 Dough Hook with Hexagonal Collar Round Beater with Hexagonal Collar Before Using Your Electronic Stand Mixer Carefully unpack the Mixer and remove all packaging materials.
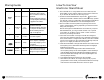
Mixing Guide Icon Speed Minimum • Medium Low • Medium High Action Stir/Fold Use when stirring liquid ingredients or when a gentle action is needed to moisten dry ingredients. Use when folding two portions of a recipe together, like beating an egg white into a batter. Mix Knead Use when mixing dry ingredients and liquid ingredients together alternately in a recipe or use when recipe calls for kneading until the dough is a dough ball. Blend/Beat Use when creaming sugar /Cream and butter together.
Mixing Guide Icon Speed Minimum • Medium Low • Medium High Action Stir/Fold Use when stirring liquid ingredients or when a gentle action is needed to moisten dry ingredients. Use when folding two portions of a recipe together, like beating an egg white into a batter. Mix Knead Use when mixing dry ingredients and liquid ingredients together alternately in a recipe or use when recipe calls for kneading until the dough is a dough ball. Blend/Beat Use when creaming sugar /Cream and butter together.
How To Use Your Electronic Stand Mixer (cont.) 8. Plug into 120 V ~ 60 Hz outlet. Turn the Variable Speed Control to the Minimum position. Slide the ON/OFF Power Switch to the ON position. The Power Light will come on. NOTE: Always start mixing on the Minimum speed. The operating speed increases as the Variable Speed Control is moved from Minimum to Maximum speed, see FIGURE 5. Select the desired speed. Refer to mixing guide on page 5 for further information. 9.
How To Use Your Electronic Stand Mixer (cont.) 8. Plug into 120 V ~ 60 Hz outlet. Turn the Variable Speed Control to the Minimum position. Slide the ON/OFF Power Switch to the ON position. The Power Light will come on. NOTE: Always start mixing on the Minimum speed. The operating speed increases as the Variable Speed Control is moved from Minimum to Maximum speed, see FIGURE 5. Select the desired speed. Refer to mixing guide on page 5 for further information. 9.
Helpful Hints For Bread And Dough (cont.) Dough Stretch Test: Testing For Developed Gluten After approximately 10 minutes of kneading, stop the Mixer and check the gluten development by performing the dough stretch test. Remove a small piece of dough about the size of a small egg. Holding the dough up, carefully stretch it into a flat circle with your fingers. When the dough is properly developed, the structure will be smooth and stretchy; light should pass through the stretched dough.
Helpful Hints For Bread And Dough (cont.) Dough Stretch Test: Testing For Developed Gluten After approximately 10 minutes of kneading, stop the Mixer and check the gluten development by performing the dough stretch test. Remove a small piece of dough about the size of a small egg. Holding the dough up, carefully stretch it into a flat circle with your fingers. When the dough is properly developed, the structure will be smooth and stretchy; light should pass through the stretched dough.
Rising Dough (cont.): Optimum Temperature Of Room 80°-85°F/27°-29°C Sometimes a second dough rising is beneficial especially for whole grain or 100% whole wheat bread. Let the dough rise once, punch down, let rise again, punch down, let rest 10 minutes and shape. Storing And Freezing Baked Breads And Rolls Refrigeration or temperatures under 70°F/21°C will cause breads to stale (firm) quickly. They can, however, be frozen for several months.
Rising Dough (cont.): Optimum Temperature Of Room 80°-85°F/27°-29°C Sometimes a second dough rising is beneficial especially for whole grain or 100% whole wheat bread. Let the dough rise once, punch down, let rise again, punch down, let rest 10 minutes and shape. Storing And Freezing Baked Breads And Rolls Refrigeration or temperatures under 70°F/21°C will cause breads to stale (firm) quickly. They can, however, be frozen for several months.
Doughs And Breads BASIC WHITE DOUGH 2 Loaves or 18 Rolls 4-41⁄4 cups bread flour 1 ⁄4 tsp salt 1 ⁄2 cup sugar 31⁄2 tsp active dry yeast 11⁄4 cups water 1 egg 1 ⁄4 cup shortening, room temperature Temperature: 350°F/177°C Bake Time: 25-30 minutes Insert Dough Hooks and mix together all dry ingredients except 1 cup of flour on medium low for 30 seconds. Heat water to 120°-130°F/49°-54°C. Continue mixing on Medium Low and add egg. Drizzle liquid slowly into dry mixture until mixed, 2-3 minutes.
Doughs And Breads BASIC WHITE DOUGH 2 Loaves or 18 Rolls 4-41⁄4 cups bread flour 1 ⁄4 tsp salt 1 ⁄2 cup sugar 31⁄2 tsp active dry yeast 11⁄4 cups water 1 egg 1 ⁄4 cup shortening, room temperature Temperature: 350°F/177°C Bake Time: 25-30 minutes Insert Dough Hooks and mix together all dry ingredients except 1 cup of flour on medium low for 30 seconds. Heat water to 120°-130°F/49°-54°C. Continue mixing on Medium Low and add egg. Drizzle liquid slowly into dry mixture until mixed, 2-3 minutes.
FOCCACIA BREAD 21⁄2 -3 cups bread flour 1 tsp salt 2 tsp sugar 1 tsp dry Italian seasoning 11⁄4 tsp active dry yeast 1 cup water 1 ⁄3 cup olive oil FOCCACIA BREAD (cont.) Temperature: 400°F/205°C Bake Time: 15-20 minutes Heat olive oil, add onions and cook until soft but not brown, 5 minutes. Insert Dough Hooks and mix all dry ingredients together except 1 cup of flour on Medium Low for 30 seconds. Spoon mixture over dough. Sprinkle with remaining ingredients. Bake as directed.
FOCCACIA BREAD 21⁄2 -3 cups bread flour 1 tsp salt 2 tsp sugar 1 tsp dry Italian seasoning 11⁄4 tsp active dry yeast 1 cup water 1 ⁄3 cup olive oil FOCCACIA BREAD (cont.) Temperature: 400°F/205°C Bake Time: 15-20 minutes Heat olive oil, add onions and cook until soft but not brown, 5 minutes. Insert Dough Hooks and mix all dry ingredients together except 1 cup of flour on Medium Low for 30 seconds. Spoon mixture over dough. Sprinkle with remaining ingredients. Bake as directed.
FRENCH BREAD SOFT PRETZEL DOUGH (cont.) Punch down dough, cover and allow to rest 10 minutes to make the dough easier to handle. Place dough on a lightly floured surface. Roll up tightly, starting with widest edge. Seal with fingertips as you roll. Punch down dough, cover and allow to rest 10 minutes to make the dough easier to handle. Cut dough into pieces on a lightly floured surface. Roll each piece into a 16-inch rope.
FRENCH BREAD SOFT PRETZEL DOUGH (cont.) Punch down dough, cover and allow to rest 10 minutes to make the dough easier to handle. Place dough on a lightly floured surface. Roll up tightly, starting with widest edge. Seal with fingertips as you roll. Punch down dough, cover and allow to rest 10 minutes to make the dough easier to handle. Cut dough into pieces on a lightly floured surface. Roll each piece into a 16-inch rope.
PIZZA SAUCE 3 pizzas 2 TBL 1 cup 1 8-oz can 1 14-oz can 1 ⁄2 tsp 1 ⁄2 tsp 1 ⁄8 tsp 1 ⁄8 tsp 1 tsp olive oil onion, chopped tomato sauce tomatoes, chopped oregano basil garlic powder salt ground pepper Heat oil over medium heat and sauté onions until transparent. Stir in remaining ingredients, cover and simmer for 45 minutes, stirring occasionally. Spread 1 cup of sauce over pizza dough.
PIZZA SAUCE 3 pizzas 2 TBL 1 cup 1 8-oz can 1 14-oz can 1 ⁄2 tsp 1 ⁄2 tsp 1 ⁄8 tsp 1 ⁄8 tsp 1 tsp olive oil onion, chopped tomato sauce tomatoes, chopped oregano basil garlic powder salt ground pepper Heat oil over medium heat and sauté onions until transparent. Stir in remaining ingredients, cover and simmer for 45 minutes, stirring occasionally. Spread 1 cup of sauce over pizza dough.
Keep Dated Sales Receipt for Warranty Service. Keep this booklet.
Keep Dated Sales Receipt for Warranty Service. Keep this booklet.
24.
Electric Stand Mixer USE AND CARE GUIDE MODEL TMSM350 • 35 • In 0-Wat t • P clude Moto owe s L rH a •S oft r Boo rge 4 andle •E jec Tech ™ st But Quart s Den tor s t But Ergon on for Stainl e Mix e t om ton ic C Peak ss-Ste ures e P ont l rols erfor m Mixi anc ng B owl e ? Questions Call toll free 1-800-947-3744 Monday – Friday, 8:00 a.m. - 5:30 p.m. CST www.toastmaster.