READ AND SAVE THESE INSTRUCTIONS WARNING: A risk of fire and electrical shock exists in all electrical appliances and may cause personal injury or death. Please follow all safety instructions.
IMPORTANT SAFEGUARDS When using electrical appliances, basic safety precautions should always be followed to reduce the risk of fire, electric shock and injury to persons, including the following: • Read all instructions before using food processor. • To protect against risk of electrical shock, do not immerse base, cord, or plug in water or other liquid. • Close supervision is necessary when any appliance is used near children. • This appliance is not for use by children.
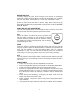
POLARIZED PLUG: This appliance has a polarized plug, (one blade is wider than the other). As a safety feature to reduce the risk of electrical shock, this plug is intended to fit in a polarized outlet only one way. If the plug does not fit fully in the outlet, reverse the plug. If it still does not fit, contact a qualified electrician. Do not attempt to defeat this safety feature. This product is for household use only.
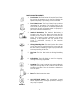
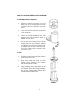
PARTS AND ATTACHMENTS 3. 1. Food Pusher: The Food Pusher fits into the Food Chute. By varying the pressure put on the Food Pusher, the speed and quality of processing can be controlled. 2. Food Chute/Cover: The Food Chute/Cover positions ingredients for processing. The Locking Tabs on the Food Chute/Cover are part of an Interlock System that assures the unit will not operate unless it is properly in place (see “Interlock Mechanism”). 3.
BEFORE FIRST USE Carefully unpack the Mini Food Processor and remove all packaging materials. Handle the Knife Blade and Slicing/Shredding Disc carefully; they are very sharp. Set the Base on a clean, dry countertop or table. Wash all parts except the Base in warm, soapy water. Rinse and dry thoroughly. The Base may be wiped with a damp cloth. DO NOT IMMERSE BASE IN WATER. USING THE ON/OFF/PULSE SWITCH The ON/OFF/PULSE Switch is conveniently located on the top of the Mini Food Processor.
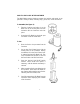
HOW TO SLICE OR SHRED IN THE CONTAINER To Assemble (Refer to Figure 3): 1. Take the Container and place it on the Base. Line up the Locking Tabs and turn clockwise until the Container locks into place. 2. Lower the Disc Post onto the Center Post in the Container. 3. Center the Slicing/Shredding Disc with desired side facing upward (SLICE or SHRED) on Disc Post. 4.
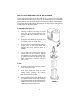
HOW TO CHOP ONLY IN THE CONTAINER The Knife Blade’s special design processes food quickly and evenly. It can perform a variety of tasks, including chop, grind, mix, crumb and mince. To Assemble (See Figure 4): 1. Take the Container and place it on the Base. Line up the Locking Tabs and turn clockwise until the Container locks into place. 2. Grasp the Knife Blade by the plastic part and lower it onto the Center Post. To Use: 1. Place the food to be processed into the Container. 2.
HOW TO SLICE/SHRED AND CHOP IN THE CONTAINER In some particular instances you may wish to slice or shred a food and then chop it into much finer parts. This can be accomplished in one continuous action with the Slicing/Shredding Disc and the Knife Blade used together. Food passes through the Slicing/Shredding Disc with final processing being accomplished by the Knife Blade. To Assemble (See Figure 5): 1. Take the Container and place it on the Base.
USAGE GUIDE The three functions of your Mini Food Processor allow you to chop, shred or slice a wide variety of food quickly and effortlessly.
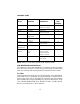
CHOPPING GUIDE APPROX. TIME (SECONDS) FOOD QUANTITY PREPARATION Bread 1-2 slices Two slices of bread Parsley/Herbs Handful Wash, dry thoroughly 30 Onion 1-2 small Peel onions, 4-6 5-7 cut into 3/4” cubes cut into 6-8 pieces Garlic 1 or more Peel 5-7 large cloves Mushrooms 4 small Cut in half Pulse 3 1-1/2 oz.
TO STORE Unplug appliance and allow it to cool. Store unit in its box or in a clean, dry place. Never store unit while it is still plugged in. Never wrap cord tightly around the appliance. Do not put any stress on the cord where it enters the unit, as it could cause the cord to fray and break. SERVICE INFORMATION Please refer to warranty statement to determine if in-warranty service applies. This appliance must be serviced by a Toastmaster authorized service center. Unauthorized service will void warranty.
LIMITED ONE YEAR WARRANTY Warranty: This Toastmaster® product is warranted to be free from defects in materials or workmanship for a period of (1) year from the original purchase date. This product warranty covers only the original consumer purchaser of the product.
To return the appliance, ship to: To contact us, please write to or call: Attn: Repair Center P.O. Box 6916 708 South Missouri Street Columbia, MO 65205-6916 Macon, MO 63552 1(800) 947-3744 Email: consumer_relations@toastmaster.com www.Toastmaster.com Limitation of Remedies: No representative or person is authorized to assume for us any other liability in connection with the sale of our products.
KEEP DATED SALES RECEIPT FOR WARRANTY SERVICE. Keep this booklet. Record the following for reference: Date purchased Model number Date code (stamped on bottom) EVERYBODY EATS. It’s a fact of life. But sometimes preparing meals can become a chore. That’s why TOASTMASTER has been invited into millions of kitchens just like yours so we can HELP YOU MASTER your mixing, baking, grilling, toasting, brewing, heating and serving tasks WITH EASE AND STYLE.