
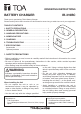
User Manual


4
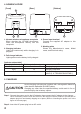
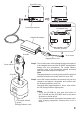
1. Infrared wireless microphone receptacle
When charging the IR-310M microphone,
insert the microphone directly into the
receptacle.
2. Charging indicator
Lights red continuously while charging is in
progress.
3. Full-charge indicator
Lights green once the battery is fully charged.
4. Power input terminal
Connect the supplied AC adapter to this
terminal.
5. Marking plate
Shows the Manufacturer’s name, Model
name, and Electrical rating.
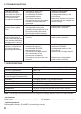
[Indicator status table]
Chargingindicator(red) Full-chargeindicator(green) Status
Lit Unlit Charging in progress
Unlit Lit Charging completed
Both indicators light alternately. Charging failure
(refertop.6"TROUBLESHOOTING.")
4. NOMENCLATURE
CHARGE
FULL
1
2
3
4 5
[Front] [Rear] [Bottom]
5. CHARGING
Avoid charging microphones installed with rechargeable batteries
other than the dedicated IR-200BT battery.
Charging any other than the specified battery could result in fire or
personal injury due to battery rupture.
CAUTION
Step 1. Connect the power cord to the AC adapter, then connect the AC adapter to the charger.
Once connected, push the cord into the slot in the charger’s bottom surface to prevent the AC
adapter plug from accidentally slipping out of place. (Refer to “Handling the power cord” in the
gureonthenextpage.)
Step 2. Insert the AC power plug into an AC outlet.