Mini Sewing Machine Instruction Manual Model: LSS-338 Please read the instruction manual carefully before operating the machine.
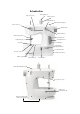
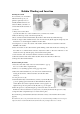
Introduction Take Up Lever (D) Thread Spindle (C)) Thread Spool (E) Bobbin Holder (V) Bobbin Winder Spindle (T) Tension Screw (Q) Handwheel (K) Bobbin Spindle (U) Needle Clamp Screw (O) Speed Button (L) Needle Clamp (P) ON/OFF Switch (A) Light Button Needle (R) Stitch Length Adjustment Button Foot Pedal Jack (M) Presser Foot (F) AC/DC Jack (DC 6V) Bobbin compartment (I) Bobbin Holder (J) Reverse Button Bobbin Winder Handler (W) Presser Foot Lever (G) Bobbin Cover Release Button (H) Battery Com
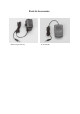
Parts & Accessories AC/DC Adapter (DC 6V) Foot Pedal (M)
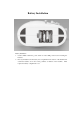
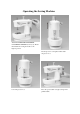
Battery Installation Battery Installation 1. Caution: Make certain the power switch is in the OFF position before inserting the batteries. 2. Inser (4)AA batteries in the battery slot compartment in the bottom of the machine. Be certain the batteries are in the correct polarities as marked on the machine. Then replace the battery compartment cover.
Threading the machine 1. Raise thread spindle (C) by grasping the exposed top and pulling upward until thread spindle (C) is fully extended. 2. Place thread spool (E) on the thread spindle (C) as shown. 3. Pull thread from the thread spool (E) on the thread spindle (C) and put it through the thread holder (1) in the direction toward front of machine. 4. Bring thread across to the thread tension screw (2).
Bobbin Winding and Insertion Winding the bobbin You can wind your own bobbins with thread from spools you purchase separately to have a virtually unlimited thread color selection. Match your fabrics or contrast with the thread shades of your choice. 1. Always remove the bobbin (S) from the bobbin case on the machine before you wind a new bobbin. 2. Place the thread spool (E) on the thread spindle (C). 3. Press down the bobbin winder handler (W) and the bobbin winder (T) will be lifted up. 4.
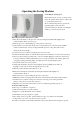
Operating the Sewing Machine ALWAYS TURN THE HANDWHEEL COUNTERCLOCKWISE (toward you). Rotate the handwheel to bring the needle to the highest position. Lift the presser foot and place fabric under the presser foot. Lower the presser foot. Press the power switch to begin sewing. Don’t pull the fabric.
Operating the Sewing Machine Controlling the Sewing Speed The machine has two speeds of sewing control. In the “H” position the switch is in, while in the “L” position the switch is out. We recommend using the slow speed at the beginning. When you become more experienced and feel confident controlling the machine, you can use the fast speed. Operating the machine without the foot pedal 1.
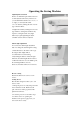
Operating the Sewing Machine Adjusting thread tension Tension for maximum performance has been set and adjusted at the factory. However, if you should find that stitches are too loose, or too tight, you can adjust the stitch. 1. Loosen stitch by turning the tension screw (Q) counterclockwise. 2. Tighten the stitch by turning tension screw (Q) clockwise. Sewing heavier fabric may require loosening the stitch. Very light fabric may require tightening the stitch. 3. Bobbin tension cannot be adjusted.
Changing the Needle 1. Turn the handwheel (K) clockwise to raise the needle (R) to its highest position. 2. Loosen the needle clamp screw (O) by turning it counterclockwise (toward you). You may need to use a short slotted screwdriver or small pliers. 3. Remove the needle (R) pulling down, away from the needle clamp (P). 4. Place the new needle with the flat side facing in against the needle clamp (P). 5. Push it gently as far up as it will go, and against the needle clamp (P). 6.
Precautions Set the power switch to OFF and don’t touch the switch when inserting batteries or plugging in or replacing the needle. Keep the unit away from children. If operated by a child, an adult shall watch the operation. Set the switch to OFF after usage and remove the batteries or pull off the plug. Don’t mix old batteries with new ones. Don’t dismantle or rebuild the unit. Don’t switch on when fabric has not been put on the unit even though top and bottom threads are ready. Troubleshooting 1.
Michley/Tivax Limited Warranty to Original Purchaser Michley/Tivax warrants this product purchased in the USA against defects in material and workmanship under normal use and service for a period of one year from the date of retail purchase by the original end-user purchaser. Products will not be warranted if the serial number is removed or defaced. This warranty shall be void upon transfer of ownership of this product and is effective only when used in the United States.