
Product Manual


AirCoat 15
GB
Maintenance Troubleshooting
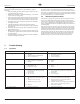
7. Troubleshooting
7.1 Spray Gun
Problem Cause Solution
A. Spitting gun 1. Air in system
2. Dirty gun
3. Needleassemblyoutofadjustment
4. Brokenorchippedseat
1. Inspect connections for air leaks.
2. Disassemble and clean.
3. Inspect and adjust.
4. Inspect and replace.
B. Gunwillnotshuto 1. Worn or broken needle & seat
2. Needleassemblyoutofadjustment
3. Dirty gun
1. Replace.
2. Adjust.
3. Clean.
C. Gundoesnotspray 1. Nopaint
2. Plugged lter or tip
3. Brokenneedleingun
1. Check uid supply.
2. Clean.
3. Replace.
D. Insucient material supply. 1. Material pressure set too low.
2. Blockedspraygunlterorpumphigh
pressure lter.
3. Tip is blocked.
4. Tip is too small.
1. Increase the material pressure at pump.
2. Clean or replace the gun lter and/or pump high
pressure lter.
3. Clean the tip.
4. Select a larger tip.
E. Poor spraying pattern. 1. Tip is too large.
2. Material pressure at the pump is set too
low.
3. Material viscosity is too high.
4. Atomizing air is set incorrectly.
5. Worn tip.
1. Select a smaller tip.
2. Increase the material pressure at the pump.
3. Dilute the material according to the material
manufacturer’s instructions.
4. Adjust the atomizing air using the gun air adjustment
knob or pressure regulator at the air outlet.
5. Replace with a new tip.
F. Leakingairvalve. 1. Damaged air valve seal. 1. Replace the air valve seal.
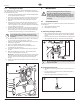
Reassembly (Fig. 18)
After cleaning and inspecting all parts, reassemble the regulator
assembly.
1. Lubricatepacking(7)withalithiumgrease.Replaceintothe
cylinder with the lips facing up.
2. Replace the washer (6) on top of the packing (7). Secure both
in place with the spring clip (5).
3. Slide bolts (9) through the upper bar (14) and into the sleeves
(15). Reinstall into the housing (3), making sure the ball valve
pin (11) is inserted into the center hole of the upper bar (14).
4. Thread the bolts into the lower bar and piston (10) assembly
and tighten securely.
5. LubricatetheO-rings(13)insidetheregulatorhousing.
Thread the cylinder (2) into the regulator housing and tighten
with a wrench.
6. Thread the cap (8) onto the top of the regulator housing and
tighten with a wrench.
7. Making sure the piston (10) is seated inside the spring locator
(4), thread the regulator knob onto the bottom of the cylinder
(2). Hand-tighten.
8. Reattach the entire regulator assembly to the lter assembly.
Tighten the tting with a wrench.
6.4 Air Motor Maintenance
Air motors require a normal maintenance and service inspection at
1500 hours service. Service procedure includes replacement of motor
service kit. It is suggested that one motor service kit be kept on hand
for normal maintenance and emergency repairs. Check the individual
model’s specications for correct part numbers.
6.5 Maintaining the Fluid Pump
If the sprayer is going to be out of service for an extended period of
time,itisrecommendedthatfollowingcleanup,LiquidShield™be
introduced as a preservative. Packings may tend to dry out from lack
of use. This is particularly true of the upper packing set for which
upperpackinglubricantPistonLube(P/N314-480)isrecommended
in normal usage.
If the sprayer has been out of service for an extended period of time,
it may be necessary to prime the pump with solvent. It is extremely
important that the threads on the siphon hose coupling are properly
sealed. Any air leakage will produce erratic operation of the sprayer
and may damage the system. The up and the down strokes should
be approximately equal in time (one should not be faster than the
other). A fast up or down stroke may indicate air in the system or
malfunctioning valve or seats (see the Troubleshooting section).