
Product Manual


14 AirCoat
GB
Maintenance
6.2 Maintaining the Filter Assembly
Clean the lter regularly. Dirty or clogged lters can greatly reduce
ltering ability and cause a number of system problems including
poor spray patterns, clogged spray tips, etc.
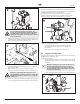
Cleaning (Fig. 17)
1. Follow the “Pressure Relief Procedure” found in the Operation
section of this manual (section 4.7).
2. Remove lter cap assembly (1).
3. Pull the lter element (2) with support (3) straight out of the
lter body (6).
4. Clean inside the lter body, lter element with support, and
lter cap assembly using the appropriate solvent.
i
Use care in handling parts as dirt, debris, scratches,
or nicks may prevent o-rings or gaskets from sealing.
This lter element lters from the outside in. Be
sure to clean the lter element thoroughly. Soak in
solvent to loosen hardened paint or replace.
1
2
6
5
4
3
Inspection (Fig. 17)
Inspect all parts of the lter assembly before reassembly.
1. Inspect the support inside the lter element. If the support
has pressure cuts or scratches, replace the lter element.
2. Inspect the two PTFE gaskets (4, 5) for deformity, nicks, or
cuts. Replace, if needed.
Reassembly (Fig. 17)
After cleaning and inspecting all parts, reassemble the lter.
1. Place the lter element (2) with support (3) into the lter body
(6).
2. Place the thin PTFE gasket (5) onto the step at the top of the
lter body (6).
3. Place the PTFE O-ring (4) into the groove of the base of the
lter body threads (6).
4. Tighten the lter cap assembly (1) onto the lter body (6).
6.3 Maintaining the High Pressure Fluid
Regulator
Regular inspection and lubrication of the regulator are necessary to
keep it working properly.
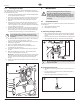
Cleaning (Fig. 18)
1. Follow the “Pressure Relief Procedure” found in the Operation
section of this manual.
2. Remove the entire high pressure uid regulator assembly
from the lter assembly.
3. Turn the regulator knob (1) counterclockwise until it is
removed.
4. Usingawrenchonthehexofthecylinder(2),loosenand
remove the cylinder from the regulator housing (3), being
careful not to lose the spring locator (4).
5. Inside the cylinder, remove the spring clip (5), washer (6) and
packing (7).
6. Usingawrenchontheatsofthecap(8),loosenandremove
the cap.
7. Usinganallenwrench,loosenandremovethetwobolts(9)
from the regulator housing. The bar and piston assembly (10)
willcomeloose.Becarefulnottolosetheballvalve(11).
8. Thoroughly clean inside the cylinder (2), inside the regulator
housing (3), and the cap (8) with the appropriate solvent.
Clean the washer (6), packing (7) and the bar and piston (10).
1
2
5
8
9
11
14
15
12
13
13
6
7
4
3
10
Inspection (Fig. 18)
Inspect all parts of the high pressure uid regulator before
reassembly.
1. Inspect the spring locator (4), packing (7), ball valve (11) and
seat (12). If worn or damaged, replace.
2. Inspect the piston assembly (10). If the piston is worn, replace.
3. Inspect the O-rings (13) in the regulator housing. If worn or
damaged, replace and lubricate with lithium grease.