
Product Manual


12 AirCoat
GB
Cleanup
5. Cleanup
Attention
The sprayer, hose, and gun should be cleaned
thoroughly after daily use. Failure to do so permits
material to build up, seriously aecting the
performance of the unit.
Always spray at minimum pressure with the gun
nozzle tip removed when using mineral spirits or
any other solvent to clean the sprayer, hose, or
gun. Static electricity buildup may result in a re or
explosion in the presence of ammable vapors.
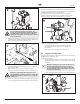
5.1 Special cleanup instructions for use with
ammable solvents
• Alwaysushspraygunpreferablyoutsideandatleastone
hose length from spray pump.
• Ifcollectingushedsolventsinaonegallonmetalcontainer,
place it into an empty ve gallon container, then ush
solvents.
• Areamustbefreeofammablevapors.
• Followallcleanupinstructions.
5.2 Cleaning the sprayer
1. Follow the “Pressure Relief Procedure” found in the Operation
section of this manual, section 4.7.
2. Remove the gun tip and tip guard and clean with a brush
using the appropriate solvent.
3. Place the siphon tube into a container of the appropriate
solvent.
Attention
Use only compatible solvents when cleaning
out oil based enamels, lacquers, coal tar, and
epoxies. Check with the uid manufacturer for the
recommended solvent.
4. Place a metal container under the bleed hose.
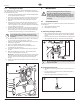
5. Close the shuto valve (g. 13, item 1). The gure shows the
handle in the closed position.
6. Start the compressor.
7. Turn the air regulator (2) fully counterclockwise to its lowest
pressure setting.
8. Open the bleed valve (3) by turning it fully counterclockwise.
The bleed valve handle should be pointing down.
9. Turn the high pressure uid regulator knob (5)
counterclockwise until the spring tension is relieved.
3
5
1
2
4
10. Open the shuto valve (g. 13, item 1). The handle should
now be in line with the valve.
11. Allow the solvent to circulate through the sprayer and ush
the material out of the bleed hose into the metal waste
container.
12. Close the shuto valve (g. 13, item 1). The gure shows the
handle in the closed position.
13. Close the bleed valve by turning it fully clockwise.
14. Open the shuto valve (g. 13, item 1). The handle should
now be in line with the valve.
Ground / Earth the gun by holding it against the
edge of the metal container while flushing. Failure
to do so may lead to a static electric discharge, which
may cause a fire.
15. Trigger the gun into the metal waste container until the paint
is ushed out of the hose and solvent is coming out of the
gun.
16. Continue to trigger the spray gun into the waste container
until the solvent coming out of the gun is clean.
i
For long-term or cold weather storage, pump
mineral sprits through the entire system.
17. Follow the “Pressure Relief Procedure” found in the Operation
section of this manual.
18. Store the sprayer in a clean, dry area.
Attention
Do not store the sprayer under pressure.