Owner’s Manual
TABLE!OF!CONTENTS Assembly . . . . . . . . . . . . . . . . . . . . . . . . . . . . . . . . .3-4 Batteries . . . . . . . . . . . . . . . . . . . . . . . . . . . . . . . . . . .5 Quick-Start Demo . . . . . . . . . . . . . . . . . . . . . . . . . .6-7 Basic Operation . . . . . . . . . . . . . . . . . . . . . . . . . . .8-11 All Metal . . . . . . . . . . . . . . . . . . . . . . . . . . . . . . .9 Discrimination . . . . . . . . . . . . . . . . . . . . . . . . . .10 Notch . . . . . . . . . . . . . . . . . . . . .
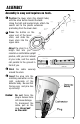
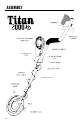
ASSEMBLY Assembly is easy and requires no tools. 1 Position the lower stem (the straight tube) ● with the silver button toward the back. Using the bolt and knurled knob, attach the search coil to the plastic extension protruding from the lower stem. 2 P ress ● the button on the upper end of the lower stem, and slide the lower stem into the upper stem.
ASSEMBLY 4
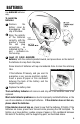
BATTERIES Use ALKALINE batteries only. To install the batteries: 1 Remove ● the battery cover by disengaging the clip at the back. 2 Align the polarity ● of the batteries correctly, with the positive "+" toward the coil plug connection, as indicated by the + and – indicators on the housing. 3 Insert ● (2) 9-Volt ALKALINE batteries, with the contacts pointed inward, and press down on the back of the batteries to snap them into place.
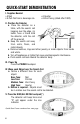
QUICK-START!DEMONSTRATION I. Supplies Needed • A Nail • A Pull-Tab from a beverage can • A Quarter • A Zinc Penny (dated after 1982) II. Position the Detector a. Place the detector on a table, with the search coil hanging over the edge. (or better, have a friend hold the detector, with the coil off the ground) b. Keep the search coil away from walls, floors, and metal objects. c. Remove watches, rings and other jewelry or metal objects from hands and wrists. d.
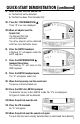
QUICK-START!DEMONSTRATION!(continued) VI. Wave the Nail over the Search Coil a. The Nail will not be detected. b. The Nail has been "Discriminated Out." VII. P ress the “DISCRIMINAT I O N -▲” Three “R”s are now displayed. VIII. Wave all objects over the Search Coil The Nail and Pull-Tab will not be detected. The other objects will be detected with their own distinctive tones. IX. Press the NOTCH touchpad. A flashing “R” will appear under the 5¢/PT segment. X. Press the DISCRIMINATION ▲ touchpad three times.
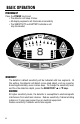
BASIC!OPERATION! POWERING UP Press the POWER touch pad. • The detector will beep 4 times • All display segments will illuminate momentarily • The SENSITIVITY and BATTERY indicators will stay illuminated SENSITIVITY The detector’s default sensitivity will be indicated with two segments. At this setting, the detector will detect a coin-sized object, such as a quarter, buried approximately seven inches deep. To change the sensitivity level, and thus the detection depth, press the SENSITIVITY ▲ or ▼ keys.
BASIC!OPERATION!(continued) DEFAULT OPERATION The detector defaults to ALL METAL mode after powering on. In this mode, all types of metals will be detected. An object’s probable identification is indicated by the arrows at the top of the display. In addition, the probable depth of coin-sized objects is indicated by the large numeric indicator in the center of the display. All detected objects will cause the depth indicator to illuminate.
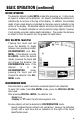
BASIC!OPERATION!(continued) To increase the level of discrimination, press the DISCRIMINATION ▲ touch pad. Each time the ▲ pad is depressed, an additional "R" will appear, thus eliminating from detection the objects which fall into the corresponding categories. To decrease the level of discrimination, press the DISCRIMINATION ▼ touch pad. Each time the ▼ pad is depressed, an illuminated "R" will disappear, thus returning to detection the objects which fall into the corresponding categories.
BASIC OPERATION (continued) ITD The ITD control is a convenient way to eliminate a known undesirable metal object from detection. To demonstrate the ITD control: 1) Set the detector in All-Metal Mode Note: ITD functions in all modes, but is best demonstrated first from the All-Metal Mode. 2) Pass the search coil over an undesirable object. 3) Notice the Target Indication Note: You can only ITD objects that register under the five left-most segments (from Iron to Zinc). 4) Press ITD.
AUDIO!TARGET!IDENTIFICATION While the LCD (Liquid Crystal Display) is very accurate in identifying buried objects, the user in the field does not always maintain the display screen in his field of vision. Therefore, we have incorporated an audio feedback mechanism to alert the user to the nature of buried objects. This audio feedback system first alerts the user to the presence and classification of objects, whose nature and location can be confirmed using the LCD display.
TARGET!AND!DEPTH!DISPLAY READING THE DISPLAY The Liquid Crystal Display (LCD) shows the PROBABLE identification of the t a rgeted metal, as well as the PROBABLE depth of the target, in inches. The detector will register a repeated, unchanging target identification when a buried target has been located and identified. If, upon repeated passes over the same spot, the target identification reads inconsistently, the target is probably a trash item, or oxidized metal.
SENSITIVITY!ADJUSTMENT ELECTROMAGNETIC INTERFERENCE The principle use for the Sensitivity C o n t rol is to eliminate Electromagnetic Interference (EMI). A hobby metal detector is an extremely sensitive device; the search coil creates its own magnetic field and acts like an antenna. If your detector beeps erratically when the search coil is motionless, the unit is probably detecting another electromagnetic field.
IN!THE!FIELD!TECHNIQUES PINPOINTING COIL MOVEMENT Accurate pinpointing takes practice and is best accomplished by “X-ing” the target area. When swinging the coil, be careful to keep it level with the ground about one inch from the surface. Never swing the coil like a pendulum. 1. Once a buried target is indicated by a good tone response, continue sweeping the coil over the target in a narrowing sideto-side pattern. 2. Take visual note of the place on the ground where the “beep” sounds. 3.
IN!THE!FIELD!TECHNIQUES!(continued) Swing the search coil slowly, overlapping each sweep as you move forward. It is important to sweep the coil at a consistent speed over the ground as you search. After identifying a target, your sweep technique can help in identifying both the location and the nature of the target.
IN!THE!FIELD!TECHNIQUES!(continued) you may want to dig all targets at first. With practice in the field, you will learn to better discern the nature of buried objects by the nature of the detector’s response. You may encounter some false signals as you proceed. False signals occur when the detector beeps, but no metal target is present. False signals can be induced by e l e c t romagnetic interference, oxidation, or highly mineralized ground soils.
TROUBLESHOOTING TROUBLE SHOOTING GUIDE SYMPTOM CAUSE SOLUTION Detector chatters or beeps erratically • Using detector indoors • Using detector near power lines • Using 2 detectors in close proximity • Highly oxidized buried object • Use detector outdoors only • Move away from power lines • Keep 2 detectors at least 20’ apart • Only dig up repeatable signals • Reduce sensitivity until erratic signals cease • Environmental electromagnetic interference Constant low tone or constant repeating tones • Dis
TERMINOLOGY The following terms are used throughout the manual, and are standard terminology among detectorists. ELIMINATION Reference to a metal being "eliminated" means that the detector will not emit a tone, nor light up an indicator, when a specified object passes through the coil’s detection field.
TREASURE HUNTER’S CODE OF ETHICS: • Always check Federal, State, County and local laws before searching. • Respect private property and do not enter private property without the owner’s permission. • Take care to refill all holes and try not to leave any damage. • Remove and dispose of any and all trash and litter found. • Appreciate and protect our inheritance of natural resources, wildlife and private property.