
User Manual


8
E
N
G
L
I
S
H
Getting Started
• Eye protection designed for paintball use must be worn by the user and any person
within range.
• Do not disassemble this marker while it is pressurized.
• Do not pressurize a partially assembled marker.
• Read each step completely before performing the step.
NOTE: Carefully hand start all threaded parts when assembling, and do not overtighten, as
this may potentially strip the threaded parts.
WARNING
Install the air supply and load the hopper with paintballs only after you:
• have a barrel blocking device installed (see page 5)
• have the Safety in safe mode (see page 6).
Eye protection designed for paintball use must be worn by the user
and any person within range.
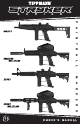
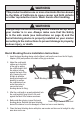
1. Install the Barrel
a. Install the Barrel and Hand Guard by turning it clockwise into the receiver.
b. Install the barrel blocking device (page 5).
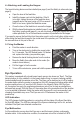
2. Battery Installation
Use these instructions for rst-time battery install or for battery replacement:
a. Use a 5/64 hex wrench to remove the two screws
from the left side grip, and open to expose the battery
compartment. NOTE: For battery replacement,
whenever removing the battery clip from the battery,
never pull it by the wires.
b. Install a 9 volt battery onto the battery clip. Observe the
polarity! Reverse polarity will damage the circuit board!
c. Insert the battery into the grip with the battery clip at the
bottom, and wires routed as shown.
d. Replace the grip and fasten with the two screws
removed in step 2a.
3. High Pressure Air (HPA) Cylinder Installation
Read the Air Cylinder Warnings, Safety Tips, and Removal on pages 13-14 before
beginning the HPA cylinder installation. Do not pressurize a partially assembled paintball
marker. Never use any other gas than high pressure air (HPA).
a. Put the Safety in safe mode (see page 6) and install the barrel blocking device (see
page 5).
b. Lubricate the air cylinder valve O-ring with a little Tippmann grease.
c. Insert the air cylinder valve into the Air Supply Adapter (ASA) at the back end of the
marker grip.
d. Twist the air cylinder clockwise into the ASA until it stops. Use caution as the marker is
now capable of ring after you put the Safety in a re mode. If you do not hear the full
air cylinder engage, the pin valve could be too short or the pin valve seal is damaged,
follow the Air Cylinder Removal instructions on page 14 and take your air cylinder to
a “C5” Certied Airsmith for inspection or contact the cylinder manufacturer.