
User Manual


14
E
N
G
L
I
S
H
• Cylinder valves must be installed or repaired only by properly trained personnel.
• Do not overll a cylinder! Never exceed the air cylinder’s capacity.
• Do not expose pressurized air cylinder to temperatures exceeding 130 degrees
Fahrenheit (55 degrees Celsius).
• Do not use caustic cleaners or strippers on the air cylinder or cylinder valve and do
not expose to corrosive materials.
• Do not modify the air cylinder in any way. Never try to disassemble the cylinder
valve from the air cylinder.
• Any air cylinder that has been exposed to re or heated to a temperature of 350
degrees Fahrenheit (177 degrees Celsius) or more must be destroyed by properly
trained personnel.
• Use appropriate gas for your cylinder. Only use compressed air in a compressed air
cylinder. Never use any other gas than high pressure air (HPA).
• Keep all cylinders out of the reach of children.
• The air cylinder should be inspected and hydrostatically retested at least every 5
years by a DOT licensed agency.
• Keep exposed skin away from escaping gas when installing or removing the air
cylinder, or if the marker or air cylinder is leaking. Compressed air is very cold, and
can cause frostbite under certain conditions.
NOTE: Locate a “C5” certied airsmith at www.paintball-pti.com.
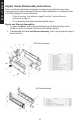
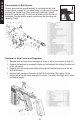
Air Cylinder Removal
1. Read Air Cylinder Warnings (page 13) and Air Cylinder Safety Tips (page 13-14)
before beginning the cylinder removal process.
2. Eye protection designed for paintball use must be worn by the user and any person within
range.
3. Follow the Unloading Your Marker instructions on page 10.
4. Watch the marks on the cylinder and cylinder valve as you turn the cylinder approximately
¾ turn counterclockwise. This allows the air valve pin to close so that no air will enter the
marker.
5. Remove the barrel blocking device. Set the Safety to re mode. Point the marker in a
safe direction, and discharge the remaining gas in the marker by repeatedly pulling the
trigger until the marker stops ring (this may take 4-5 shots). If your marker continues to
re, the cylinder’s pin valve has not closed yet. The cylinder pin valve could be longer than
usual. Because of the variances in cylinder pin valve parts, each cylinder varies slightly
on exactly how far it has to be turned. Turn the cylinder counterclockwise a little further
and repeat this step until the marker does not re. Only then remove the air cylinder.
NOTE: If during this step, you turned the air cylinder and it began to leak before you pulled
the trigger, the cylinder O-ring should be checked for damage before any re-assembly (see
Repairing Air Cylinder Leaks below).
6. After the air cylinder is removed, again point and re the marker in a safe direction to verify
the marker is completely discharged of gas.
7. Move the Safety to safe mode (see page 6) and install the barrel blocking device (see
page 5).
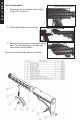
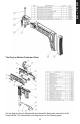
Repairing Air Cylinder Leaks
The most common leak occurs from a bad air valve O-ring. To replace a valve O-ring you must
rst remove the bad O-ring and then install a new one. This O-ring is located on the tip of your
air valve. The best valve O-rings are made of urethane. Urethane O-rings are not affected by