
User Manual


11
E
N
G
L
I
S
H
Programming Navigation
Entering Programming - Unload the marker (page 10) and remove the air supply (page
14). Never attempt to do Programming on a pressurized marker!
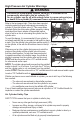
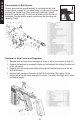
Turn on the marker and use a hex wrench to press and release
the Programming Button (arrow at right). The LED ashes an
array of colors. You are now in the main programming menu.
Cycling through the menu - To cycle through the menu
items, pull and release the trigger. Each time the trigger is pulled
and released, a different color code is displayed by the LED:
Firing Mode RED Solid
ROF cap GREEN Solid
Dwell AMBER Solid
Debounce RED Flicker
BIP GREEN Flicker
Ramp Start AMBER Flicker
Ramp Sustain RED Blink
Ramp Reset GREEN Blink
Burst shot count AMBER Blink
Current Value - Upon selecting a menu item, press and release the power button to show
the current setting value. The ashes represent the current setting value; see the setting you
have selected to determine the actual value.
Enter a new value - Press and hold the trigger until the LED goes out. You can now enter
value of the setting by pulling and releasing the trigger quickly. Each time the trigger is pulled
the LED will light up green indicating the value is being increased. When the setting reaches
its maximum limit, the LED glows an Amber color when pulling the trigger. When trigger has
not been pulled for 3seconds, the LED ashes an array of colors indicating that modifying the
setting is stopped. The setting is automatically saved. If the new value entered is less than the
minimum limit for that menu item, the minimum limit for that setting is saved. If the trigger is
not pulled at all, the minimum value for that setting will be saved
Reset to Factory Settings - You can reset programming back to the Factory Default
Settings. Press and hold the programming button for 6-7 seconds. The LED ashes an array
of colors and the board shuts off. The programming is now reset to Factory Default.
Programming Menus
This section discusses the menu items in detail, so that the user fully understands the purpose
and use of each menu item.
Firing Mode
1. Semi-Auto (Factory Default) One Blink
- This semi-automatic ring mode is
available for elds or tournaments which restrict the use of automatic ring modes. In
this ring mode, one pull/release of the trigger res one paintball.
2. Burst* Two Blinks - The marker res a burst of shots for each time the trigger is
pulled at the set Rate of Fire. The programmable range is 2 to 6 shots per burst which is
set by the Burst Shots setting. In Burst mode, the user must re programmed number of
times set by Ramp Start setting (page 12) with time between each trigger pull less than
Ramp Reset setting (below) then the marker will enter Burst and re number of shots