
User Manual


8
E
N
G
L
I
S
H
Getting Started
• Eyeprotectiondesignedforpaintballusemustbewornbytheuserandanyperson
withinrange.
• Donotdisassemblethismarkerwhileitispressurized.
• Donotpressurizeapartiallyassembledmarker.
• Readeachstepcompletelybeforeperformingthestep.
NOTE:Carefullyhandstartallthreadedpartswhenassembling,anddonotovertighten,as
thismaypotentiallystripthethreadedparts.RefertothePartsDiagramonpages24and25
fortheseinstructions(itemnumbersareinparentheses).
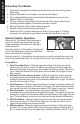
1. Battery Installation
a. Usingtheincluded5/64”Allenwrench,removetwo
screws(Figure2)fromtheleftsideGripCover.
b. LifttheGripCovertoexposethebattery
compartment.
c. Installa9voltbatteryintothebatteryarea.The
battery compartmentis designedso that the
batterywillgoinproperlyoriented.However,due
tovariancesinbatterymanufacturers,besureto
orientthebatterycorrectlyasshowninFigure3.
d. ReplacetheleftGripCoverandsecurewiththe
twoscrewsremovedinstep(a)above.
2. Air/CO2 Cylinder Installation
ReadtheAir/CO2 Cylinder Warnings, Safety Tips, and
Removal
onpages15-16beforebeginningthecylinderinstallation.
Donotpressurizeapartiallyassembledpaintballmarker.
IfyouintendtooperatetheCrossoverwithCO2,takeafewsteps
toensurethatliquidCO2doesnotenterthemarker.LiquidCO2
willnotdamagethemarker,butwillreduceperformance.We
recommendinstallingaremotelineset-up.Ifyoudonothave
accesstoaremoteline,thenllyourCO2cylinderto75%ofits
capacity.ThenegativeeffectsofCO2willbeincreasedincolder
climates.
a. PuttheSelectorSwitchinSafemode(seepage6)and
installthebarrelblockingdevice(seepage4).
b. Lubricatetheair/CO2cylindervalveO-ringwithalittle
Tippmanngrease.
c. Inserttheair/CO2cylindervalveintotheAirSupplyAdapter(ASA)atthebackend
ofthemarkergrip.
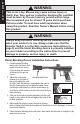
WARNING
Install the air supply and load the hopper with paintballs only after you:
• have a barrel blocking device installed (see page 4)
• have the Selector Switch in Safe mode (see page 6).
Eye protection designed for paintball use must be worn by the user
and any person within range.
Figure 2: Remove Screws from Left Grip
Cover.
Figure 3: Battery installed
correctly, arrow is positive
terminal (+).