
User Manual


20
E
N
G
L
I
S
H
Reassembly:
1. Always inspect and clean all parts prior to re-assembly. Replace any damaged part.
Lubricate all O-rings and springs with Tippmann grease to help prevent damage to
O-rings and to make assembly easier.
2. After greasing O-rings, reinstall the Valve Spool (29), making sure it bottoms out
inside the Air Valve Body (26). Reinstall the Valve Spool Spring (30) into the
opening of the Valve Spool.
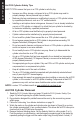
3. The tip of the End Cap assembly (32) goes into the visible end of the Valve Spool
Spring. Align the holes marked with an asterisk (*Figure 17 above) and squeeze the
parts together with your thumb and nger. Insert the Valve Pin (33) fully into the holes
marked with the asterisk. Relax your squeeze on the Air Valve and End Cap as the pin
now holds the parts together.
Figure 17: The Front Bolt, Power Tube, and Air Valve
WARNING
Do not disassemble this marker while it is pressurized.
Do not pressurize a partially assembled marker.
30
3
36
26
25
29
32
27
24
34
23
27
33
31
28
*
*
28
27
*Refer to step 3 below.
74
73