
User Manual


14
E
N
G
L
I
S
H
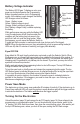
Debounce (Green LED) It is strongly suggested that the Debounce setting not be changed.
1. Pull the trigger until the bottom LED is green.
2. Use an extended trigger pull (approx. 2 seconds) to select the Debounce menu. Upon
trigger release, the bottom LED ashes the current setting. There are three settings, 1
low, 2 medium, and 3 high.
3. Pull the trigger one time (LED ashes green once) for the low setting. Each time you
pull the trigger, the LED ashes and advances to the next level of debounce. For
example, if you pull the trigger ve times after entering debounce programming, you
have chosen the medium setting: 1, 2, 3, 1, 2.
4. Use an extended trigger pull (approx. 2 seconds) to save the setting. The bottom LED
ashes the new setting.
5. Continue with further programming (use a short trigger pull), or go to Saving the
Programming Settings
below when nished making changes.
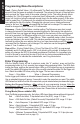
Rate of Fire (Blue LED)
Rate of Fire is programmed individually, and is Fire Mode specic. ROF is not global to all
re modes. A change to this setting only changes the ROF of the programmed Fire Mode.
Choosing a setting that is lower than the minimum ROF or higher than the maximum ROF for
a particular re mode results in the default ROF for that mode being saved to memory.
1. Pull the trigger until the bottom LED is blue.
2. Use an extended trigger pull (approx. 2 seconds) to select the ROF menu. Upon
release, the bottom LED ashes four times.
3. The LED ashes the current setting in 0.5 bps increments.
4. Use an extended trigger pull (approx. 2 seconds) to
change the ROF.
5. Pull back the trigger once for each 0.5 bps in the desired
ROF (i.e. for 12 bps you would pull the trigger 24 times;
the led ashes once for each trigger pull).
6. Use an extended trigger pull (approx. 2 seconds) to save
the setting. The LED ashes the new setting.
7. Continue with further programming (use a short trigger
pull), or go to Saving the Program Settings (below)
when nished making changes.
Saving the Program Settings
Push the programming button while holding back
the trigger to save the new settings in memory.
The LEDs ash red several times to conrm the
choices are saved to memory, then the electronics
go through the power up sequence (LEDs ash green,
then briey display the current settings).
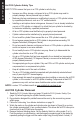
Tournament Lock (disables programming)
1. After choosing PSP, CFOA, NXL, or Millenium in Fire Mode
programming (and then exiting programming), remove two
screws from the right side of the Grip Cover.
2. Pull back on the Grip Cover to expose the backside of the
circuit board.
3. Move SW1 on the circuit board from the unlocked position to
the locked position. This prevents changing the programming
of the marker.
Figure 8: Tournament
Lock Switch Detail
UNLOCKED
LOCKED
SW1