
User Manual


11
E
N
G
L
I
S
H
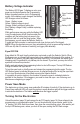
Battery Voltage Indicator
The Battery LED (Figure 7) displays a color upon
power up and also whenever the Programming
Button is pushed one time (not in Programming
mode). As the battery power changes, the Battery
LED changes colors as follows:
Green - Battery is new.
Yellow - Battery voltage is good.
Orange - Battery voltage is getting low.
Red - Battery voltage is risky; consider replacing
the battery.
While performance may vary while the Battery LED
is red, the electronics will still function under this
condition until the battery has lost power to the
point that it will not cycle the ring system. When
this happens, you can move the Selector Switch to
F mode and re the marker in mechanical mode (one shot per pull of the trigger).
NOTE: When the electronics are on, they automatically go into a power-saving mode (all
LEDs are off) after 20 minutes of inactivity (no trigger pulls detected).
Eyes OFF/ON
Eyes default to ON each time the electronics are turned on with the Selector Switch. When
the Eyes are on, an infrared light beam checks for a paintball in the breech of the marker. If a
paintball is not present, the eyes keep the marker from ring. This prevents the marker from
chopping paint if a paintball is only halfway into the breech. If you wish, you may shut off the
eyes and not have this protection.
Briey push and release the programming button to shut off the eyes. The top LED ashes
orange to indicate the eyes are off.
To turn the eyes back on, briey press and release the programming button again. The top
LED ashes green to indicate the eyes are on. An alternate method for turning the eyes back
on is to turn the electronics off and back on using the Selector Switch.
It is possible for paint or debris in the chamber to cause the eyes to mistakenly detect a
paintball in the chamber. If this happens, you need to clean the eyes - see Cleaning and
Maintenance
beginning on page 17.
Power Save Mode
The electronics go into a power save mode after 20 minutes of inactivity. If the electronics go to
Power Save mode (all LEDs off), point the marker in a safe direction and pull the trigger one time
to activate the electronics. The marker will re when the trigger is pulled.
Turning On the Electronics
Unload the marker (page 10) and remove the air/CO2 supply (page 16). Never attempt to do
programming on a pressurized marker! Turn on the electronics (move selector switch to the
“A” position). All LEDs ash three times, then show the current setting colors. After awhile, just
the top LED ashes green, unless you shut off the eyes, making the LED ash orange.
Programming
Button
Eyes Condition
LED
Figure 7: LEDs and Programming Button
Firing Mode
LED
Battery LED