
Operation Manual


5
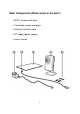
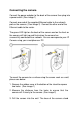
Connecting the camera
Connect the power adapter to the back of the camera then plug into
a power outlet. (See image 1)
Connect one end of the supplied Ethernet cable to the network
port on the camera. (See image 2). Connect the other end of the
Ethernet cable to the router.
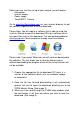
The green LED light on the back of the camera and on the front on
the camera will light up and flash when the camera has
successfully connected to a network. You can now operate your IP
Camera using your smartphone or PC.
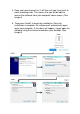
To mount the camera to a surface using the screws such as a wall,
please see below:
1. Remove the rubber case at the bottom of the stand to expose
two holes. (See image 1)
2. Measure the distance from the holes to ensure that the
camera will fit nicely to the screws. (See image 2)
3. Drill the screws into the wall. The base of the camera stand