
Installation Guide


Page 4
Installing TimberTech
®
Decking
12"
Substructure/Preparation
TimberTech
®
Fascia and Riser Boards
• Prior to installation, check to make sure all joists are
level structurally sound, and there are no nails or screws
protruding
• As joists are installed, run string line frequently to en
sure that the tops of the joists are in plane, as Timbertech
Decking will conform to the contour of the joists to which
it is attached. It may be necessary to shim or plane joists
due to size variations in lumber. Be sure to sort and
exclude any extremely crowned joists/lumber material.
• Proper joist spacing is required for proper installation.
Joist spacing should never exceed 16” on center Tim
bertech can be spanned at 24” o.c. For a more rigid feel,
12” may be preferred. However, all angled or commercial
installations of decking require 12” oc max.
• For best results, install solid wood blocking
between each joist, placed every 4’ - 6’ within the
structure, can help reduce movement or twisting of
the joists. Limiting joist movement can help reduce
excessive gapping and also ensure more uniform
finished surface of the TimberTech Deck.
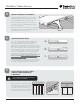
16”BASIC INSTALLATION
SUBSTRUCTURE
16” on center maximum joists.
(12” on center for commercial applications)
PICTURE FRAME INSTALLATION
SUBSTRUCTURE
16” on center maximum joists plus additional
support for picture frame structure
(12” on center for commercial applications)
DIAGONAL INSTALLATION
SUBSTRUCTURE
12” on center maximum joists
More severe angles may require closer joist spacing.
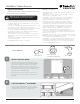
Using screws with proper installation of TimberTech
Fascia provides the best long-term holding. TimberTech
recommends the use of TimberTech TOPLoc Fascia Fasteners
for best results. Refer to gapping requirements on page 3 for
proper installation
For Use with TOPloc Fascia Fasteners:
Using the TOPLoc Fascia Bit, pre-drill 2” from the top and
bottom alternating a maximum of 12”. It is recommended
that screws are evenly spaced for the best look
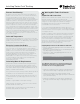
Follow these guidelines for best deck installation:
• Set fascia in place being sure to follow proper
gapping okrequirements.
• Drive TOPLoc fascia fastener 90 degrees with
the fascia surface so that the screw head is flush
with the surface. Do not completely torque down
screw; screw should serve as a hanging mecha
nism to allow for expansion and contraction in the
fascia
• Continue fastening in pattern described being
sure to work left to right or right to left. This will
ensure flatness in the fascia. If preferred, TopLoc
Fascia Fasteners may be installed 2 every 12”, 2”
from the top and bottom.
1 2 3
16”
16”