
Manual

9
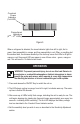
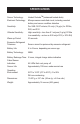
When a refrigerant is detected, the visual indicator lights from left to right; first in
green, then sequentially in orange, and then sequentially in red. Often, on anything but
the smallest leak, the extreme sensitivity of the unit may cause the LEDs to all light in
orange or red. Since each LED can appear in one of three colors – green, orange or
red – this will result in 15 distinct alarm levels.
WARNING: To prevent personal injury, do not use this Leak Detector in
an explosive or combustible atmosphere. Ambient atmosphere is drawn
through the probe and sensor, which operate at a very high temperature.
The resulting hot mixture of air and combustible gas could explode.
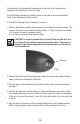
1. Press and release the ON/OFF Key to switch the unit on.
2. The LEDs begin cycling in orange, from left to right, to indicate warm-up. The warm-
up time is fixed at 20 seconds.
3. After warm-up, all LEDs briefly flash orange, indicating the unit is ready for use. The
unit begins beeping at a steady rate (two quick beeps approximately once every two
seconds – indicating HIGH sensitivity). The first LED displays the battery voltage
level as described in the Constant Power Indicator section.
4. Set the sensitivity level you wish to use, as described in the Sensitivity Adjustment
section.
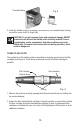
OPERATION
Proportional
Indicators
(2
nd
– 6
th
LEDs)
Constant
Power
Indicator
(1st LED)
Figure 5