
Use and Care Manual


1. Resin Tank - the tank will have a temporary shipping cap, a master O-Ring, and a piece
of tape covering the riser tube. The cap, master O-Ring (another is supplied) and the tape
must be removed and discarded prior to attaching control valve and the upper distributor.
This water softener includes regular control valve connections and a bypass valve connection;
therefore, a set of installation components has been included for each method of installation.
As such, following installation, the installer will be left with an “extra set” of installation
components (animated connectors, brine line flow control, master O-Ring, washers).
2. Read the complete installation guide
3. Unpack the Tier1 WS-165-132 and ensure all parts pictured and listed above are present. such
as tubing, are necessary Rotate the shutoff valve at the main water line to the OFF position
4. Shut off power supply to water heater – only if you will be draining the tank
5. Open the highest and lowest water faucets in your home (drainage and pressure allowance)
6. Ensure you are aware of local laws and codes regarding the installation, use, and maintenance
of water softeners
7. Begin assembly
Assembling the shipped components:
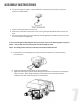
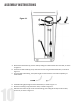
STEP 1: Attaching the Control Valve to the Resin Tank
A. Lightly coat the master O-ring, from Parts bag B, with silicone grease – insert into bottom of
control valve, as shown below
6
ASSEMBLY INSTRUCTIONS