
User Manual
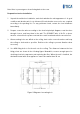
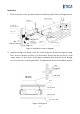

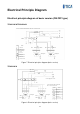
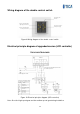

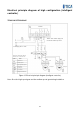
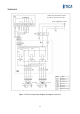
Table Of Contents
- Product Overview
- Features
- Use Conditions
- Precautions/Safety
- Appearance Overview
- Specifications
- Controller
- Basic model - double control switch
- 1) Power-on/off
- 2) Fan speed regulation
- Upgraded version - LCD controller
- 1) Power-on/off
- 2) Fan speed regulation
- 3) Work duration threshold setting for the filter
- 4) Filter reset
- High configuration version - Intelligent controller
- 1) Power-on/off
- 2) Fan speed regulation
- 3) Operating mode switching
- 4) Auto mode
- 5) Filter reset
- 6) Timed on/off and time adjustment
- Installation
- Electrical Principle Diagram
- Electrical Installation
- Operation and Maintenance
- After-sales Service

9
Note: Note to prevent gases from flowing back to the room.
Preparations before installation
1. Unpack the unit before installation, and check whether the unit appearance is in good
condition and whether unit is not deformed. Check whether accessories are complete
according to the packing list. For any problems found, contact the local distributor
immediately.
2. Prepare connection wires according to the electrical principle diagram, route the wires
through sleeves, and bury them in the wall. The IEC60227 wire of No.53 or above
must be selected for the power cord and the control board and switch connection line.
3. After mounting holes are drilled on the ceiling, lead out the connection wires and keep
the ceiling as horizontal as possible. Reinforce the ceiling to prevent vibration when
necessary.
4. Use M10 lifting bolts to fix the unit onto the ceiling. The distances between the four
fixing points are shown in the following figure. Meanwhile, reserve enough space for
checking electrical components and replacing the filter. When the unit is installed, the
minimum interval with other appliances cannot be smaller than 10 cm.
Figure 2 Diagram of mounting hole
Lifting point dimension
Center line
Access hole dimension
Access hole dimension
Lifting point dimension