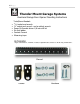
|Page Thunder Mount Garage Systems Overhead Garage Door Opener Mounting Instructions Tools/Items Needed: 9 /16” socket and wrench ½” socket and wrench and a ratchet wrench Power Drill socket driver 1/8 inch drill bit Six foot ladder Contact Cement Measuring tape IN THE BOX: Figure 1: Instructions, 1-channel, 2 cradles, 2 adjustable tubes, isolators, 1 chrome ring, and hardware.
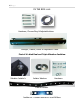
|Page IN THE BOX: cont. Hardware, Chrome Ring & Adjustable tubes Stronger, Cleaner, Easier to Adjustable Tubes. First of it’s kind Dual and Triple Vibration Isolation. Vibration Isolator’s Isolator Washers Hardware Channel Isolator Isolator for Thunder Mounts DC Multi-fit Base.
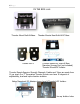
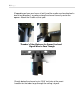
|Page IN THE BOX: cont. Thunder Mount Multi-fit Base. Cradles Gen 3 Thunder Mounts New Multi-fit DC Base Thunder Mounts DC Multi-fit Base Marantec Synergy Part (not included) Thunder Mounts DC Isolator Thunder Mounts Superior Strength Channels, Cradles and Tubes are made from 12 ga. steel. Our 3rd Generation Thunder Mounts now have 30 degree’s of adjustability, dual and triple vibration isolation. Below Marantec’s DC Adapter shown here & Thunder’s DC Isolator. line up Isolator holes.
|Page IN THE BOX: cont. Line up the Isolator holes to Marantec Part and Attach to Thunder Mount Multi-fit DC Base. First of it’s kind Triple Isolation. Thunder Mounts DC Marantec Multi-fit Base, Marantec Synergy Part, Isolator. Isolator goes on Marantec Rail Part in-between the two parts above. Lay out all hardware in the order to be assembled.”This Saves Time” #1 Base #2 Channel #3 Cradles #4 Adjustable Shafts. Notes: Thunder Mounts can also be pre assembled then mounted.
|Page (Depending on how your house is built) and the cradles can be attached in one of two directions, anywhere along the channel to easily center the opener. Attach the Cradles at that spot. Thunder’s Tube Slots are for Power Cord and Signal Wire to Pass Though. Directly below the channel cut a 2.5/8” inch hole at the exact Location for the tubes to go through the ceiling / drywall.
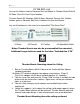
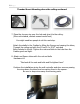
|Page Thunder Mount Mounting above the ceiling continued. Seen here is a Thunder Mount System Mounted above the Supports with Isolators installed. 5. Attach the cradles to the channel facing away from each other above the hole where the tubes pass through the ceiling and where The channel can be supported securely. #3 hardware. 6. Drill 1/8 x 1 inch deep holes in the structure to attach the Channels.
|Page Thunder Mount Mounting above the ceiling continued. 7. Place the chrome ring over the hole and glue it to the ceiling. (Glue not included, contact cement works best) You might need two people to do this next step. Attach the shafts to the Cradles by lifting the Opener and passing the tubes, Through the ceiling and with the #3 set 3.0 x 9/16th nuts and Bolts included in the kit. Tighten the nuts and bolts to the tube then the Cradles good and tight. 8.
|Page Thunder Mounts Installed under the ceiling. 1. Attach Thunder Mounts Base to Overhead Door Opener. #1 hardware. 2. Attach and bolt Inner Tube to Base and pass the “Power cord” through it. Use #4 hardware and washer isolators. Secure. All Vibration Isolation Parts Must Be Used To Make This System Work Correctly.
|Page Thunder Mounts Installed under the ceiling cont. 3. Locate the solid wood supports directly above from where to attach The Channel. Thunder Mounts Patented Channel and Cradle’s design can be placed in two Directions depending on how your house is built, and the Cradles can be attached anywhere along the channel. Mark that location and Pre-Drill the holes with a 1/8 inch drill Bit And drill 1” deep. 4.