
Instructions / Assembly


6 | P a g e
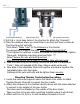
Mark that location and pre-drill the holes with a 1/8 inch drill
Bit and drill 2” deep.
4. First loosely bolt the retainers on the channel where needed.
5. Then bolt on the Wider Tube into the second set of holes
And tighten them up.
6. Then tighten up the retainers good and tight.
This makes sure the retainers are tight against the tubes.
7. Bolt the adjustable tubes together to door tracks. Gen 3 hardware are
9/16 x 3” bolts for the thick 12 ga. Gen 3 Tubes.
Adjust the Height. Recheck all the nuts and bolts and secure them well!
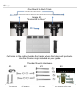
This is the Wrong Way to Mount the Channels.
Look at this!!
This is the wrong way !!
Unstable Mounted this way.
Not Recommended at all !!!
(Seen here is TMGTC) Image #2.
We Recommended Only Mounting Channels Parallel with the Door! Image #1. Page 3 and 4
Be sure that it’s secure and tight and assembled like Image #1 and Page 3.
(Remember that the door and track spacing should be one inch or less).
Thunder Mounts Garage Systems LLC.
The Leader of Overhead Garage Mount Safety & Technology
The Overhead Garage Mount Solution Made In America.
Give us a call if you have any questions. 805-338-6680
Hours: M-F 9-5, 10-2 Sat. Closed Sunday 805-262-2895 PST. info@thundermounts.com
Injury and or property damage can occur if instructions are not followed properly voids
All manufactures warranty.
Right a review @Homedepot.com
Send us your before and after pictures to Thunder@ThunderMounts.com
Copyright © 2010-2019.THUNDER MOUNTS TM All rights