
Instructions / Assembly


4 | P a g e
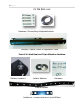
IN THE BOX: cont.
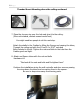
Line up the Isolator holes to Marantec Part and Attach to Thunder Mount Multi-fit
DC Base. First of it’s kind Triple Isolation.
Thunder Mounts DC Marantec Multi-fit Base, Marantec Synergy Part, Isolator.
Isolator goes on Marantec Rail Part in-between the two parts above.
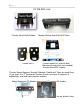
Lay out all hardware in the order to be assembled.”This Saves Time”
#1 Base #2 Channel #3 Cradles #4 Adjustable Shafts.
Notes: Thunder Mounts can also be pre assembled then mounted.,
Additional Longer bolts are used for the tubes “Included Gen 3 TM”
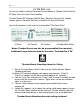
Thunder Mount: Mounting above the Ceiling
1. Bolt on Thunder Mounts Multi-Fit base to the Overhead Door Opener.
Hardware provided.
1.b Attach DC Isolator to adapter from opener manufacturer. (Page 3)
Then Push adapter into the base and bolt together. #1 hardware
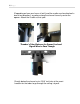
2. Take the Inner tube and pass the “Power Cord” through it and bolt the tube
to base with #4 and washer Isolators. Signal wires can be passed down
tubes at a later time.
3. Take the Outer tube passing the power cord and bolting the tubes
together.#4
4. Locate the supports / joists above the ceiling (solid wood supports) where
the Thunder Mount channel will be attached. Thunder Mount’s patented
channel and cradle design is able to be placed in one of two directions,
Thunder Mount Mounting above the ceiling continued.