Couv-Ferrari Motors Gamepad-5075584.
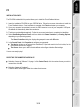
For PC & PlayStation® 3 User Manual TECHNICAL FEATURES 1. Handles 2. 2 progressive analog mini-sticks 3. D-Pad 4. Progressive optical wheel 5. 2 progressive triggers 6. HOME LED button for Playstation®3 and MODE for PC 7. MAPPING LED button (for programming and indicating connection status) 8. PRESET LED button (to select programming) 9.
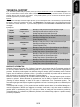
TABLE OF SUPPORTED MODES System PLAYSTATION® 3 PC MODE Color of MODE button (8) “PS3” OFF “4 AXES” OFF “5 AXES” RED “7 AXES” GREEN PLAYSTATION® 3 INSTALLATION ON PLAYSTATION® 3 1. Connect the USB connector to a USB port on your console. 2. Turn on your console. 3. Switch your gamepad to “PS3” mode = the MODE button should be Off. (to do so, if necessary, press the button until it switches off). 4. Launch the game.
PC INSTALLATION ON PC The CD-ROM included with this product allows you to install the Force Feedback drivers. 1. Insert the installation CD-ROM into your CD-ROM drive. Follow the on-screen instructions to install the Force Feedback drivers. Once installation is complete, click Finish and restart your computer. 2. Once your computer has restarted, connect the USB connector to one of your computer’s USB ports. Windows® will automatically detect the new device. 3. The drivers are installed automatically.
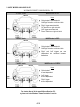
3 “AXES” MODES AVAILABLE ON PC “AUTOMATIC PRESET” CONFIGURATION - PC “4 AXES” mode MODE button is OFF Here: “Optical wheel” associated with “Left/Right” direction on left mini-stick “Right” trigger associated with “Up” direction on right mini-stick “Left” trigger associated with “Down” direction on right mini-stick “5 AXES” mode MODE button is RED Here: “Optical wheel” associated with “Left/Right” direction on left mini-stick “Right” and “Left” triggers are now independent but combined between themselves
ADVANCED FUNCTIONS ADJUSTING THE OPTICAL WHEEL’S SENSITIVITY The optical wheel (4) has 2 sensitivity modes: - Normal sensitivity (default mode) - High sensitivity (must be adjusted) Adjustment for “High sensitivity” mode: Color of MODE button Steps Action 1 Raise and hold the “UP” direction on the optical wheel 2 Flashes Red 2 seconds Press and release the MAPPING button (7) The optical wheel is now more sensitive (Repeat this procedure each time you restart your console or disconnect the gamepad) Ad
PROGRAMMING THE OPTICAL WHEEL AND TRIGGERS The 2 directions of the optical wheel and the 2 progressive triggers can be programmed using the MAPPING button (7).
EEPROM MEMORY Your gamepad features an internal chip which serves to retain all of your “MANUAL PRESET” programming in memory (even when the gamepad is switched off or disconnected for a long period of time). You can save 1 different “MANUAL PRESET” for each system used (PS3, PC 4 Axes, PC 5 Axes or PC 7 Axes). The exception is for “PS3” and “PC 4 Axes”, which use the same “MANUAL PRESET” (modifying or erasing one of these will have the same effect on the other).
DIFFERENT EXAMPLES ACCORDING TO TYPE OF GAME Action/Adventure (“Car” mode) Action/Adventure (“On foot” mode) Sports (“Ball game” type) Sports (“Golf” type) Car racing (“Simulation” type) Car racing (“Arcade/Rally” type) Flying (“Simulation” type) Flying (“Arcade/Action” type) 8/10
TECHNICAL SUPPORT If you encounter a problem with your product, please go to http://ts.thrustmaster.com and click Technical Support. From there you will be able to access various utilities (Frequently Asked Questions (FAQ), the latest versions of drivers and software) that may help to resolve your problem.
Additional warranty provisions In the United States of America and in Canada, this warranty is limited to the product’s internal mechanism and external housing. Any applicable implied warranties, including warranties of merchantability and fitness for a particular purpose, are hereby limited to two (2) years from the date of purchase and are subject to the conditions set forth in this limited warranty. In no event shall Guillemot Corporation S.A.
Pour PC & PlayStation® 3 Manuel de l'utilisateur CARACTÉRISTIQUES TECHNIQUES 1. 2. 3. 4. 5. 6. Poignées 2 sticks analogiques progressifs Croix digitale Roue optique progressive 2 Gâchettes progressives Bouton Led HOME pour Playstation®3 et MODE pour PC 7. Bouton Led MAPPING (pour programmer et indiquer l’état de la Connexion) 8. Bouton Led PRESET (pour choisir son programme) 9.
TABLEAU DES « MODES » SUPPORTES Support MODE Couleur du bouton MODE (8) PLAYSTATION® 3 « PS3 » ETEINT PC « 4 AXES » ETEINT « 5 AXES » ROUGE « 7 AXES » VERT PLAYSTATION® 3 INSTALLATION SUR « PLAYSTATION® 3 » 1. Branchez le connecteur USB sur un port USB de la console. 2. Allumez votre console. 3. Basculez votre manette en mode « PS3 » = le bouton MODE doit être éteint. (pour cela, si nécessaire, appuyez sur le bouton jusqu’à ce qu’il s’éteigne.) 4. Lancez le jeu.
PC INSTALLATION SUR PC Le CD-ROM fourni avec ce produit permet d'installer les pilotes Force Feedback. 1. Insérez le CD-ROM d'installation dans votre lecteur de CD-ROM. Suivez les instructions affichées à l'écran pour installer les pilotes Force Feedback. Une fois l'installation terminée, cliquez sur Terminer et redémarrez votre ordinateur. 2. Au redémarrage de l'ordinateur, reliez le connecteur USB à l'un des ports USB de votre unité centrale. Windows® détectera automatiquement le nouveau périphérique. 3.
3 MODES D’« AXES » DISPONIBLE SUR PC CONFIGURATION DES « PRESET AUTOMATIQUE » - PC Mode « 4 AXES » Bouton MODE ETEINT Ici : « Roue optique » associée à la direction «Gauche/Droite» du ministick gauche « Gâchette Droite » associée à la direction « Haut » du mini-stick droit « Gâchette Gauche » associée à la direction « Bas » du mini-stick droit Mode « 5 AXES » Bouton MODE ROUGE Ici : « Roue optique » associée à la direction « Gauche/Droite » du mini-stick gauche « Gâchettes Droite et gauche» désormais indép
FONCTIONS AVANCÉES REGLAGE DE LA SENSIBILITE DE LA ROUE OPTIQUE La roue optique (4) possède 2 modes de sensibilité : - Sensibilité Normale (mode par défaut) - Sensibilité Haute (nécessite un paramétrage) Paramétrage en mode « Sensibilité Haute » : Couleur du bouton MODE Etapes Action 1 Levez et maintenir la direction « HAUT » de la roue optique. 2 Etapes 1 2 Clignote en Rouge 2 secondes Pressez et relâchez le bouton MAPPING (7). Votre roue optique est désormais plus sensible.
PROGRAMMATION DE LA ROUE OPTIQUE ET DES GACHETTES Les 2 directions de la roue optique ainsi que les 2 gâchettes progressives peuvent être programmées à l’aide du bouton MAPPING (7).
MEMOIRE EEPROM Votre manette dispose d'une puce interne qui garde en mémoire l’ensemble de vos programmations « PRESET MANUEL » (même manette éteinte ou débranchée pendant une longue période). Vous pouvez enregistrer 1 « Preset Manuel » différent sur chaque support utilisé (PS3, PC 4 Axes, PC 5 Axes ou PC 7 Axes). Excepté pour « PS3 » et « PC 4 Axes » qui utilisent le même « Preset Manuel » (modifier ou effacer l’un sera équivalent sur le second).
DIFFERENTS EXEMPLES EN FONCTION DU GENRE DE JEU UTILISE Action / Aventure (En mode « Voiture ») Action / Aventure (en mode « A pied ») Sport (Type « Jeu de balle ») Sport (Type « Golf ») Automobile (Type « Simulation ») Automobile (Type « Arcade / Rallye ») Aviation (Type « Simulation ») Aviation (Type « Arcade / Action ») 8/10
SUPPORT TECHNIQUE Si vous rencontrez un problème avec votre produit, rendez-vous sur le site http://ts.thrustmaster.com et cliquez sur Support Technique. Vous aurez alors accès à différents services (Foire Aux Questions (FAQ), dernières versions des pilotes et logiciels) susceptibles de résoudre votre problème.
Stipulations additionnelles à la garantie Aux États-Unis d’Amérique et au Canada, cette garantie est limitée au mécanisme interne et au boîtier externe du produit. Toute garantie implicite applicable, incluant les garanties de qualité marchande ou d’adaptation à un usage particulier, est limitée à deux (2) ans à compter de la date d’achat et soumise aux conditions de la présente garantie limitée. En aucun cas, Guillemot Corporation S.A.
Für PC & PlayStation® 3 Benutzerhandbuch TECHNISCHE FEATURES 1. Handgriffe 2. 2 analoge Ministicks 3. D-Pad 4. Analoges, optisches Rad 5. 2 analoge Trigger 6. HOME LED-Button für Playstation®3 und MODE für PC 7. MAPPING LED-Button (für Programmierung und zur Anzeige des Verbindungsstatus) 8. PRESET LED -Button (um versch. Programmierungen zu wählen) 9.
TABELLE DER UNTERSTÜTZTEN MODI System PLAYSTATION® 3 PC MODE Farbe des MODUS Button (8) “PS3” AUS “4 ACHSEN” AUS “5 ACHSEN ” ROT “7 ACHSEN ” GRÜN PLAYSTATION® 3 INSTALLATION AUF DER PLAYSTATION® 3 1. Stecken Sie den USB Stecker in einen freien USB Port Ihrer Konsole. 2. Schalten Sie die Konsole ein. 3. Schalten Sie Ihr Gamepad in den “PS3” Modus um = der MODUS Button sollte AUS sein (falls nötig, den Button solange drücken bis er ausschaltet). 4. Starten Sie das Spiel.
PC INSTALLATION AUF DEM PC Die beigelegte CD-ROM erlaubt es Ihnen die Force Feedback Treiber zu installieren. 1. Legen Sie die Installations-CD-ROM in Ihr CD-ROM Laufwerk. Folgen Sie den Bildschirmanweisungen, um die Force Feedback Treiber zu installieren. Nach der kompletten Installation klicken Sie auf Beenden und starten Ihren Computer neu. 2. Nach dem Computerneustart stecken Sie den USB Stecker in einen freien USB Port an Ihrem Computer. Windows® erkennen automatisch die neue Hardware. 3.
3 VERFÜGBARE “Achsen” MODI AUF DEM PC KONFIGURATION DER “AUTOMATISCHEN VOREINSTELLUNG” AUF PC “4 ACHSEN” Modus MODUS Button ist AUS Hier: “Optisches Rad” mit der “Links/Rechts” Richtung auf dem linken Ministick assoziiert “Rechter” Trigger mit der “Hoch” Richtung auf dem rechten Ministick assoziiert “Linker” Trigger mit der “Runter” Richtung auf dem rechten Ministick assoziiert “5 ACHSEN” Modus MODUS Button ist ROT Hier: “Optisches Rad” mit der “Links/Rechts” Richtung auf dem linken Ministick assoziiert “R
ERWEITERTE FUNKTIONEN JUSTIEREN DER EMPFINDLICHKEIT DES OPTISCHEN RADES Das optische Rad (4) hat 2 Empfindlichkeitsstufen: - Normale Empfindlichkeit (voreingestellter Modus) - Hohe Empfindlichkeit (muß eingestellt werden) Justieren des Modus “Hohe Empfindlichkeit”: Schritt Farbe des MODUS Button Aktion Das optische Rad auf die „Hoch“ Position bewegen und dort halten Blinkt für 2 Sek.
PROGRAMMIERUNG DES OPTISCHEN RADES UND DER TRIGGER Die beiden Richtungen des optischen Rades und der beiden progressiven Trigger können über den MAPPING Button (7) programmiert werden.
EEPROM SPEICHER Ihr Gamepad verfügt über einen nichtflüchtigen, internen Chip, der all Ihre „Manuellen Voreinstellungen“ speichert und Ihnen entsprechend zur Verfügung stellt (auch wenn das Gamepad für längere Zeit ausgeschaltet oder abgestöpselt ist). Sie können jeweils eine unterschiedliche „MANUELLE VOREINSTELLUNG“ für jedes genutzte System (PS3, PC 4 Achsen, PC 5 Achsen oder PC 7 Achsen) speichern.
VERSCHIEDENE BEISPIELE NACH SPIELETYP Action/Adventure (“Auto” Modus) Action/Adventure (“Zufuß” Modus) Sport (“Ballspiel” Typ) Sport (“Golf” Typ) Autorennen (“Simulation” Typ) Autorennen (“Arcade/Rallye” Typ) Fliegen (“Simulation” Typ) Fliegen (“Arcade/Action” Typ) 8/10
TECHNISCHER SUPPORT Sollten Sie mit Ihrem Produkt ein Problem haben, besuchen Sie bitte die Seite http://ts.thrustmaster.com und klicken Sie auf Technischer Support. Von dort aus können Sie auf verschiedene Hilfen zugreifen (Fragen und Antworten (FAQ), die neuesten Versionen von Treibern und Software), die Ihnen bei der Lösung Ihres Problems helfen könnten.
COPYRIGHT © 2009 Guillemot Corporation S.A. Alle Rechte vorbehalten. Thrustmaster® ist ein eingetragenes Warenzeichen der Guillemot Corporation S.A. Ferrari® ist ein eingetragenes Warenzeichen der Ferrari S.p.A. PlayStation® ist ein eingetragenes Warenzeichen der Sony Computer Entertainment Inc. Microsoft® Windows® ist ein eingetragenes Warenzeichen der Microsoft Corporation in den Vereinigten Staaten von Amerika und/oder anderen Ländern.
voor PC & PS3 Handleiding TECHNISCHE KENMERKEN 1. Handvatten 2. 2 progressief reagerende analoge mini-joysticks 3. D-pad 4. Progressief reagerend optisch stuur 5. 2 progressief reagerende triggers 6. HOME-knop met LED voor Playstation® 3 en MODE voor pc 7. MAPPING-knop met LED (voor programmeren en indicatie van verbindingsstatus) 8. PRESET-knop met LED (om programmering te selecteren) 9. 9.
TABEL MET ONDERSTEUNDE MODI Systeem PLAYSTATION® 3 PC MODUS Kleur van MODUSknop (8) "PS3" UIT "4 ASSEN" UIT "5 ASSEN" ROOD "7 ASSEN" GROEN PLAYSTATION® 3 INSTALLATIE OP PLAYSTATION® 3 1. Sluit de USB-kabelconnector aan op de USB-poort van uw console. 2. Zet de console aan. 3. Zet uw gamepad in de modus "PS3" = de MODE-knop moet op Uit staan. (indien nodig, moet u de knop indrukken totdat hij uitgaat). 4. Start de game.
PC INSTALLATIE OP DE PC Met behulp van de meegeleverde cd-rom worden de drivers geïnstalleerd die nodig zijn voor Force Feedback. 1. Plaats de installatie-cd in het cd-rom-station. Volg de instructies op het scherm om de Force Feedback-drivers te installeren. Klik, als de installatieprocedure is afgerond, op Voltooien om de computer opnieuw te starten. 2. Sluit, als de computer opnieuw is gestart, de USB-connector aan op een van de USB-poorten van de computer.
"3 ASSEN"-MODI BESCHIKBAAR OP DE PC "AUTOMATIC PRESET"-CONFIGURATIE - PC "4 ASSEN"-modus MODE-knop is UIT Hier: Het "optische stuurwiel" is gekoppeld aan de "links/rechts"-richting van de linkermini-joystick De "rechtertrigger" is gekoppeld aan de "omhoog"-richting van de rechterminijoystick De "linkertrigger" is gekoppeld aan de "omlaag"-richting van de rechtermini-joystick "5 ASSEN"-modus MODE-knop is ROOD Hier: Het "optische stuurwiel" is gekoppeld aan de "links/rechts"-richting van de linkermini-joysti
GEAVANCEERDE FUNCTIES DE GEVOELIGHEID VAN HET OPTISCH STUURWIEL AANPASSEN Het optisch stuurwiel (4) kent twee gevoeligheidsinstellingen: - Normale gevoeligheid (standaardinstelling) - Hoge gevoeligheid (moet worden ingesteld) Instelling voor "Hoge gevoeligheid": Stappen 1 2 Kleur van MODEknop Actie Duw "omhoog"-richting van het optische stuurwiel omhoog en Knippert Rood houd deze vast 2 seconden Druk op de MAPPING-knop (7) en laat deze weer los Het optisch stuurwiel reageert nu gevoeliger (Herhaal deze p
HET OPTISCHE STUURWIEL EN DE TRIGGERS PROGRAMMEREN De twee richtingen van het optische stuurwiel en de twee progressief reagerende triggers kunnen met behulp van de MAPPING-knop (7) worden geprogrammeerd.
EEPROM-GEHEUGEN Uw gamepad beschikt over een ingebouwde chip die uw "MANUAL PRESET"-programmering in het geheugen bewaart, zelfs als de gamepad wordt uitgezet of langere tijd wordt afgekoppeld. U kunt 1 specifieke "MANUAL PRESET" bewaren voor elk gebruikt systeem (PS3, PC 4 ASSEN, PC 5 ASSEN of PC 7 ASSEN). Een uitzondering is voor "PS3" en "PC 4 ASSEN" omdat deze dezelfde "MANUAL PRESET" gebruiken (als u de ene wijzigt of wist, wijzigt of wist u ook de andere).
VERSCHILLENDE VOORBEELDEN PER TYPE GAME Actie/avontuur (“Auto”-modus) Actie/avontuur (“Te voet”-modus) Sport (“Balspel”-type) Sport (“Golf”-type) Autorace (“Simulatie”-type) Autorace (“Arcade/rally”-type) Vliegen (“Simulatie”-type) Vliegen (“Arcade/actie”-type) 8/10
TECHNISCHE ONDERSTEUNING Mocht u problemen ondervinden met dit product, ga dan naar http://ts.thrustmaster.com en klik op Technical Support. U hebt daar toegang tot verschillende onderwerpen die u helpen bij het vinden van oplossingen, zoals de FAQ (veelgestelde vragen) en de meest recente drivers en software. Als het probleem op die manier niet kan worden verholpen, kunt u contact opnemen met de Thrustmaster product technical support service (Technical Support).
INFORMATIE MET BETREKKING TOT DE GARANTIE Wereldwijd garandeert Guillemot Corporation S.A. (“Guillemot”) de koper dat dit Thrustmaster-product gedurende een periode van twee (2) jaar vanaf de oorspronkelijke aankoopdatum vrij zal zijn van materiaal- en fabricagefouten. Indien u in de garantieperiode een defect meent te constateren aan dit product, neem dan onmiddellijk contact op met de Technical Support, die u zal informeren over de te volgen procedure.
Per PC & PlayStation® 3 Manuale d’uso CARATTERISTICHE TECNICHE 1. Maniglie 2. 2 mini-stick analogici progressivi 3. D-Pad 4. Rotella ottica progrssiva 5. 2 trigger progressivi 6. LED pulsante HOME per Playstation®3 e MODE per PC 7. LED pulsante MAPPING (programmazione e stato di connessione) 8. LED pulsante PRESET (scelta programmazione) 9.
TABELLA DELLE MODALITA’ SUPPORTATE Sistema PLAYSTATION® 3 PC MODALITA’ Colore del pulsante MODE (8) “PS3” SPENTO “4 ASSI” SPENTO “5 ASSI” ROSSO “7 ASSI” VERDE PLAYSTATION® 3 INSTALLAZIONE SU PLAYSTATION® 3 1. Collega il connettore USB ad una porta USB della tua console. 2. Accendi la tua console. 3. Attiva la modalità “PS3” del tuo gamepad = il pulsante MODE dovrebbe risultare spento. (se necessario, per far questo tieni premuto il pulsante MODE finché non si spegnerà). 4. Avvia il gioco.
PC INSTALLAZIONE SU PC Potrai installare i driver Force Feedback utilizzando il CD-ROM accluso a questo prodotto. 1. Inserisci il CD-ROM di instalalzione nel tuo lettore CD-ROM. Installa i driver Force Feedback seguendo le istruzioni che appariranno sullo schermo. Una volta completata l'installazione, clicca su Fine e riavvia il tuo computer. 2. Una volta riavviato il computer, collega il connettore USB ad una porta USB del tuo computer. Windows® rileverà automaticamente la nuova periferica. 3.
LE 3 MODALITA’ “ASSI” DISPONIBILI SU PC CONFIGURAZIONE “PROFILO AUTOMATICO” - PC Modalità “4 ASSI” Il pulsante MODE è SPENTO In questa configurazione: “Manopola ottica” associata alle direzioni “Sinistra/Destra” del ministick di sinistra Trigger “Destro” associato alla direzione “Su” del mini-stick destro Trigger “Sinistro” associato alla direzione “Giù” del mini-stick destro Modalità “5 ASSI” Il pulsante MODE è ROSSO In questa configurazione: “Manopola ottica” associata alle direzioni “Sinistra/Destra” de
FUNZIONI AVANZATE REGOLAZIONE DELLA SENSIBILITA’ DELLA MANOPOLA OTTICA La manopola ottica (4) ha 2 modalità di sensibilità: - Sensibilità normale (modalità predefinita) - Sensibilità alta (da impostare) Impostazione della modalità a “Sensibilità alta”: Colore del pulsante MODE Passo Azione 1 Tieni spinta verso l’alto la direzione “SU” della manopola ottica 2 Lampeggia rosso per 2 secondi Premi e rilascia il pulsante MAPPING (7) La manopola ottica è ora più sensibile (Ripeti questa procedura ogni volta
PROGRAMMAZIONE DELLA MANOPOLA OTTICA E DEI TRIGGER Le 2 direzioni della manopola ottica e i 2 trigger progressivi possono essere programmati utilizzando il pulsante MAPPING (7).
MEMORIA EEPROM Il tuo gamepad è dotato di un chip interno che si occupa di conservare in memoria tutte le programmazioni del tuo “PROFILO MANUALE” (anche quando il gamepad è spento o disconnesso per un lungo periodo di tempo). Puoi salvare 1 “PROFILO MANUALE” per ciascuna piattoforma utlizzata (PS3, PC 4 Assi, PC 5 Assi o PC 7 Assi).
ESEMPI DI CONFIGURAZIONI IN ACCORDO CON IL TIPO DI GIOCO Azione/Avventura Azione/Avventura (modalità “In macchina”) (modalità “A piedi”) Sport (Genere "giochi con la palla") Sport (Genere "golf") Guida (Genere "simulazione") Guida (Genere "arcade/rally") Volo (Genere "simulazione") Volo (Genere "arcade/azione") 8/10
ASSISTENZA TECNICA Qualora riscontrassi un problema con il tuo prodotto, accedi al sito http://ts.thrustmaster.com e clicca su Assistenza tecnica. Da qui, potrai accedere a vari servizi ed informazioni (Risposte alle Domande più Frequenti (FAQ), le più recenti versioni di driver e software) che potrebbero esserti utili per risolvere il tuo problema.
COPYRIGHT © 2009 Guillemot Corporation S.A. Tutti i diritti riservati. Thrustmaster® è un marchio registrato di proprietà di Guillemot Corporation. Ferrari® è un marchio registrato di proprietà di Ferrari S.p.A. PlayStation® è un marchio registrato di proprietà di Sony Computer Entertainment Inc. Microsoft® Windows® è un marchio registrato di proprietà di Microsoft Corporation, negli Stati Uniti e/o altri Paesi.
Para PC & PlayStation® 3 Manual del usuario CARACTERÍSTICAS TÉCNICAS 1. Asas 2. 2 mini-sticks analógicos progresivos 3. D-Pad 4. Rueda óptica progresiva 5. 2 gatillos progresivos 6. Botón LED HOME para Playstation®3 y MODE para PC 7. Botón LED MAPPING (para programación e indicación del estado de la conexión) 8. Botón LED PRESET (para seleccionar programación) 9.
TABLA DE MODOS COMPATIBLES Sistema PLAYSTATION® 3 PC MODE Color del botón MODE (8) “PS3” APAGADO “4 EJES” APAGADO “5 EJES” ROJO “7 EJES” VERDE PLAYSTATION® 3 INSTALACIÓN EN PLAYSTATION® 3 1. Enchufa el conector USB a un puerto USB de tu consola. 2. Enciende tu consola. 3. Cambia el gamepad a modo “PS3” = el botón MODE debería estar apagado. (para ello, si es necesario, pulsa el botón hasta que se apague). 4. Ejecuta el juego.
PC INSTALACIÓN EN PC El CD-ROM incluido con este producto te permite instalar los controladores de Force Feedback. 1. Inserta el CD-ROM de instalación en tu lector de CD-ROM. Sigue las instrucciones en pantalla para instalar los controladores Force Feedback. Una vez terminada la instalación, haz clic en Finalizar y reinicia el ordenador. 2. Una vez reiniciado el ordenador, enchufa el conector USB a uno de los puertos USB del ordenador. Windows® detectará automáticamente el nuevo dispositivo. 3.
3 MODOS DE “EJES” DISPONIBLES EN PC CONFIGURACIÓN “AUTOMATIC PRESET” - PC Modo “4 EJES” Botón MODE está apagado Aquí: “Rueda óptica” asociada con la dirección “Izquierda/Derecha” del mini-stick izquierdo Gatillo “derecho” asociado con dirección “Arriba” en el mini-stick derecho Gatillo “izquierdo” asociado con dirección “Abajo” en el mini-stick derecho Modo “5 EJES” Botón MODE está en ROJO Aquí: “Rueda óptica” asociada con la dirección “Izquierda/Derecha” del mini-stick izquierdo Gatillos “derecho” e “izq
FUNCIONES AVANZADAS AJUSTE DE LA SENSIBILIDAD DE LA RUEDA ÓPTICA La rueda óptica (4) tiene 2 modos de sensibilidad: - Sensibilidad normal (modo predeterminado) - Sensibilidad alta (debe ajustarse) Ajuste para el modo “Sensibilidad alta”: Color del botón MODE Pasos Acción 1 Sube y mantén la dirección “ARRIBA” de la rueda óptica 2 Parpadea en rojo durante 2 segundos Pulsa y suelta el botón MAPPING (7) La rueda óptica ahora es más sensible (Repite este procedimiento cada vez que reinicies la consola o de
PROGRAMACIÓN DE LA RUEDA ÓPTICA Y DE LOS GATILLOS Las 2 direcciones de la rueda óptica y los 2 gatillos progresivos pueden programarse utilizando el botón MAPPING (7).
MEMORIA EEPROM Tu gamepad incorpora un chip interno que sirve para retener toda tu programación “MANUAL PRESET” en memoria (incluso cuando el gamepad está apagado o desconectado durante un largo período de tiempo). Puedes guardar 1 “MANUAL PRESET” diferente para cada sistema utilizado (PS3, PC 4 Ejes, PC 5 Ejes o PC 7 Ejes). La excepción es para “PS3” y “PC 4 Ejes”, que usan el mismo “MANUAL PRESET” (modificando o borrando uno de ellos tendremos el mismo efecto en el otro).
DIFERENTES EJEMPLOS SEGÚN EL TIPO DE JUEGO Acción/Aventura (modo “Coche”) Acción/Aventura (modo “A pie”) Deportes (tipo “Juego con pelota”) Deportes (tipo “Golf”) Carreras de coches (tipo “Simulación”) Carreras de coches (tipo “Arcade/Rally”) Vuelo (tipo “Simulación”) Vuelo (tipo “Arcade/Acción”) 8/10
SOPORTE TÉCNICO Si encuentras un problema con tu producto, visita http://ts.thrustmaster.com y haz clic en Technical Support. Desde allí podrás acceder a distintas utilidades (preguntas frecuentes (Frequently Asked Questions, FAQ), las últimas versiones de controladores y software) que pueden ayudarte a resolver tu problema.
COPYRIGHT © 2009 Guillemot Corporation S.A. Todos los derechos reservados. Thrustmaster® es una marca registrada de Guillemot Corporation S.A. Ferrari® es una marca registrada de Ferrari S.p.A. PlayStation® es una marca registrada de Sony Computer Entertainment, Inc. Este producto no está avalado ni licenciado oficialmente por Sony Computer Entertainment, Inc. Windows® y Windows® XP son marcas comerciales registradas de Microsoft Corporation en Estados Unidos y/o en otros países.
Para PC & PlayStation® 3 Manual do Utilizador CARACTERÍSTICAS TÉCNICAS 1. 2. 3. 4. 5. 6. Punhos 2 minialavancas analógicas progressivas D-Pad Roda óptica progressiva 2 gatilhos progressivos Botão/LED HOME para a PlayStation® 3 e MODE para PC 7. Botão/LED MAPPING (para programar e indicar o estado da ligação) 8. Botão/LED PRESET (para seleccionar a programação) 9.
TABELA DOS MODOS “SUPORTADOS” Plataforma MODO Cor do botão MODE (8) PLAYSTATION® 3 “PS3” APAGADO PC “4 EIXOS” APAGADO “5 EIXOS” VERMELHO “7 EIXOS” VERDE PLAYSTATION® 3 INSTALAÇÃO NA “PLAYSTATION® 3” 1. Ligue o conector USB numa porta USB da consola. 2. Ligue a consola. 3. Ajuste o gamepad para o modo “PS3” = o botão MODE deve estar apagado (se necessário prima o botão até se apagar). 4. Execute o jogo.
PC INSTALAÇÃO NO PC O CD-ROM fornecido com este produto permite instalar os controladores de retorno de força. 1. Insira o CD-ROM de instalação na unidade de CD-ROM. Siga as instruções que surgirem no ecrã para instalar os controladores de retorno de força (tecnologia Force Feedback). Uma vez concluída a instalação, clique em Concluir e reinicie o computador. 2. Depois de o computador reiniciar, ligue o conector USB numa das portas USB da unidade central.
3 MODOS DE ”EIXOS” DISPONÍVEIS NO PC CONFIGURAÇÃO DAS “PREDEFINIÇÕES AUTOMÁTICAS” – PC Modo “4 EIXOS” Botão MODE APAGADO Aqui: “Roda óptica” associada à direcção “Esquerda/Direita” da minialavanca esquerda “Gatilho direito” associado à direcção “Subir” da minialavanca direita “Gatilho esquerdo” associado à direcção “Descer” da minialavanca direita Modo “5 EIXOS” Botão MODE VERMELHO Aqui: “Roda óptica” associada à direcção “Esquerda/Direita” da minialavanca esquerda Os “gatilhos direito e esquerdo” são agor
FUNÇÕES AVANÇADAS CONFIGURAÇÃO DA SENSIBILIDADE DA RODA ÓPTICA A roda óptica (4) possui dois modos de sensibilidade: - Sensibilidade normal (modo predefinido) - Alta sensibilidade (necessita de configuração) Passos 1 2 Passos 1 2 Configuração no modo “Alta sensibilidade”: Acção Cor do botão MODE Suba e pressione a direcção “SUBIR” na roda óptica. Pisca a vermelho durante 2 segundos Prima e solte o botão MAPPING (7).
PROGRAMAÇÃO DA RODA ÓPTICA E DOS GATILHOS As duas direcções da roda óptica e os dois gatilhos podem ser programados através do botão MAPPING (7). Exemplos de aplicações possíveis: Programar um botão ou uma direcção de uma minialavanca ou do D-pad: - na direcção “Subir” ou “Descer” da roda óptica - no “gatilho direito ” ou “gatilho esquerdo ” Procedimento de programação na roda óptica e nos gatilhos: Prima o botão para activar a “PREDEFINIÇÃO MANUAL” (8).
MEMÓRIA EEPROM O gamepad dispõe de um chip interno que guarda na memória todas as programações da “PREDEFINIÇÃO MANUAL” (mesmo que desligue o gamepad ou não o utilize durante um longo período). Pode guardar uma “PREDEFINIÇÃO MANUAL” diferente em cada plataforma utilizada (PS3, PC 4 Eixos, PC 5 Eixos ou PC 7 Eixos), excepto para “PS3” e “PC 4 Eixos”, que utilizam a mesma “PREDEFINIÇÃO MANUAL” (alterar ou eliminar uma predefinição num dos modos equivale a fazer o mesmo ao outro).
DIFERENTES EXEMPLOS EM FUNÇÃO DO TIPO DE JOGO UTILIZADO Acção/Aventura (modo “Carro”) Acção/Aventura (modo “Apeado”) Desporto (modo “Jogo com bola”) Desporto (modo “Golfe”) Corridas motorizadas (modo “Simulação”) Corridas motorizadas (modo “Arcade/Rally”) Voo (modo “Simulação”) Voo (modo “Arcade/Acção”) 8/10
SUPORTE TÉCNICO Se surgir algum problema com o seu produto, vá até http://ts.thrustmaster.com e clique em Technical Support. A partir daqui pode aceder a vários utilitários, como as perguntas mais frequentes (FAQ) ou as versões mais recentes dos controladores e do software, capazes de ajudálo a resolver o seu problema.
DIREITOS DE AUTOR © 2009 Guillemot Corporation S.A. Todos os direitos reservados. Thrustmaster® é uma marca registada da Guillemot Corporation S.A. Ferrari® é uma marca registada da Ferrari S.p.A. PlayStation® é uma marca registada da Sony Computer Entertainment, Inc. PlayStation® é uma marca registada da Sony Computer Entertainment, Inc. Windows® é uma marca registada da Microsoft Corporation nos Estados Unidos e/ou noutros países. Pentium® é uma marca registada da Intel Corporation.
PC & PS3 Руководство пользователя ТЕХНИЧЕСКИЕ ХАРАКТЕРИСТИКИ 1. ручки 2. Два пропорциональных аналоговых миниджойстика 3. Манипулятор D-Pad 4. Пропорциональный оптический датчик 5. Два пропорциональных триггера 6. Кнопка HOME LED для Playstation®3 и MODE (РЕЖИМ) для ПК 7. Кнопка MAPPING LED (для программирования и индикации состояния соединения) 8. Кнопка PRESET LED (для выбора режима программирования) 9.
ТАБЛИЦА ПОДДЕРЖИВАЕМЫХ РЕЖИМОВ Система PLAYSTATION® 3 ПК РЕЖИМ Цвет кнопки РЕЖИМ (MODE) (8) “PS3” ВЫКЛ. “4 ОСИ” ВЫКЛ. “5 ОСЕЙ” КРАСНЫЙ “7 ОСЕЙ” ЗЕЛЕНЫЙ PLAYSTATION® 3 ПОДКЛЮЧЕНИЕ К PLAYSTATION® 3 1. Подключите USB-разъем к USB-порту на консоли. 2. Включите консоль. 3. Переключите контроллер в режим “PS3”. При этом кнопка MODE должна погаснуть. (для этого при необходимости нажимайте кнопку до тех пор, пока она не погаснет). 4. Запустите игру.
ПК ПОДКЛЮЧЕНИЕ К ПК CD-диск, поставляемый с изделием, позволяет установить драйверы Force Feedback (силовой обратной связи). 1. Вставьте установочный CD-диск в привод CD дисков. Для установки драйверов Force Feedback выполняйте инструкции, которые будут появляться на экране. После завершения установки нажмите Finish (Закончить) и перезагрузите компьютер. 2. После того, как компьютер загрузится, подсоедините разъем USB к одному из портов USB на компьютере.
3 РЕЖИМА ОСЕЙ, ИМЕЮЩИЕСЯ НА ПК КОНФИГУРАЦИЯ “АВТОМАТИЧЕСКИЕ ПРЕДУСТАНОВКИ” - ПК Режим “4 ОСИ” Кнопка MODE ВЫКЛЮЧЕНА Здесь: Оптический датчик соответствует кнопкам «Влево/Вправо» на левом мини-джойстике «Правый» триггер соответствует направлению «Вверх» правого миниджойстика «Левый» триггер соответствует направлению «Вниз» на правом миниджойстике Режим “5 ОСЕЙ” Кнопка MODE светится КРАСНЫМ Здесь: Оптический датчик соответствует кнопкам «Влево/Вправо» на левом мини-джойстике Теперь «Правый» и «Левый» триггер
ФУНКЦИИ ДЛЯ ОПЫТНЫХ ПОЛЬЗОВАТЕЛЕЙ НАСТРОЙКА ЧУВСТВИТЕЛЬНОСТИ ОПТИЧЕСКОГО ДАТЧИКА Оптический датчик (4) имеет 2 режима чувствительности: - нормальная чувствительность (по умолчанию) - высокая чувствительность (настраивается) Настройка на режим «Высокая чувствительность»: Этапы Цвет кнопки РЕЖИМ (MODE) Действие Выберите и удерживайте направление ВВЕРХ на оптическом датчике Мигает красным 2 секунды Нажмите и отпустите кнопку MAPPING 2 (ПЕРЕОПРЕДЕЛЕНИЕ) (7) Теперь оптический датчик будет более чувствительным
ПРОГРАММИРОВАНИЕ ОПТИЧЕСКОГО ДАТЧИКА И ТРИГГЕРОВ Оба направления оптического регулятора и оба пропорциональных триггера могут программироваться при помощи кнопки ПЕРЕОПРЕДЕЛЕНИЕ – MAPPING (7).
ВСТРОЕННАЯ ПАМЯТЬ В игровой контроллер встроен чип, благодаря которому все назначенные вами функции сохраняются в памяти (даже когда контроллер выключен или отсоединен в течение длительного периода времени). Вы можете сохранить в памяти по одному набору ПОЛЬЗОВАТЕЛЬСКИХ НАСТРОЕК для каждой используемой системы (PS3, PC 4 оси, PC 5 осей или PC 7 осей).
ВОЗМОЖНЫЕ ВАРИАНТЫ ИСПОЛЬЗОВАНИЯ В ИГРАХ Оптический датчик (благодаря оптике угол вращения у этого регулятора больше, чем у любого мини-джойстика) обеспечивает непревзойденную точность и повторяемость результатов во всех типах игр: гонки (сверхточное руление), полет (горизонтальный поворот), игры Action и FPS (плавное приближение), спортивные игры (точное направление, сила удара) и т.д.
ПРИМЕРЫ ИСПОЛЬЗОВАНИЯ В РАЗЛИЧНЫХ ИГРАХ Action/Adventure (режим "транспорт") Action/Adventure (режим "пеший") Спорт (игры с мячом) Спорт (гольф) Гонки на авто (симуляторы) Гонки на авто (аркады) Полет (симуляторы) Полет (аркады) 9/10
ТЕХНИЧЕСКАЯ ПОДДЕРЖКА При возникновении проблем, связанных с использованием контроллера, зайдите на веб-сайт http://ts.thrustmaster.com и перейдите по ссылке Technical Support (техническая поддержка). На этой странице есть доступ к различным утилитам (часто задаваемые вопросы (FAQ), самые новые версии драйверов и программного обеспечения) – это может помочь решению проблемы.