Congratulations! You have purchased a stylish piece . We strives to provide fine furniture products, built with quality materials and hand finished details. Please carefully follow the assembly instructions to ensure your furniture is assembled correctly to provide long lasting enjoyment. Should you experience any missing or damaged parts, do not return to the store. Please visit our website or contact us directly Care: Use a soft clean cloth that will not scratch the surface when dusting.
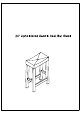
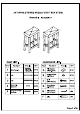
24" UPHOLSTERED SADDLE SEAT BAR STOOL Assembly Instructions Bl PART LIST: HARDWARE LIST: ™ Y Part # Part Name Drawing QTy Part # Part Name Drawing QTY Flat Washer 1 | seat Cushion @ PCS A | o181 5mm) (S secs 2 | Leg | arcs B | Spring Washer > arcs Bolt 3 |Leg &= | PCS C PCS Short Side Wood Screw 4 | St etcher = |4rcS D | (ce37mm) ot | PCS Long Front / Rear Allen Wrench , 5 | stretcher =— PCS E | scrammed) 1PC . J F cirque « > |1rc .
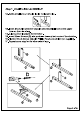
Step 1. CHAIR LEGS ASSEMBLY 1A. Add a small amount of glue inside the large holes. 1B. Insert Short Side Stretcher (4) with wood dowel aligned on the upper hole on the side of leg. 1C. Align another leg (2) to the stretcher. 1D. Insert Wood Screws (D) into prevailed holes at both ends of the stretcher. 1E. Tighten Wood Screws (D) with Phillips Head screwdriver (not supplied). 1F. Repeat same step for the other side of legs.
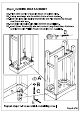
Step 2. FRONT STRETCHER ASSEMBLY 2A. Add a small amount of glue inside the large holes. : 2B. Insert Long Front/Rear Stretchers (5) with wood dowels aligned with the lower holes into one of the completed sides. 2C. Attach remaining side to the other end of the Long Front/Rear Stretchers (5) with wood dowels aligned with the lower holes.
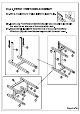
Step 3. CUSHION SEAT ASSEMBLY 3A. Place seat cushion (1) upside down on a clean cloth. 3B. Slowly insert legs into the bottom frame of seat cushion. 3C. Insert Bolt (C) with Spring Washer (B) and Flat Washer (A) through seat frame into legs. 3D. Turn bolts clockwise with Allen Wrench (E) until tight. 3E. Insert Wood Screws (D) into both ends of Long Front/Rear Stretchers and tighten with Phillips Head screwdriver (not supplied). Repeat steps 1-3 to assemble remaining stool.
Limited Manufacturers Warranty Q Our products are warranted against defects in material and workmanship for a period of 90 days beginning from the date of sale. Should any parts be missing or defective, we will replace or repair the parts for a period of 90 days from the date of purchase. Should you experience any missing or damaged parts, do not return to the store. Please visit our website, or contact us.