
Assembly and Installation Instructions
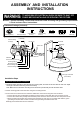

Lock Nut (E)
A
B
C
4. Attach the fixture to the mounting plate by inserting fixture mounting screws into holes on back plate, and then
secure it with two ball nuts.
5. Install a bulb (not included). Check relamping label at socket area or packaging for maximum allowed wattage.
Ball Nut (G)
Turn on the power at fuse or circuit box.
A: 8"
B: 8-1/2"
C: 9"
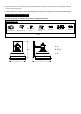
The following parts are available for re-order if damaged or missing.
Spare Parts List:
Mounting Screw (B)
Wire Nut (F)
Green Grounding
Screw (C)
Fixture Mounting
Screw (D)
Mounting Plate (A)
Assembly Kit
(1 SET)